Tutorials
Create a New Workspace
Workspace is a prerequisite for the majority of AI tools and applications.
Preparation
Activate the robot.
Activate the wrist camera.
Ensure the workspace is clearly visible by the wrist camera.
Ensure the workspace is clean and collision-free.
Execution
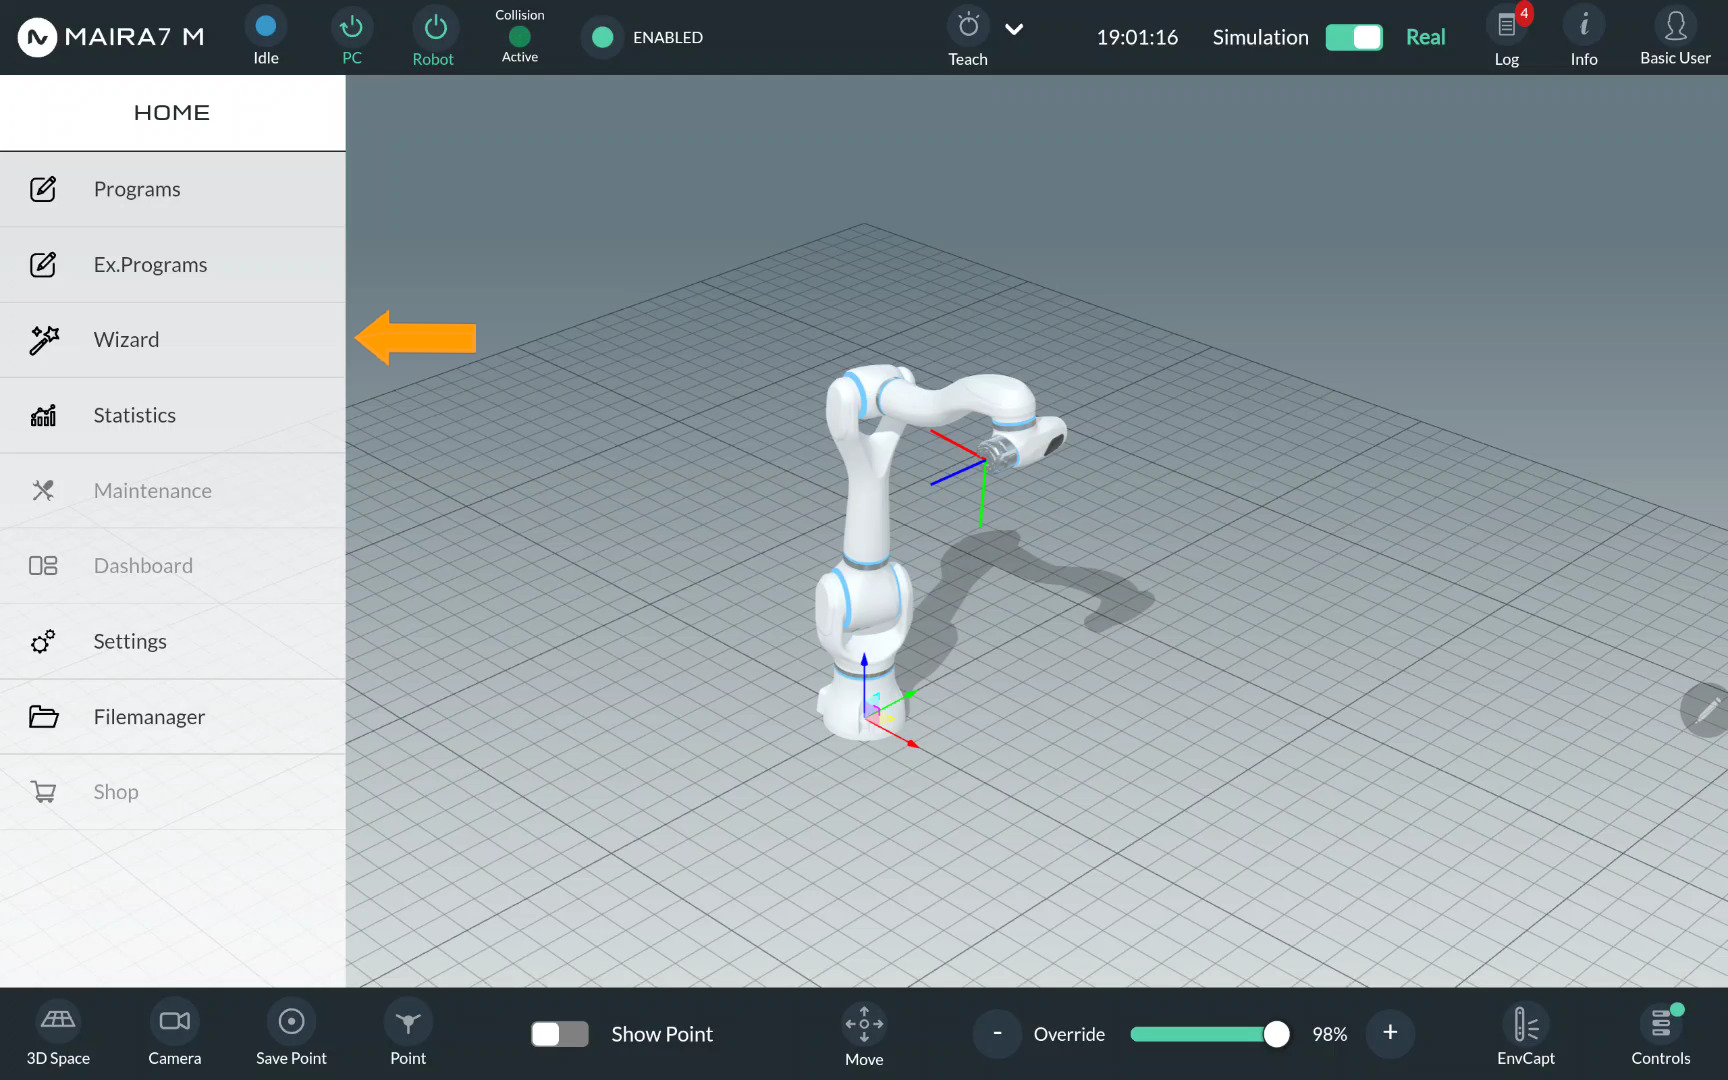
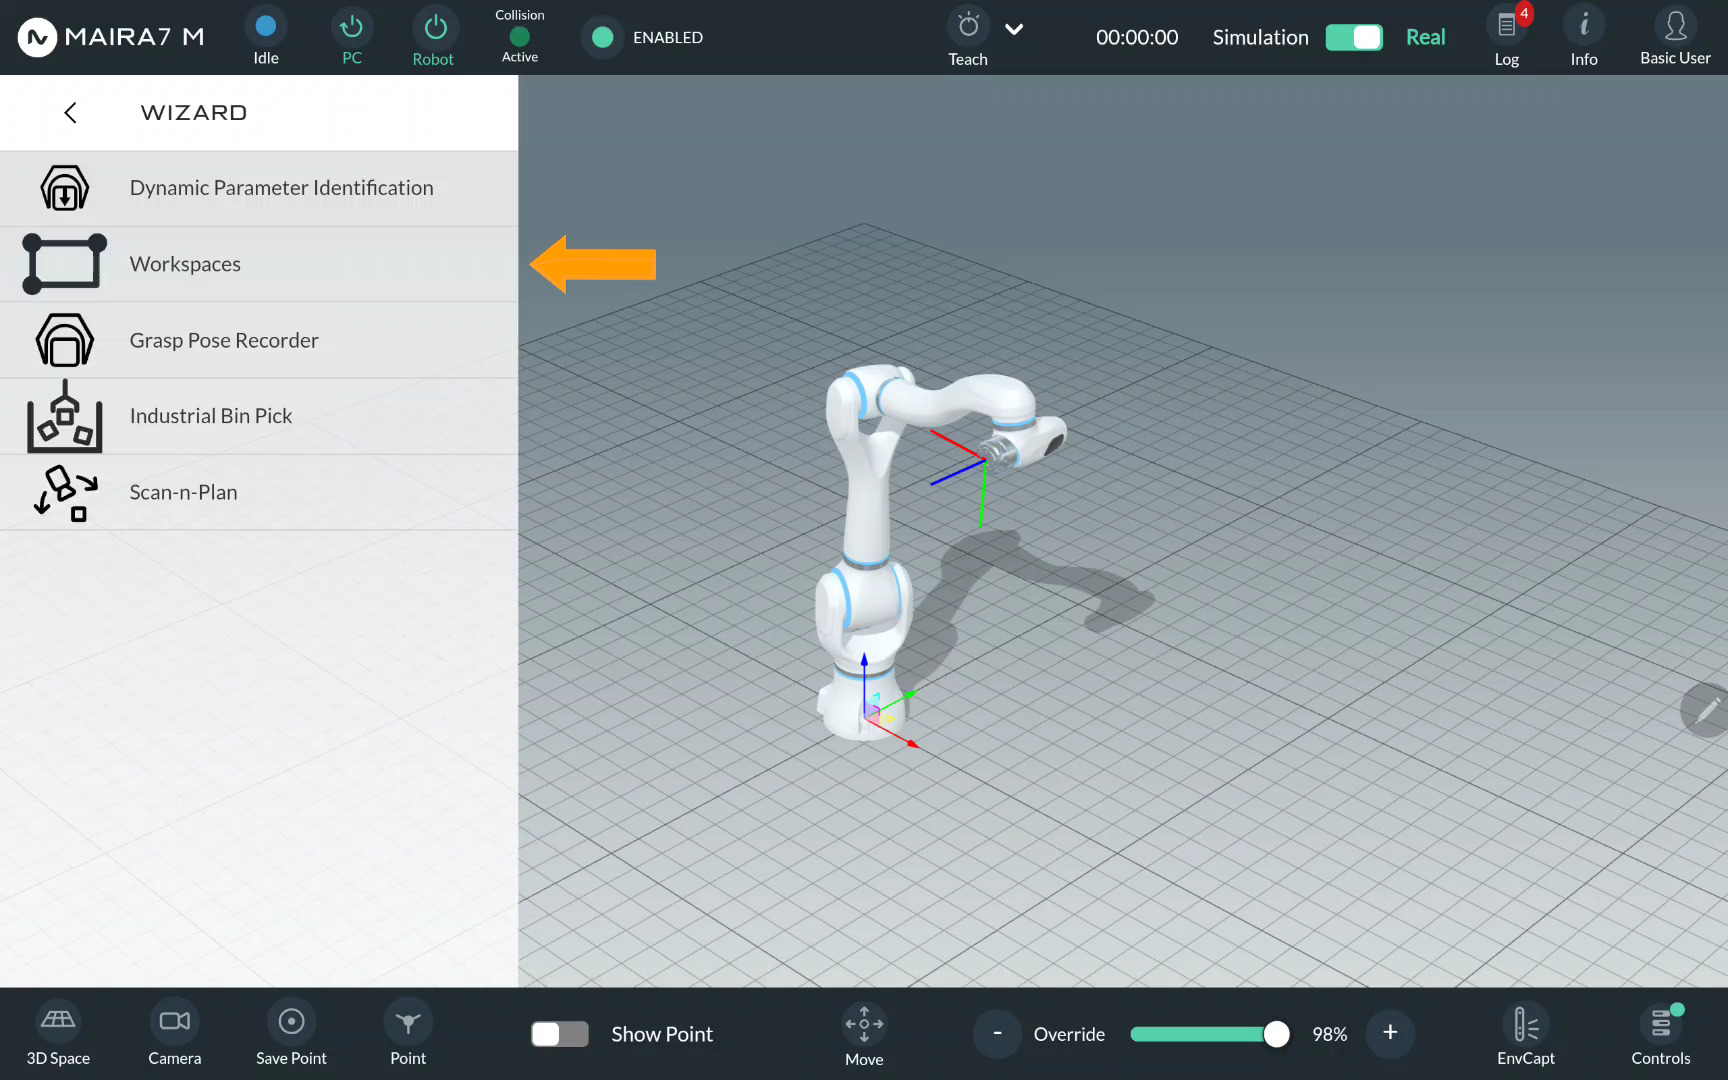
Step 1: Start a Workspace Wizard
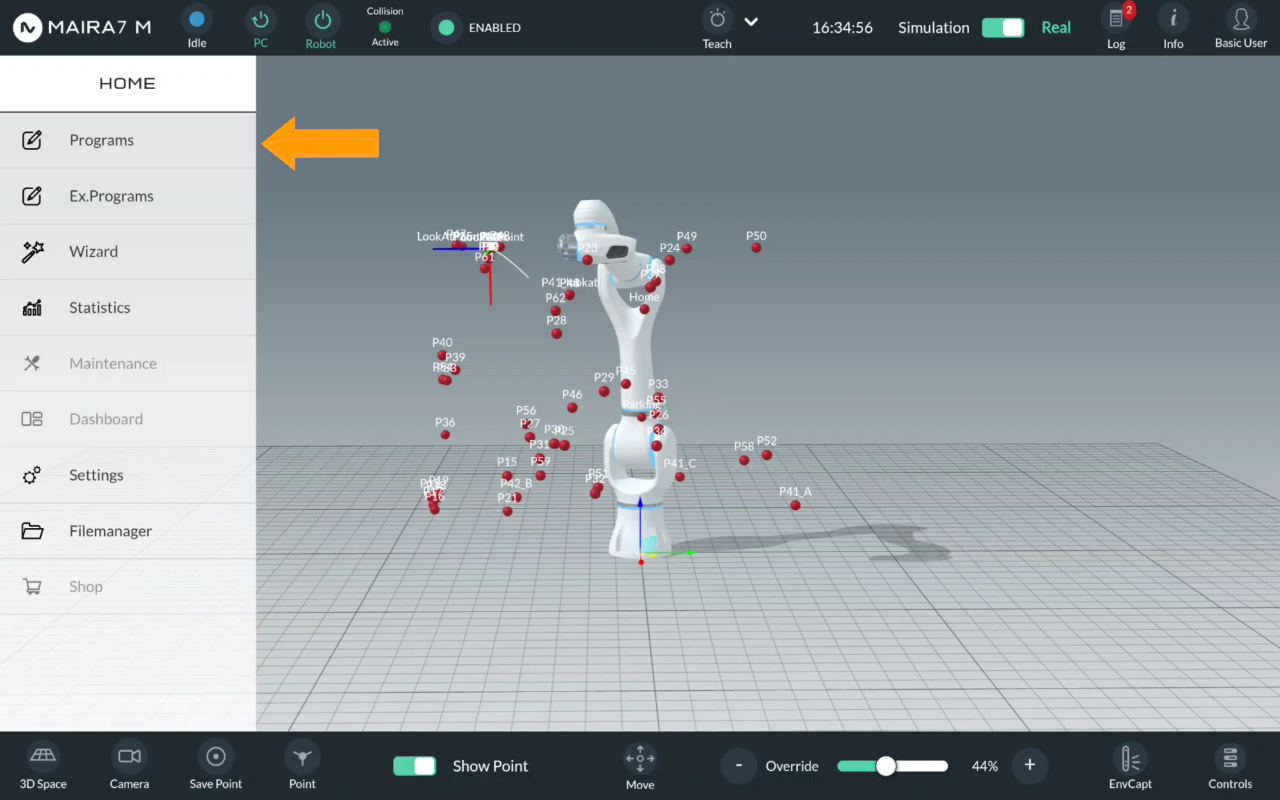
Activate Workspace Wizard in the Home Menu > Wizard > Workspaces.
Hint
If a gripper is mounted, ensure that the correct tool is selected in the system settings. Additionally, if the tool transformation refers to the closed state of the gripper, make sure the gripper is physically closed during setup and calibration. This ensures accurate referencing and alignment.
Step 2: Add a Workspace
Here you can manage all available workspaces and create new ones. To visualize a workspace in the GUI, use the eye button. To create a new workspace, click .
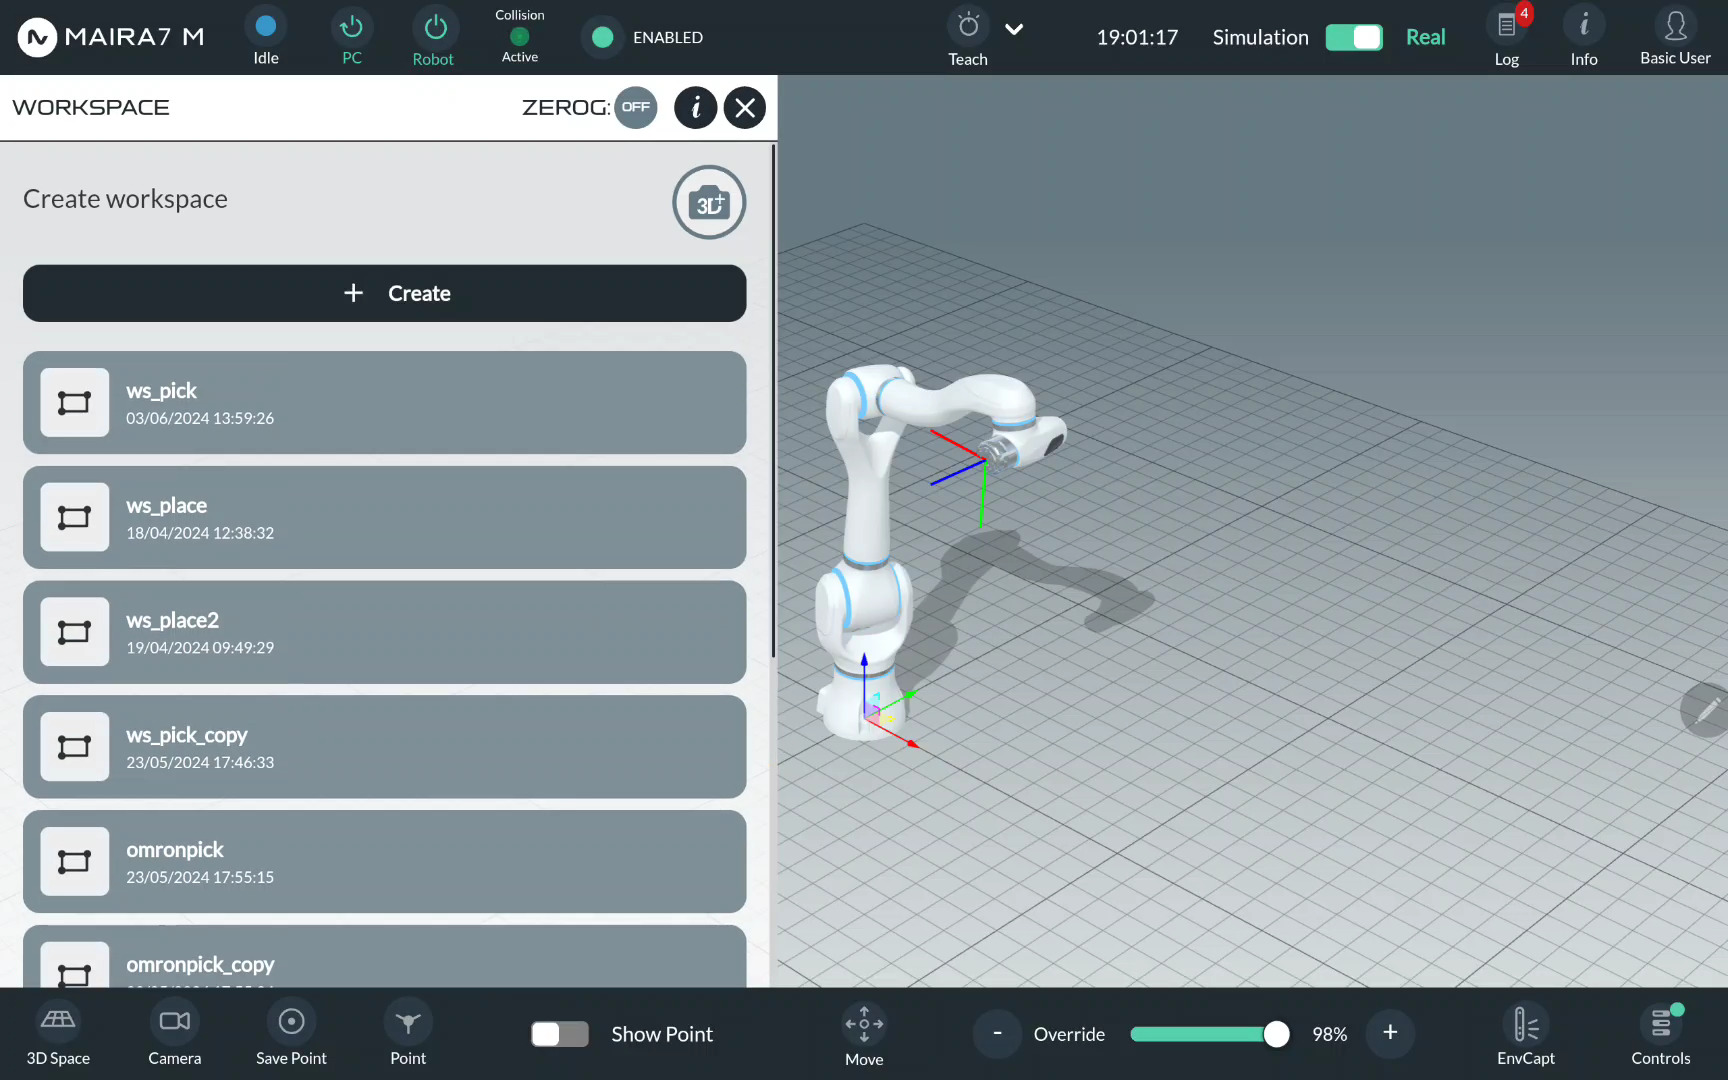
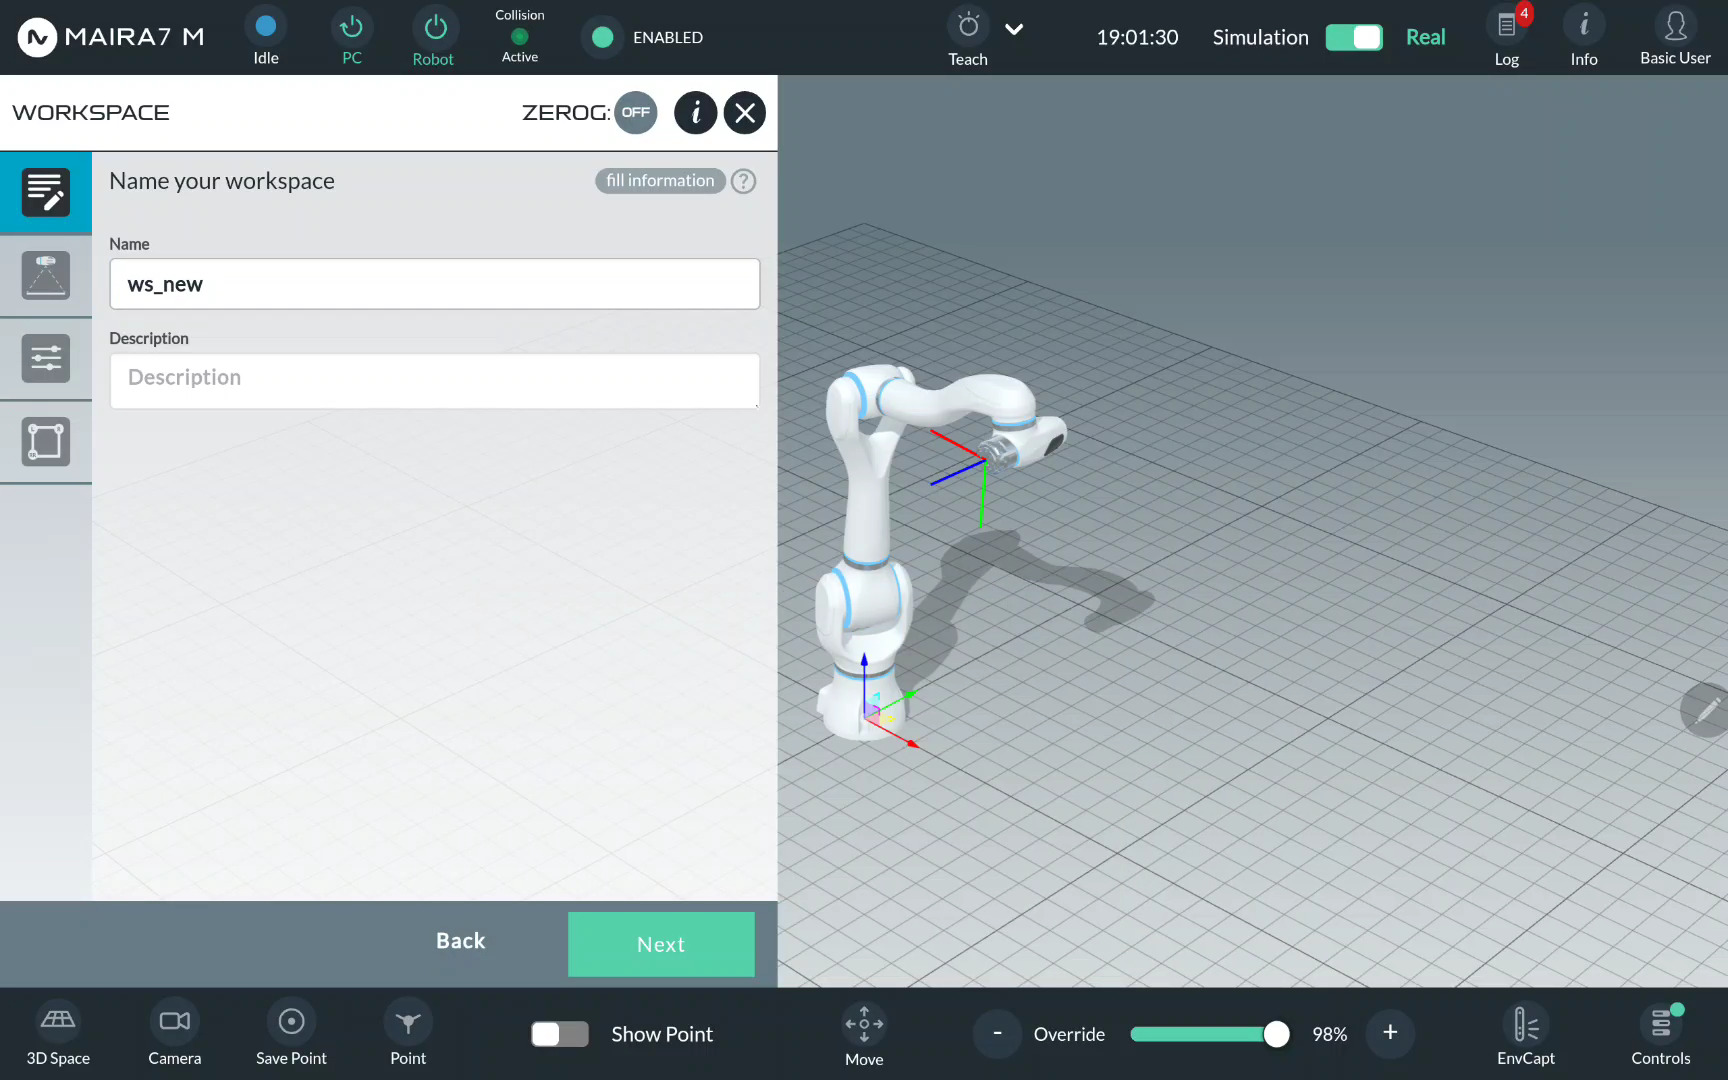
Give your workspace a unique name.
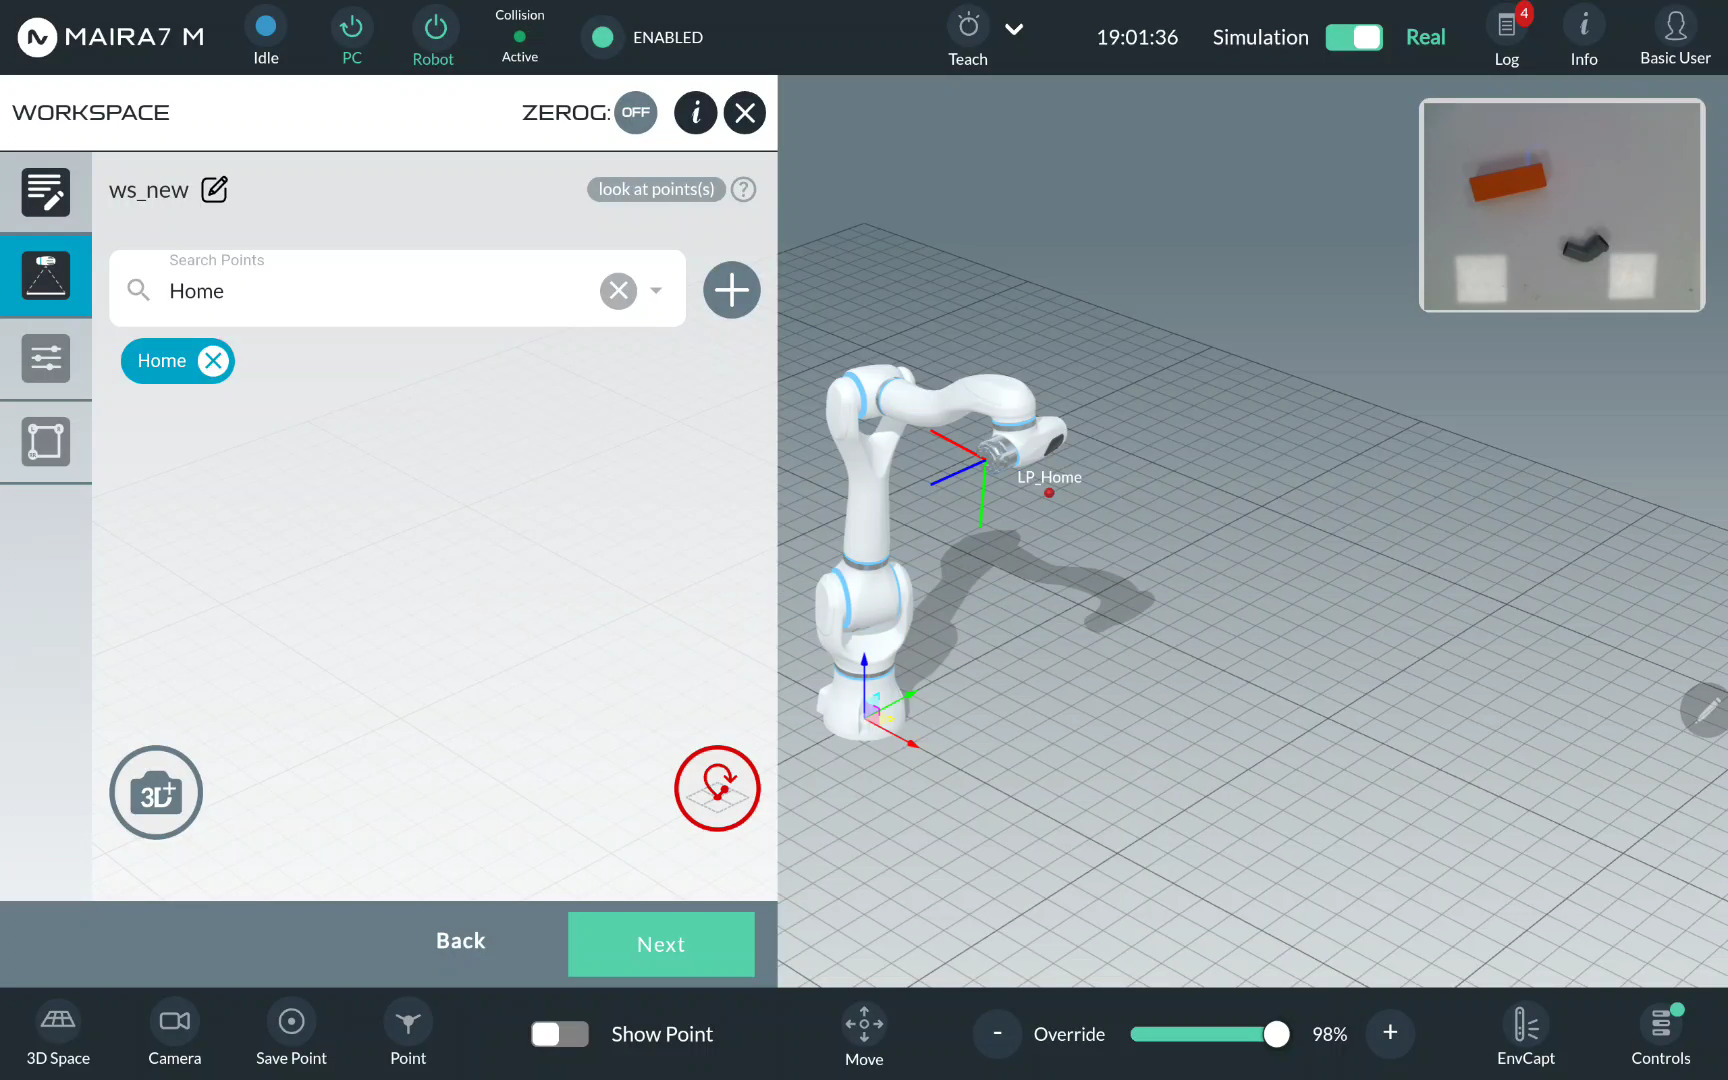
Step 3: Record a Look-at Point
A look-at point is the point, where the robot is moving to before scanning the workspace. Select a look-at point from a list of pre-recorded points.
Tip
Ensure the look-at point is positioned so the camera can see the complete workspace.
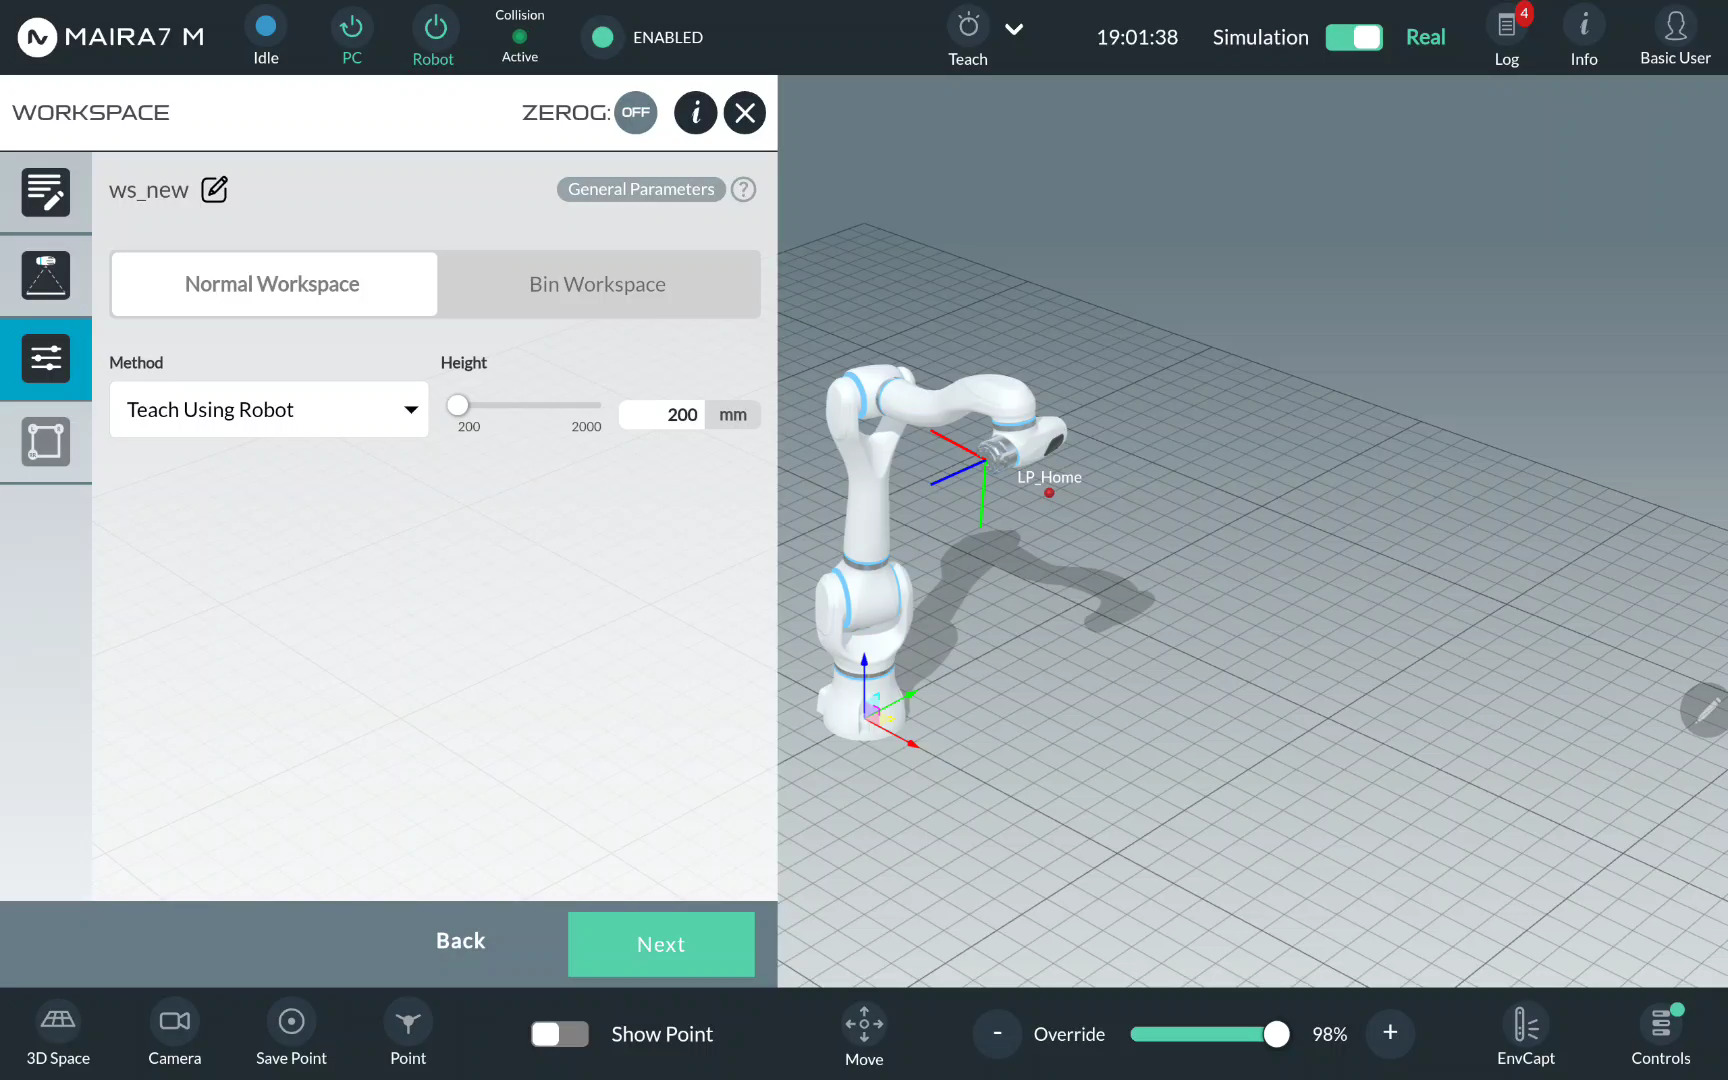
Step 4: Select a Workspace Type
Select Normal Workspace or Bin Workspace. For Bin Workspace, select a Bin Mesh Model, if available. If not specified, it will be created as a part of a workspace.
Note
If you use the bin workspace later, make sure to place the entire bin within the workspace and maintain a safe distance due to the camera’s resolution limitations.
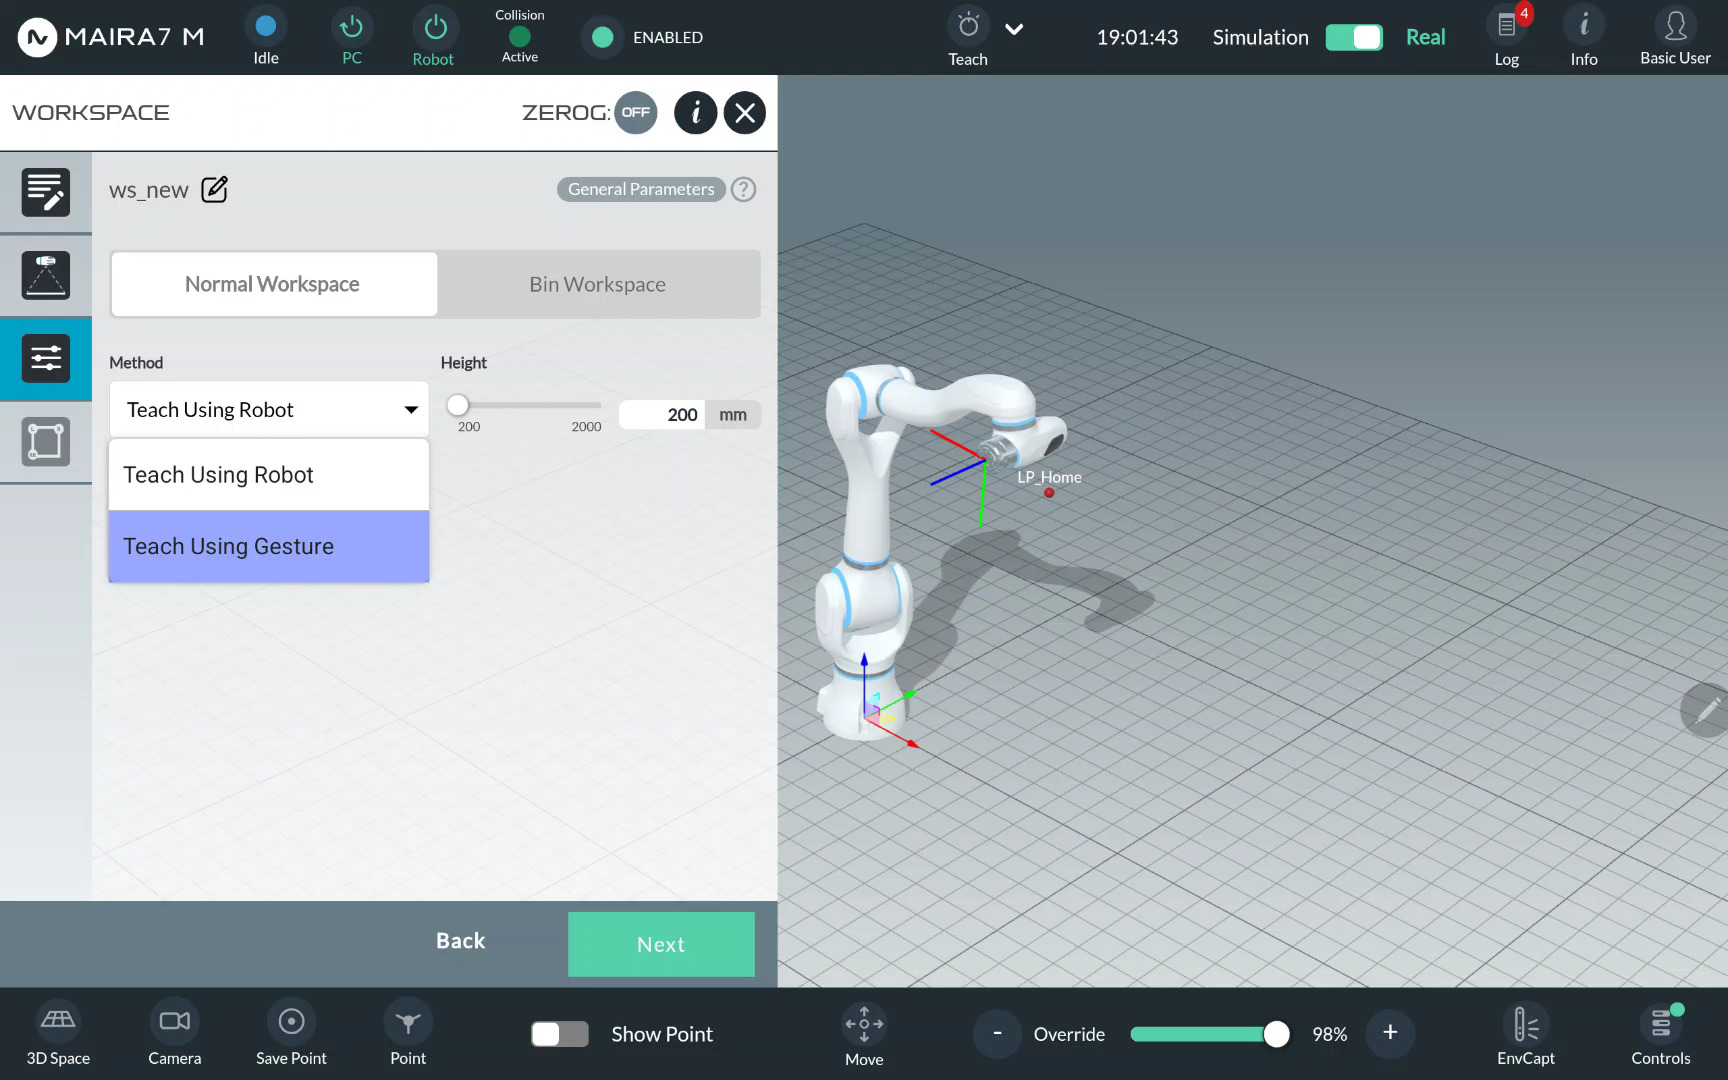
Step 5: Select a Teach Mode
A workspace can be recorded using Robot or using Gestures.
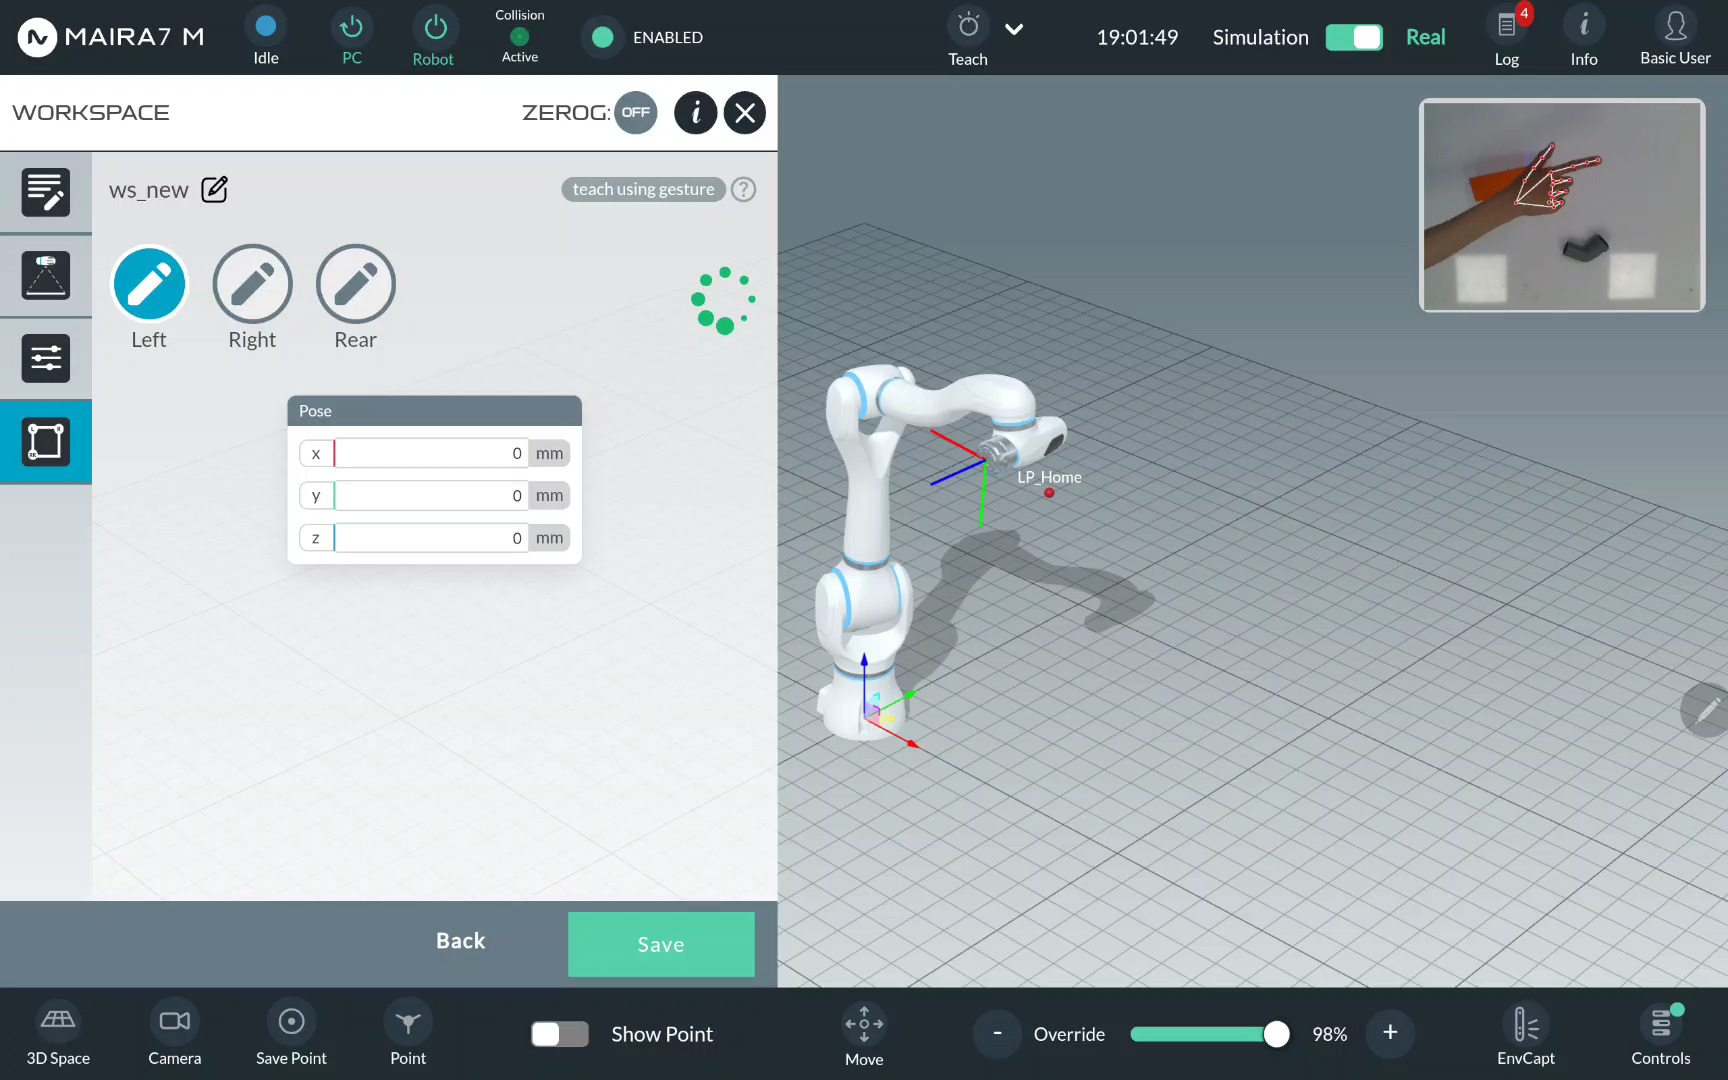
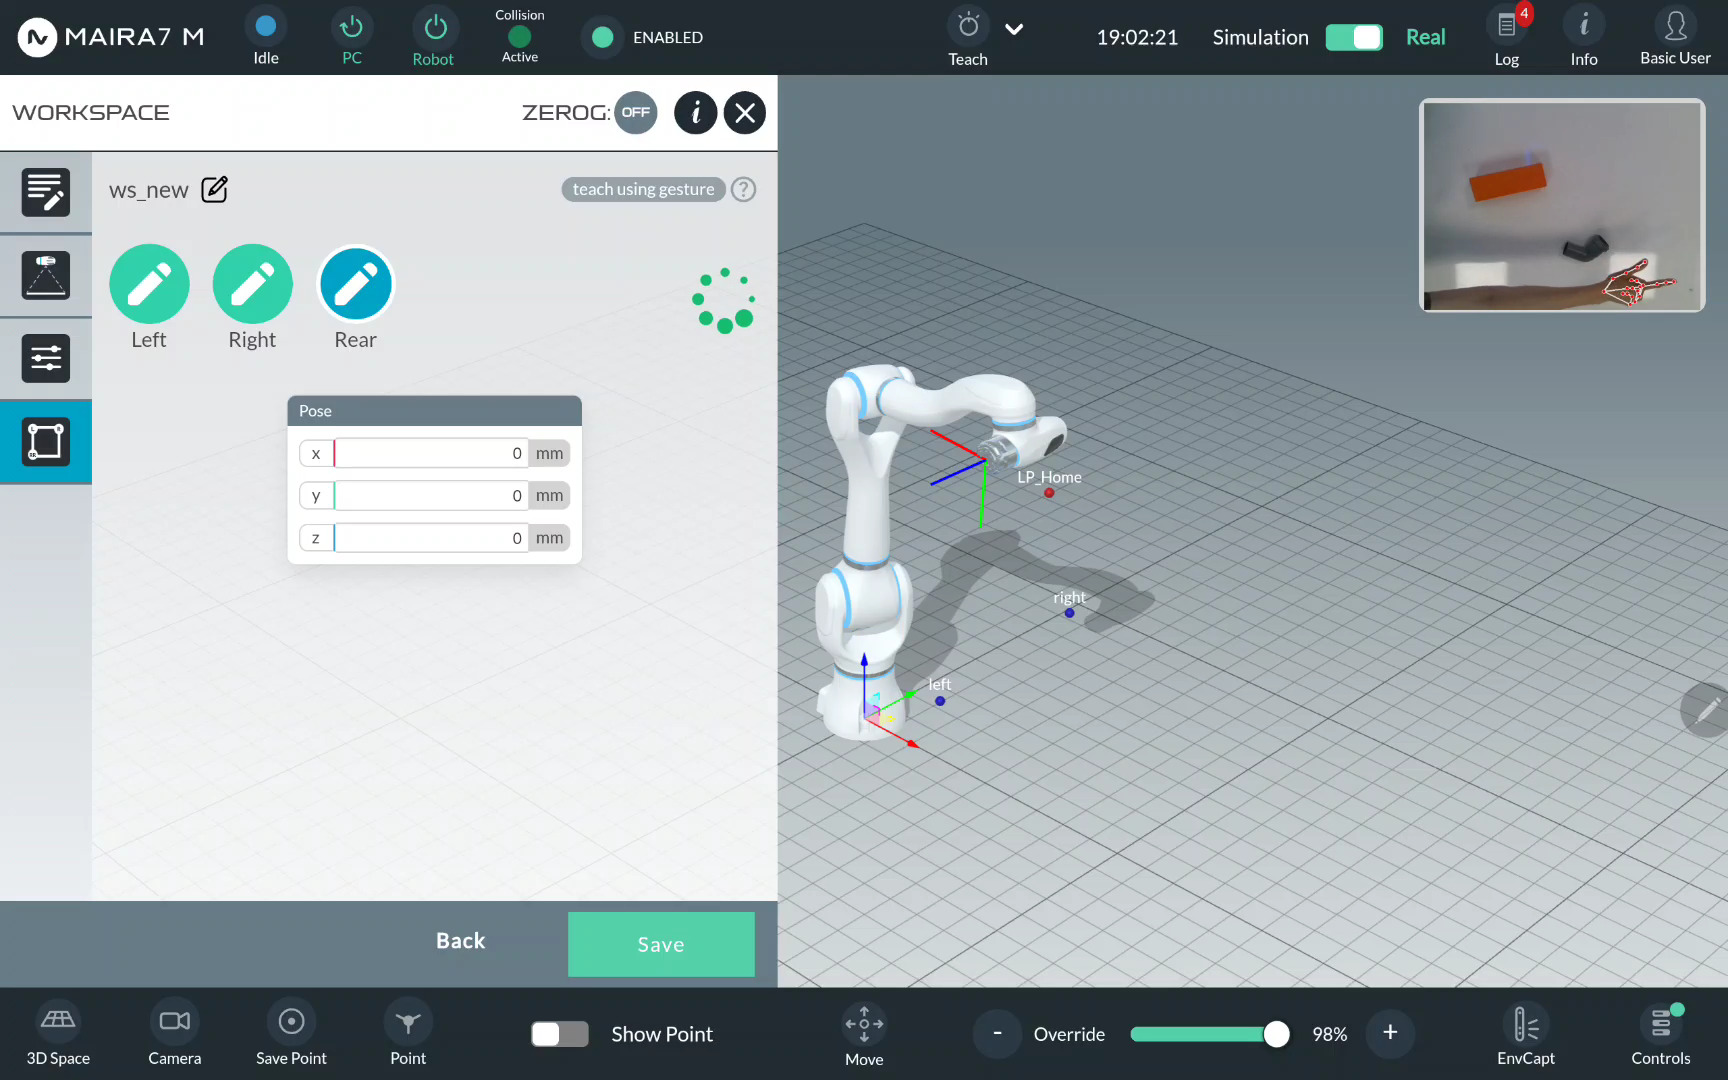
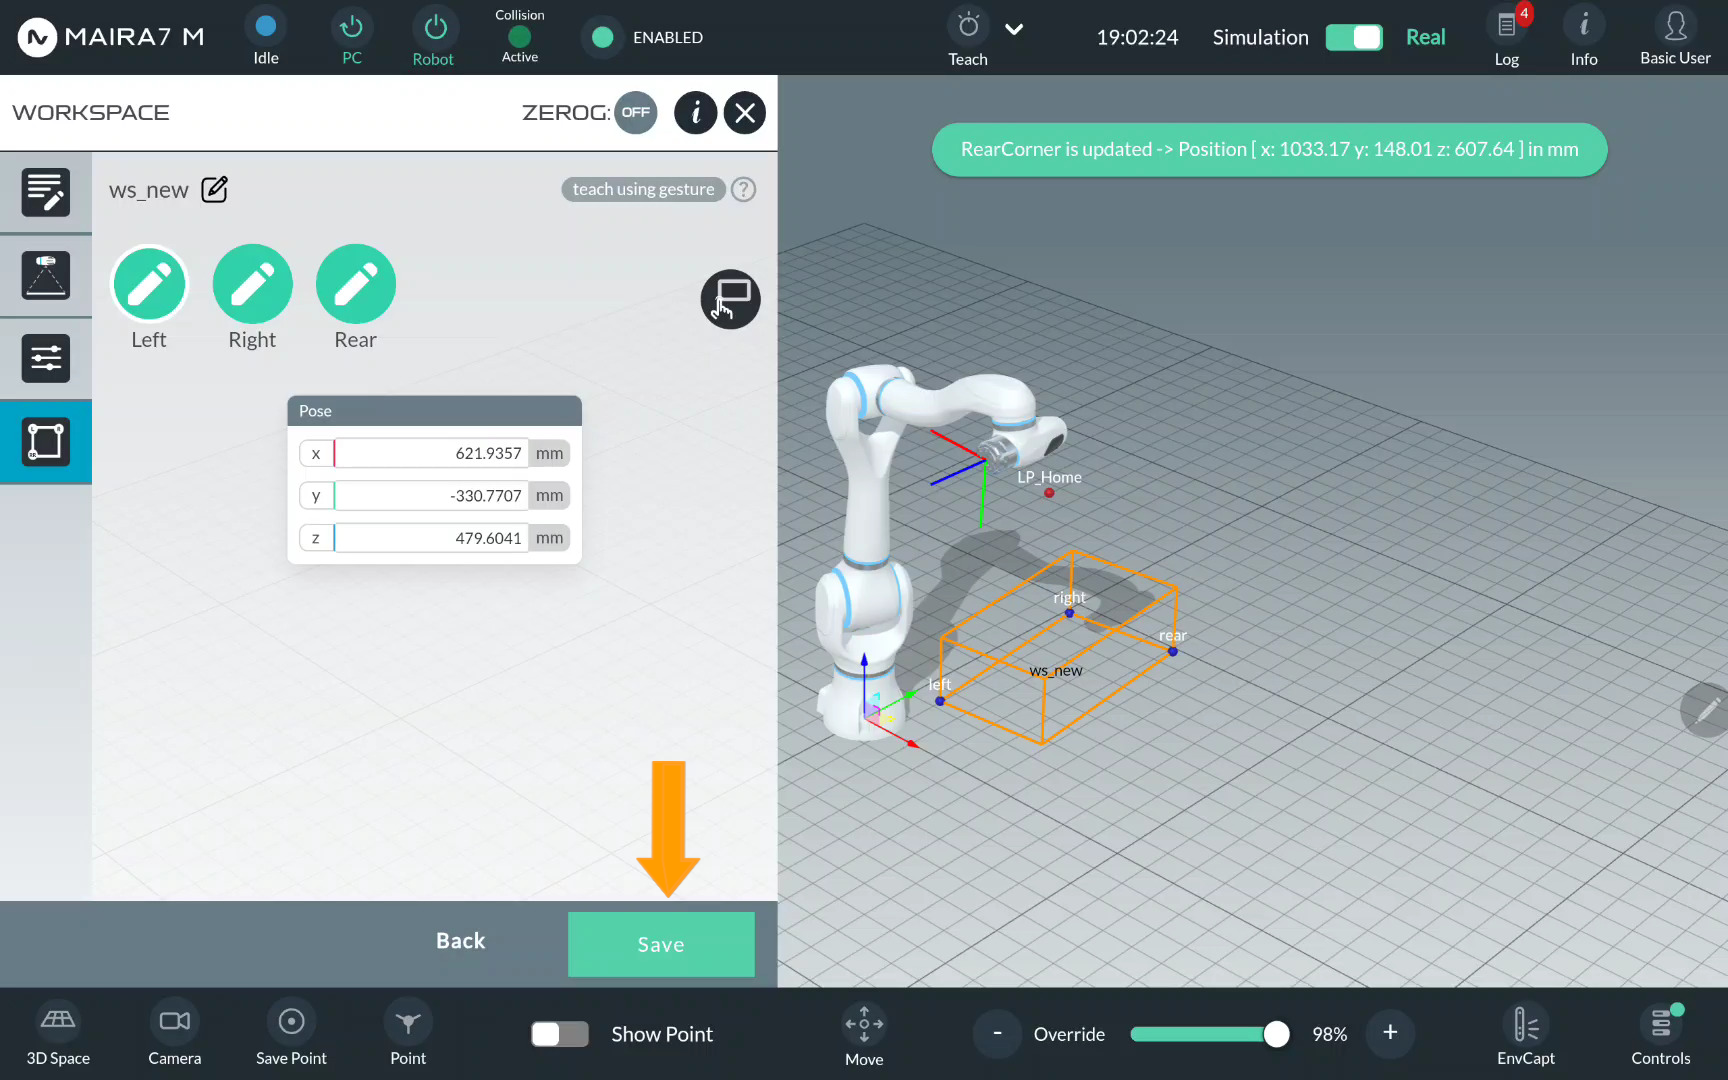
Step 6. Record Limit Points
A Workspace locates inside a 3D volume grounded on the supporting surface. Respectively, it can be defined with 1) a parallelogram area within the supporting surface and 2) a height upon the supporting surface.
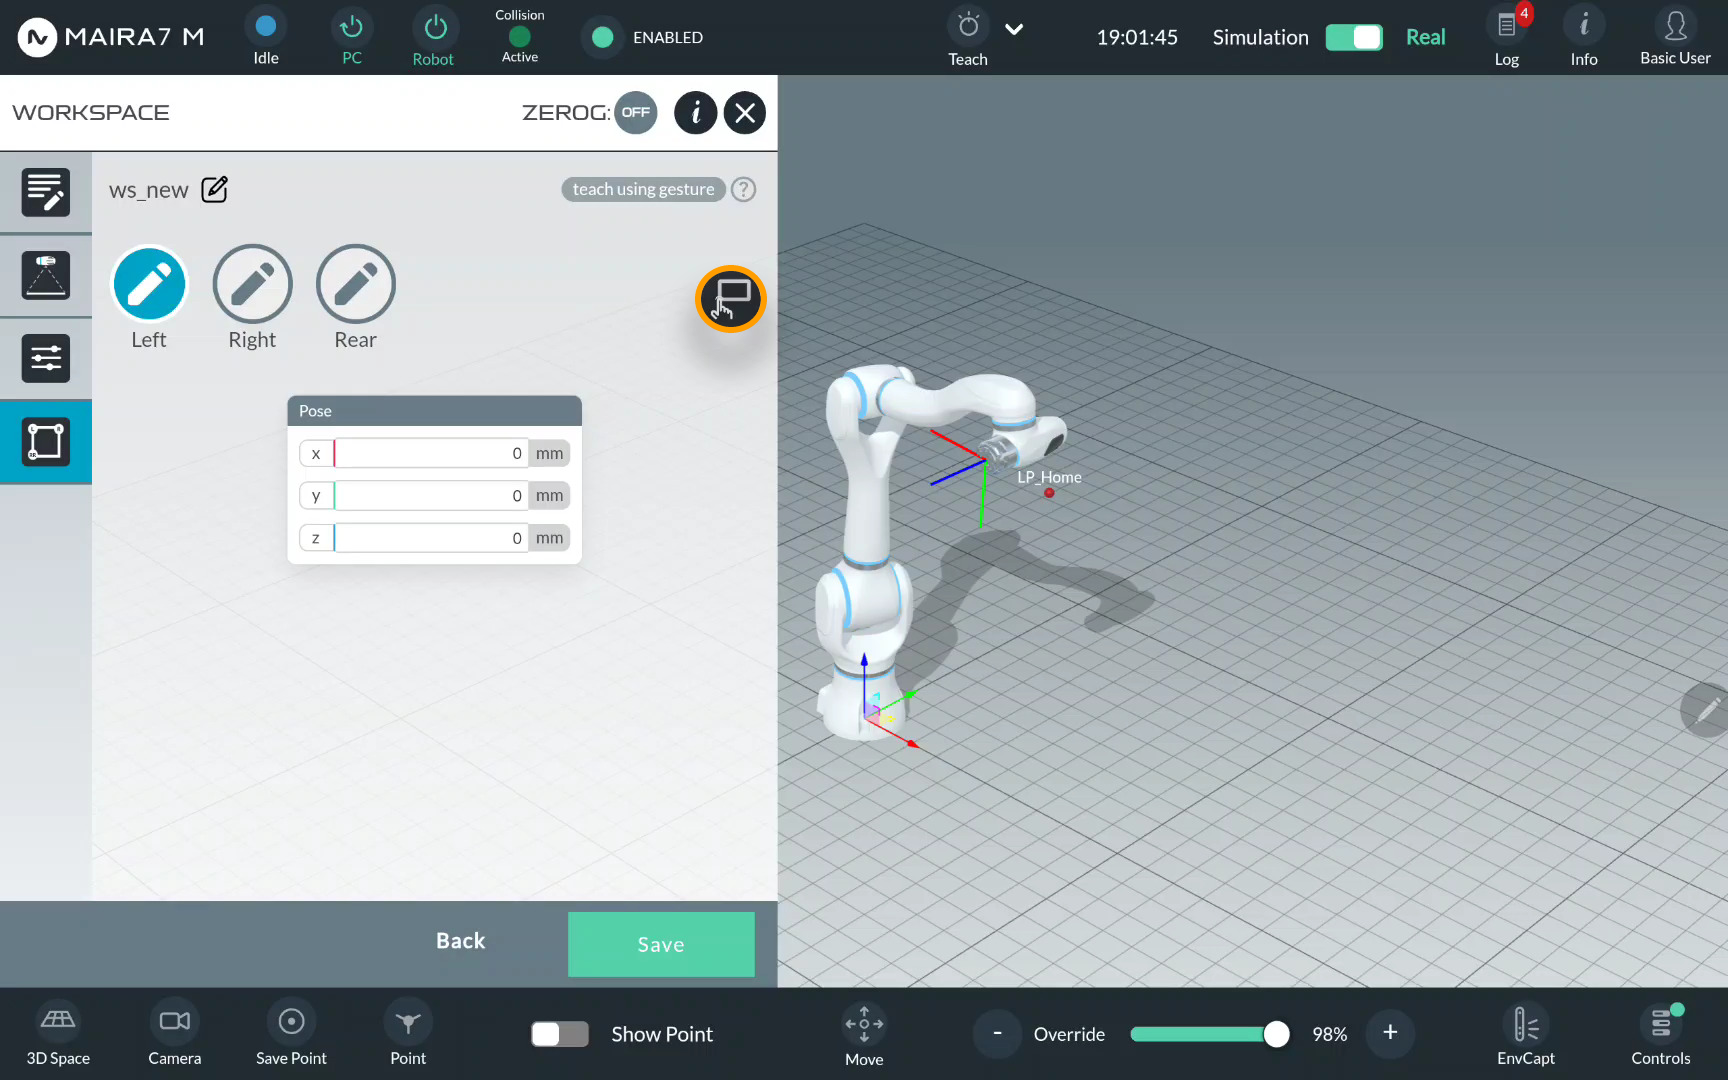
First, you need to specify the area of interest on the supporting surface. To do this, three limit points must be provided: Left, Right, and Rear.
For each limit point, set its position manually if using robot, or by pointing if using gestures. For robot, activate the ZeroG mode, move to points and click “+” to save them.
If necessary, you may adjust the robot’s camera position to record points more accurately—for example, by moving it closer to the target area. It is not required to capture all points from a single look-at point. However, ensure that the entire workspace is visible to the camera from the selected look-at point defined in the workspace settings.
For gestures, select Left/Right/Rear limit,
and click  .
.
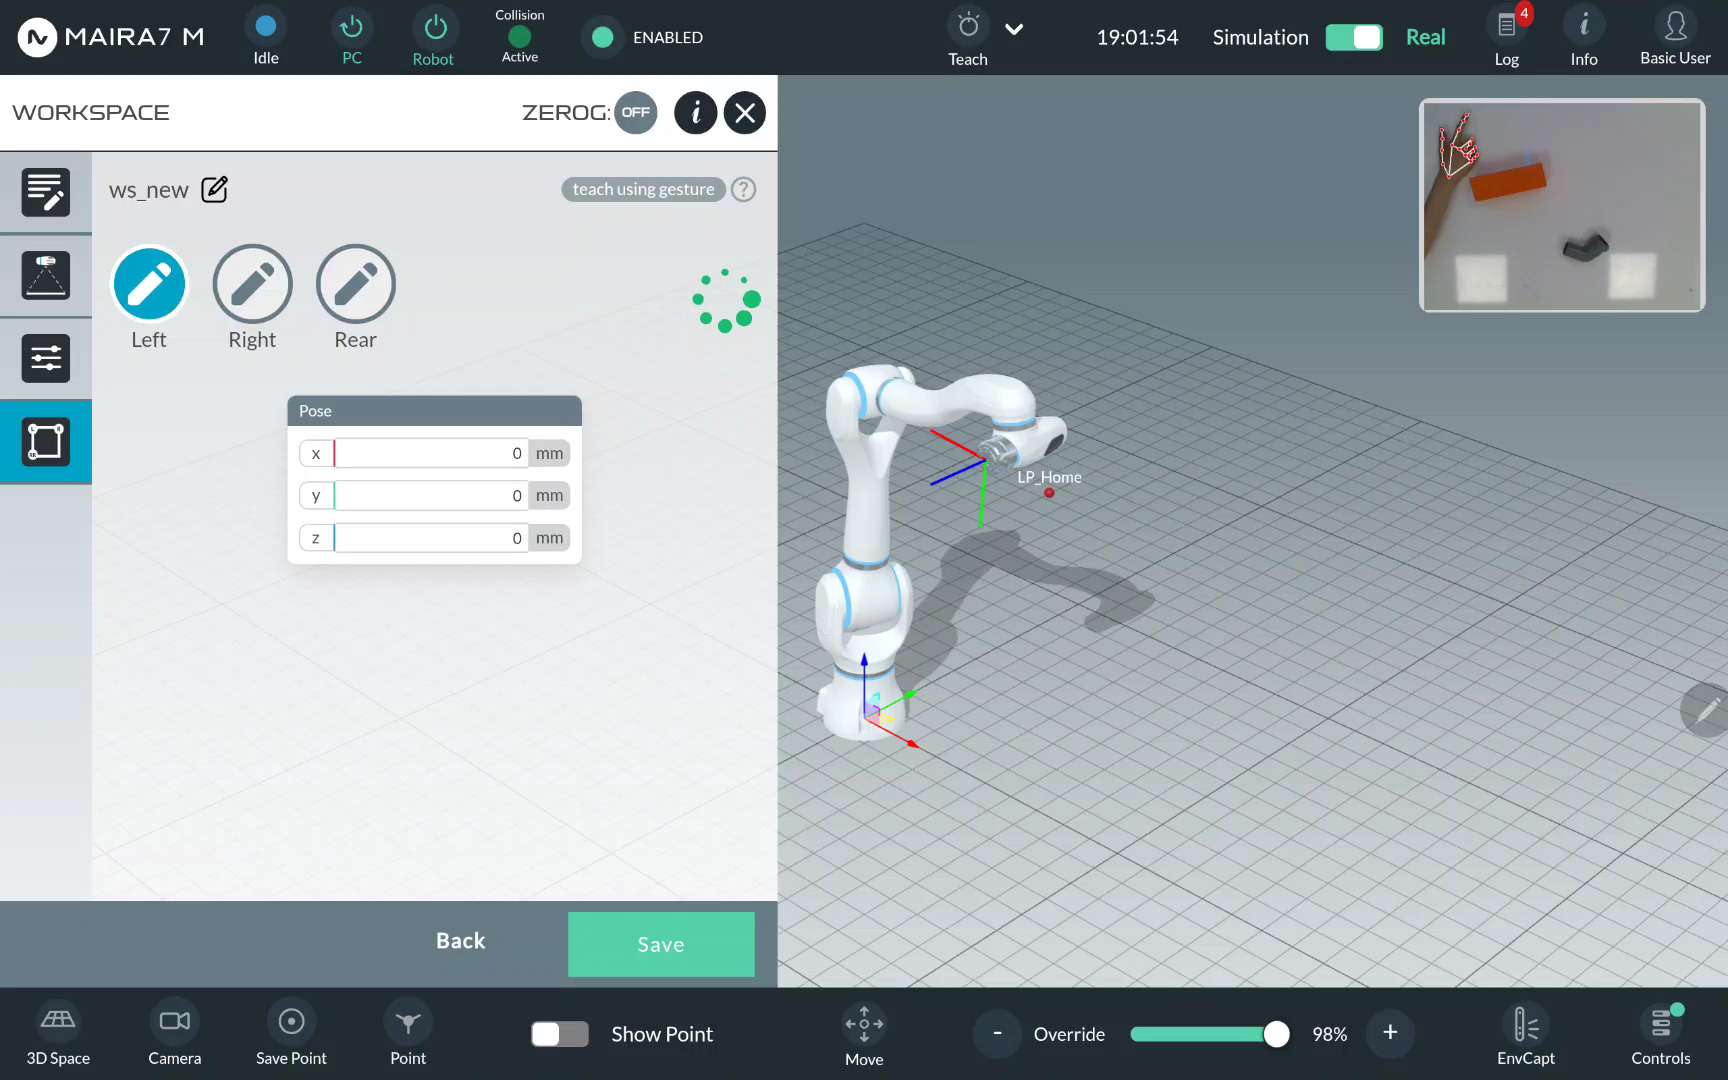
Show you right hand to the robot and wait until it detects it.
Important
Make sure to show your hand (all fingers) first and then point to a specific point. When pointing, place the hand on the table. Do not point from above otherwise the recorded point position is not accurate.
Point to the Left limit using the index finger.
Wait until the limit is recorded and the notification appears.
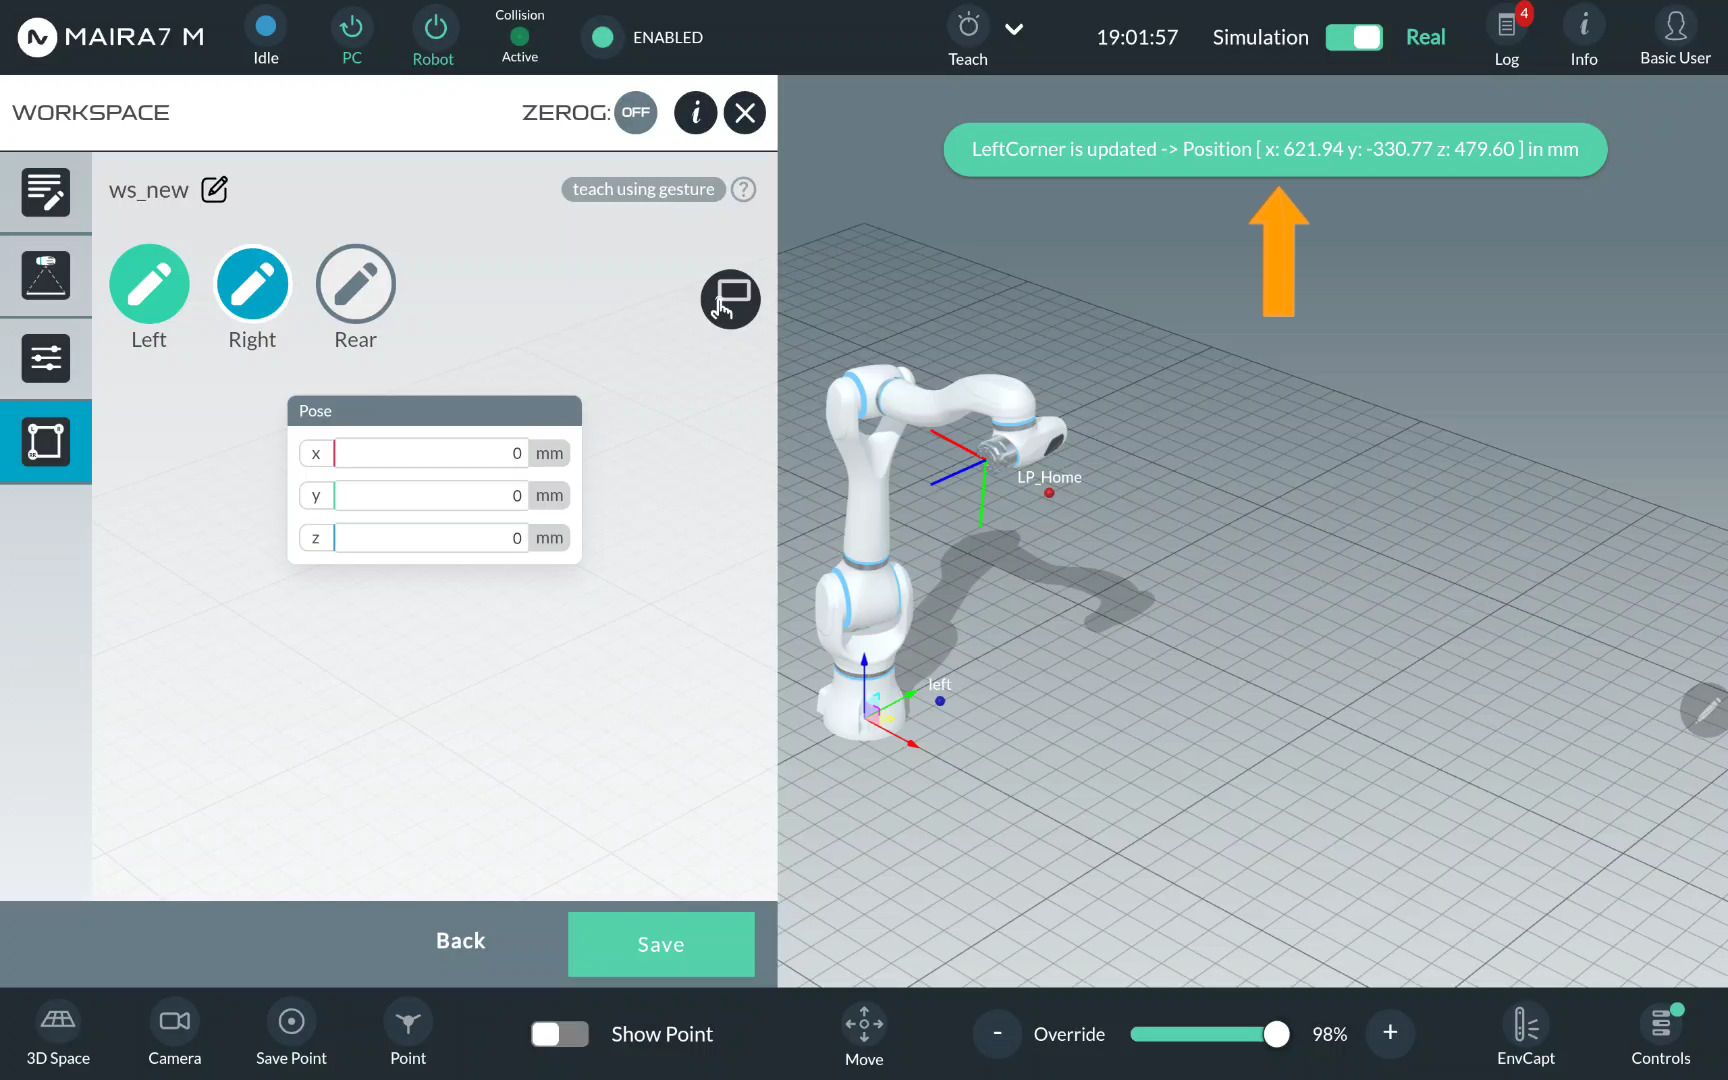
Repeat the same actions to record the Right…
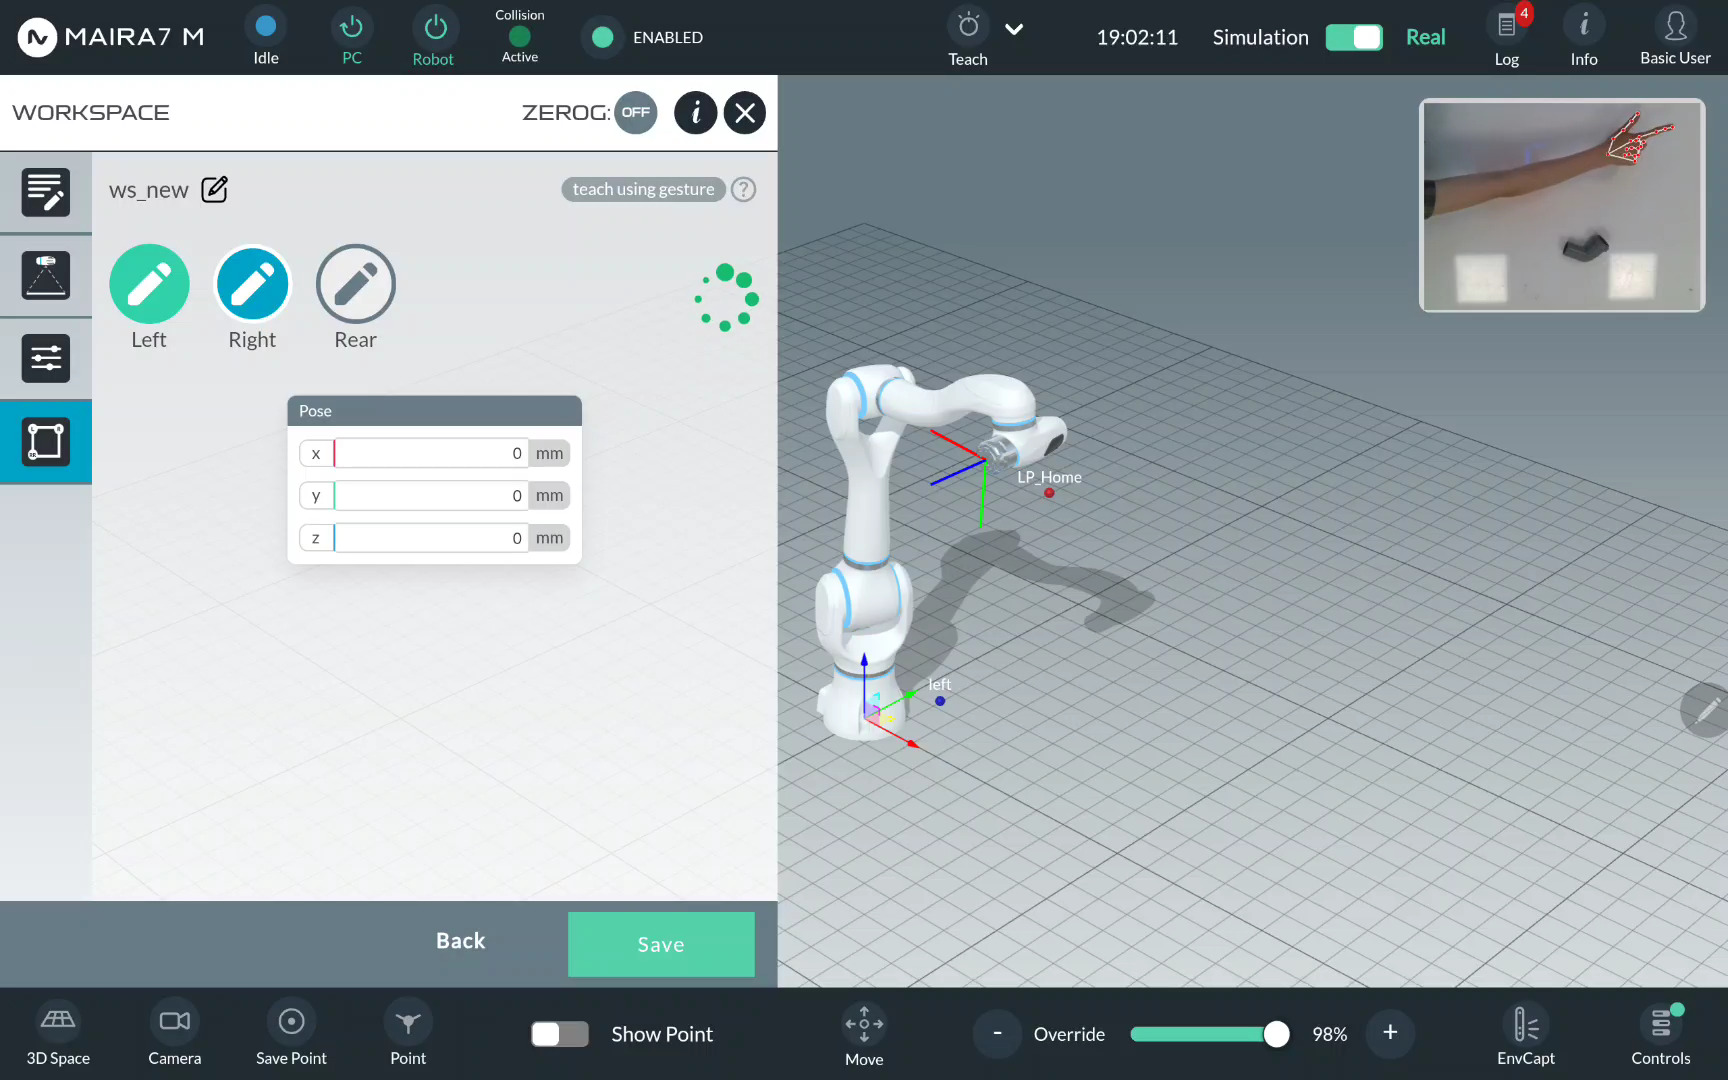
… and Rear limits.
Step 8: Save the Workspace
In the final step, you can also manually adjust the point values by directly editing them.
Click Save to save the workspace.
Create a Bin Pick Application
Picks
Pick function allows picking objects with a gripper within a certain area. Different types of picks are supported: General pick, Pose-Agnostic pick, Pose-Aware pick.
Preparation
Calibrate your camera.
Create either a Bin Workspace or a bin mesh model.
For objects you want to pick, enable
(Pose-Agnostic pick, Pose-Aware pick) Object Detection
(Pose-Aware pick) Pose Estimation
(Pose-Aware pick) Grasping
Activate the wrist camera.
Ensure the bin is clearly visible by the wrist camera.
Ensure the workspace is clean and collision-free.
Execution
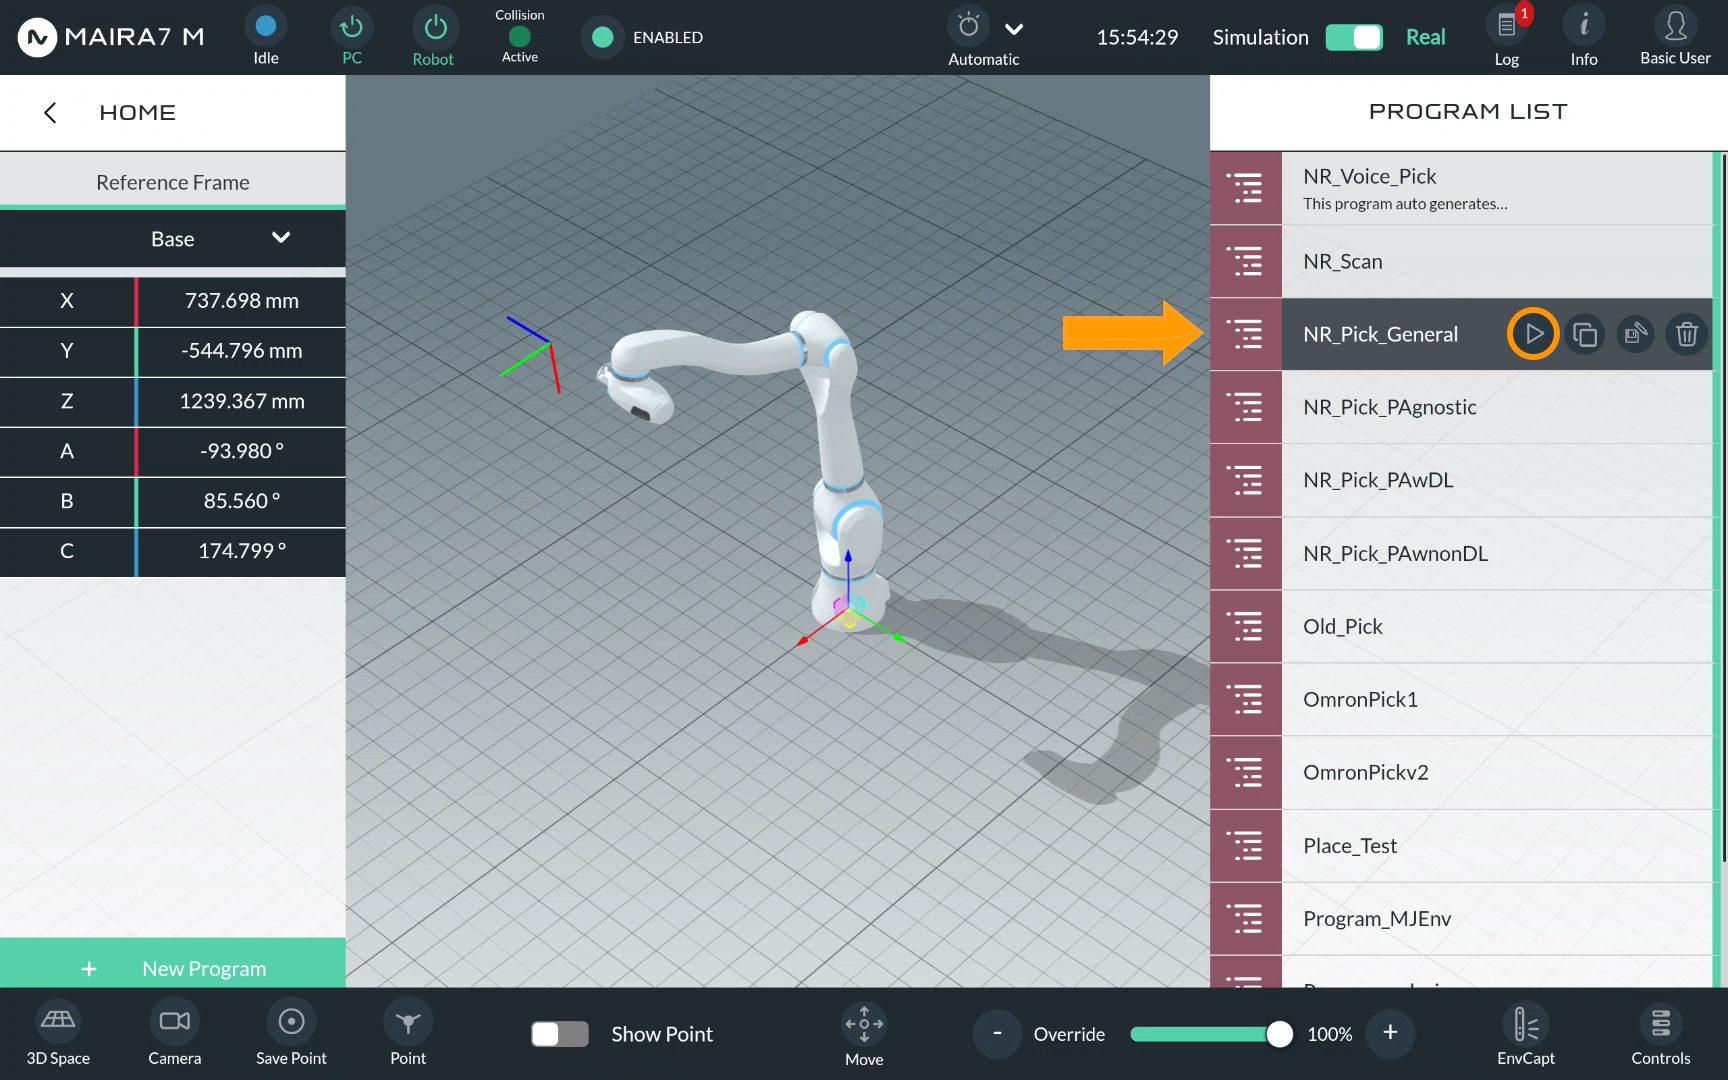
Step 1: Select a Program
Click on Home > Programs to enter a Program menu.
Step 2. Enter Program Settings
General Pick
For a General pick, select NR_Pick_General.

Pose-Agnostic Pick
For a Pose-Agnostic pick, select NR_Pick_PAgnostic.
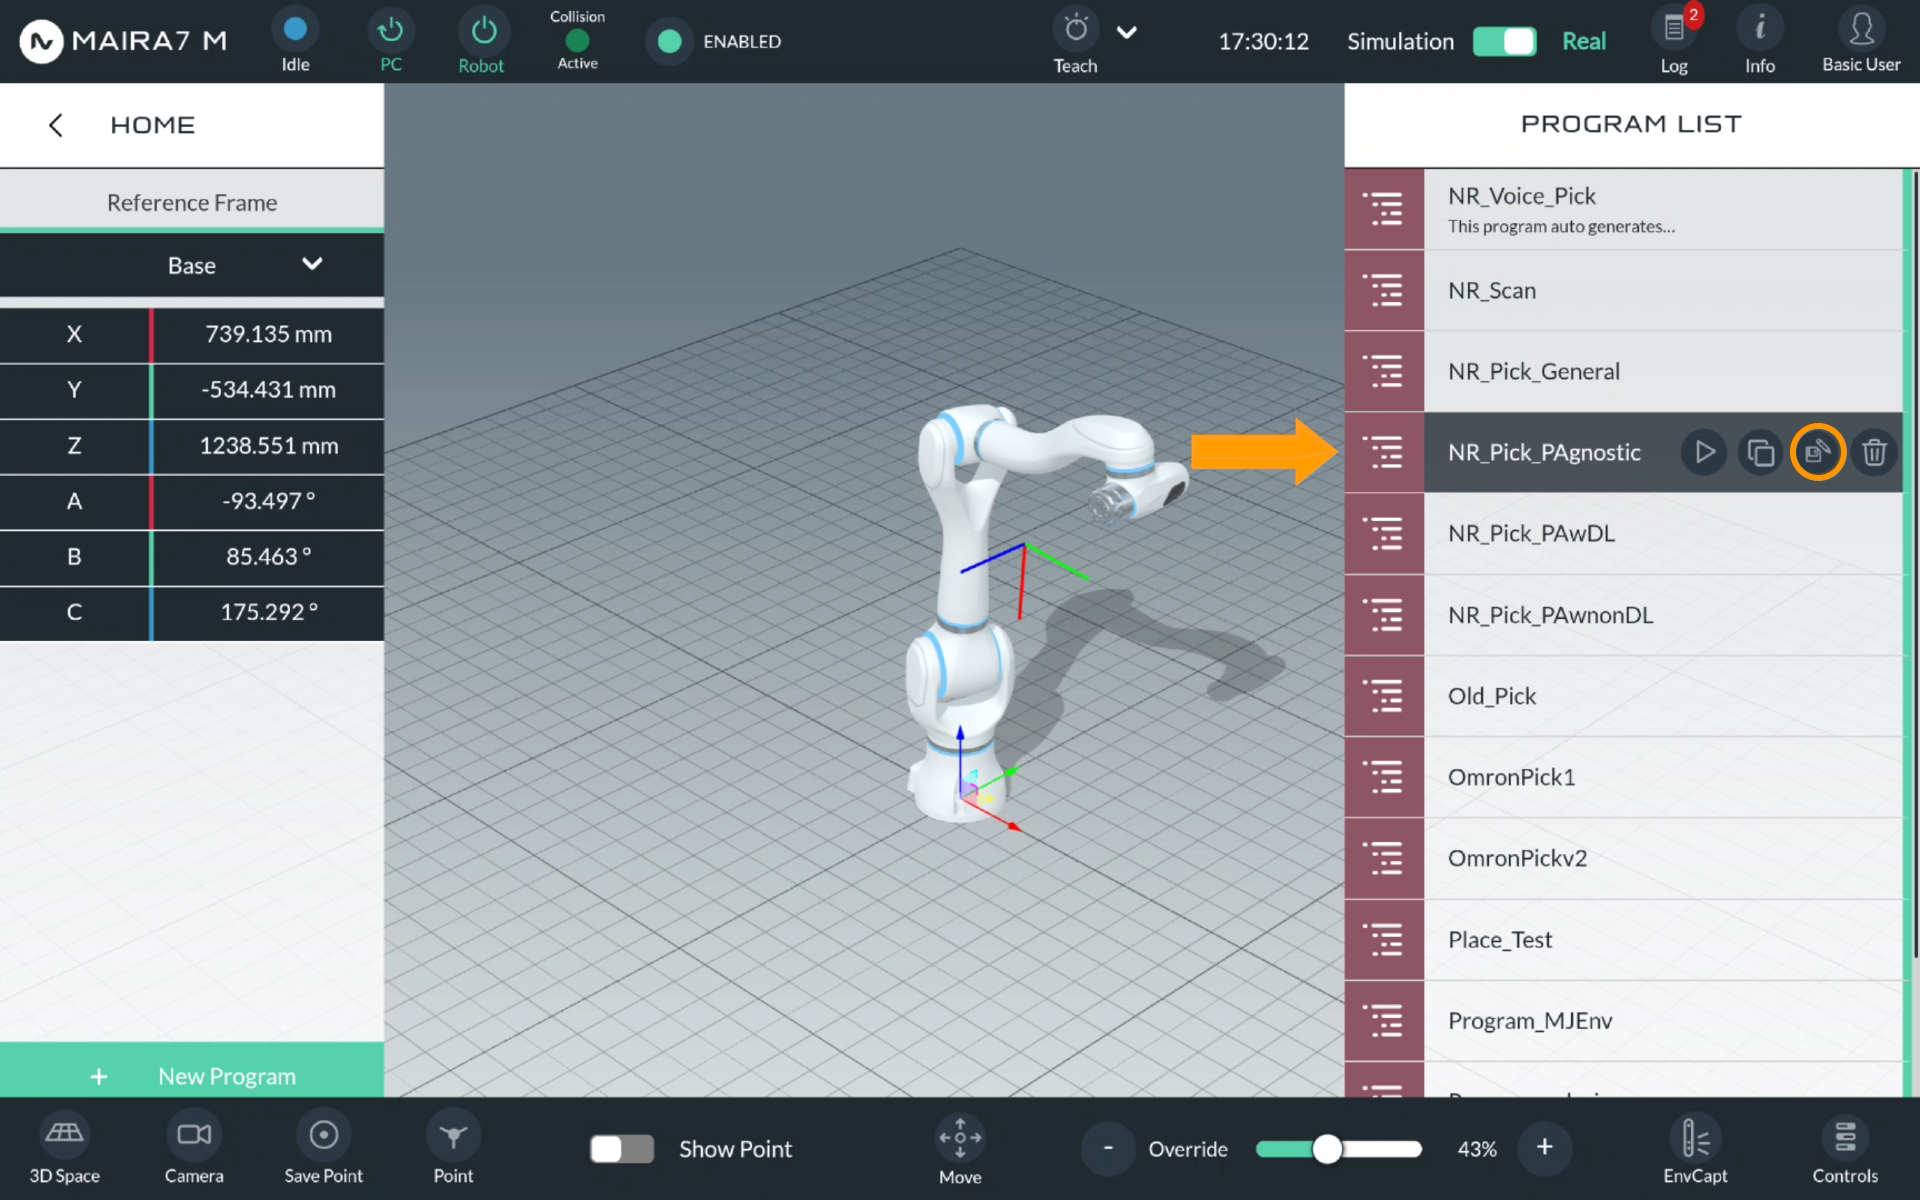
Pose-Aware Pick
For a Pose-Aware pick, there are two options.
Select NR_Pick_PAwDL to use a deep learning-based pose estimation method, or NR_Pick_PAwnonDL for a non-DL approach.
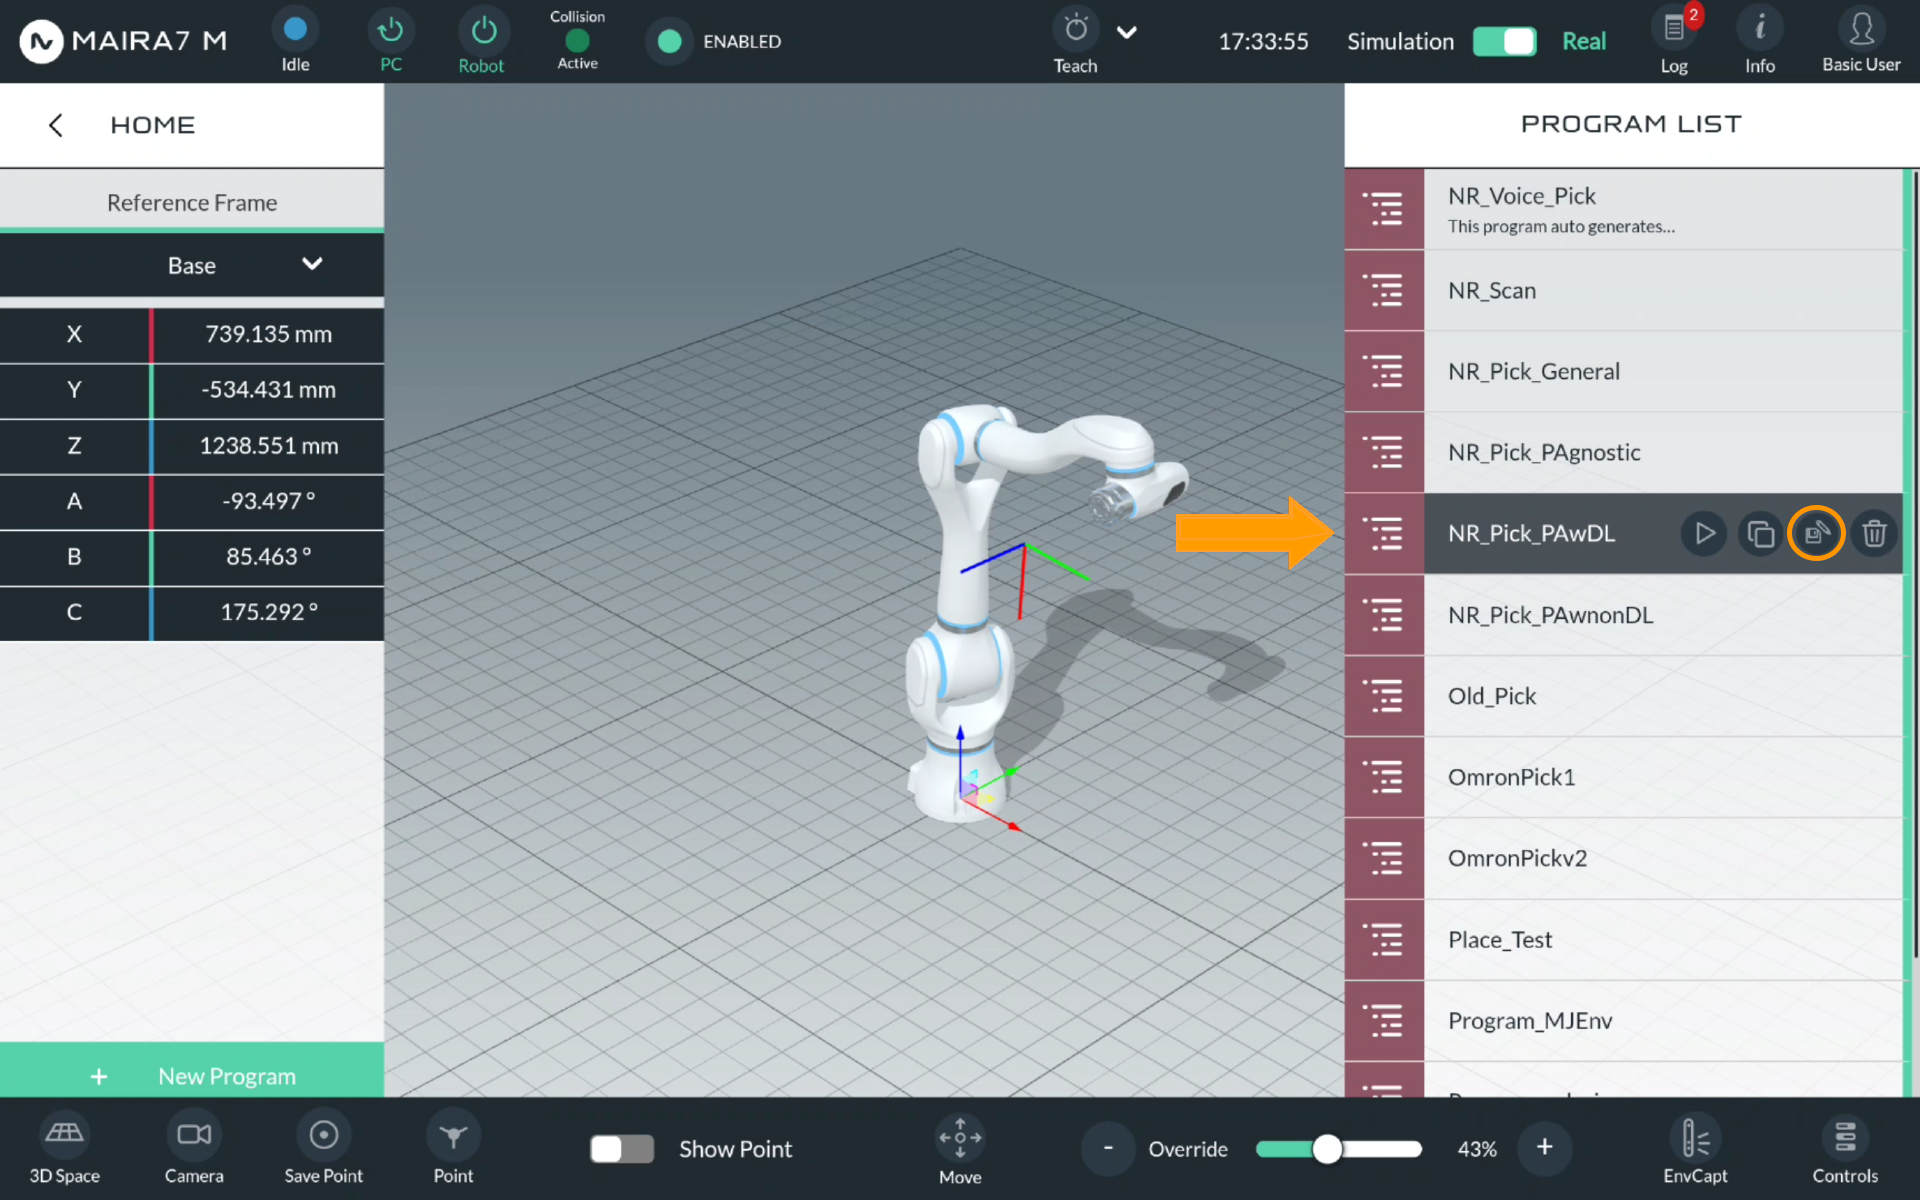
Click  to enter the program settings.
After that, you will see the overall scheme of program, comprising motions, logics and apps. Each component of a program belongs to one of these categories. Picks are naturally Motions.
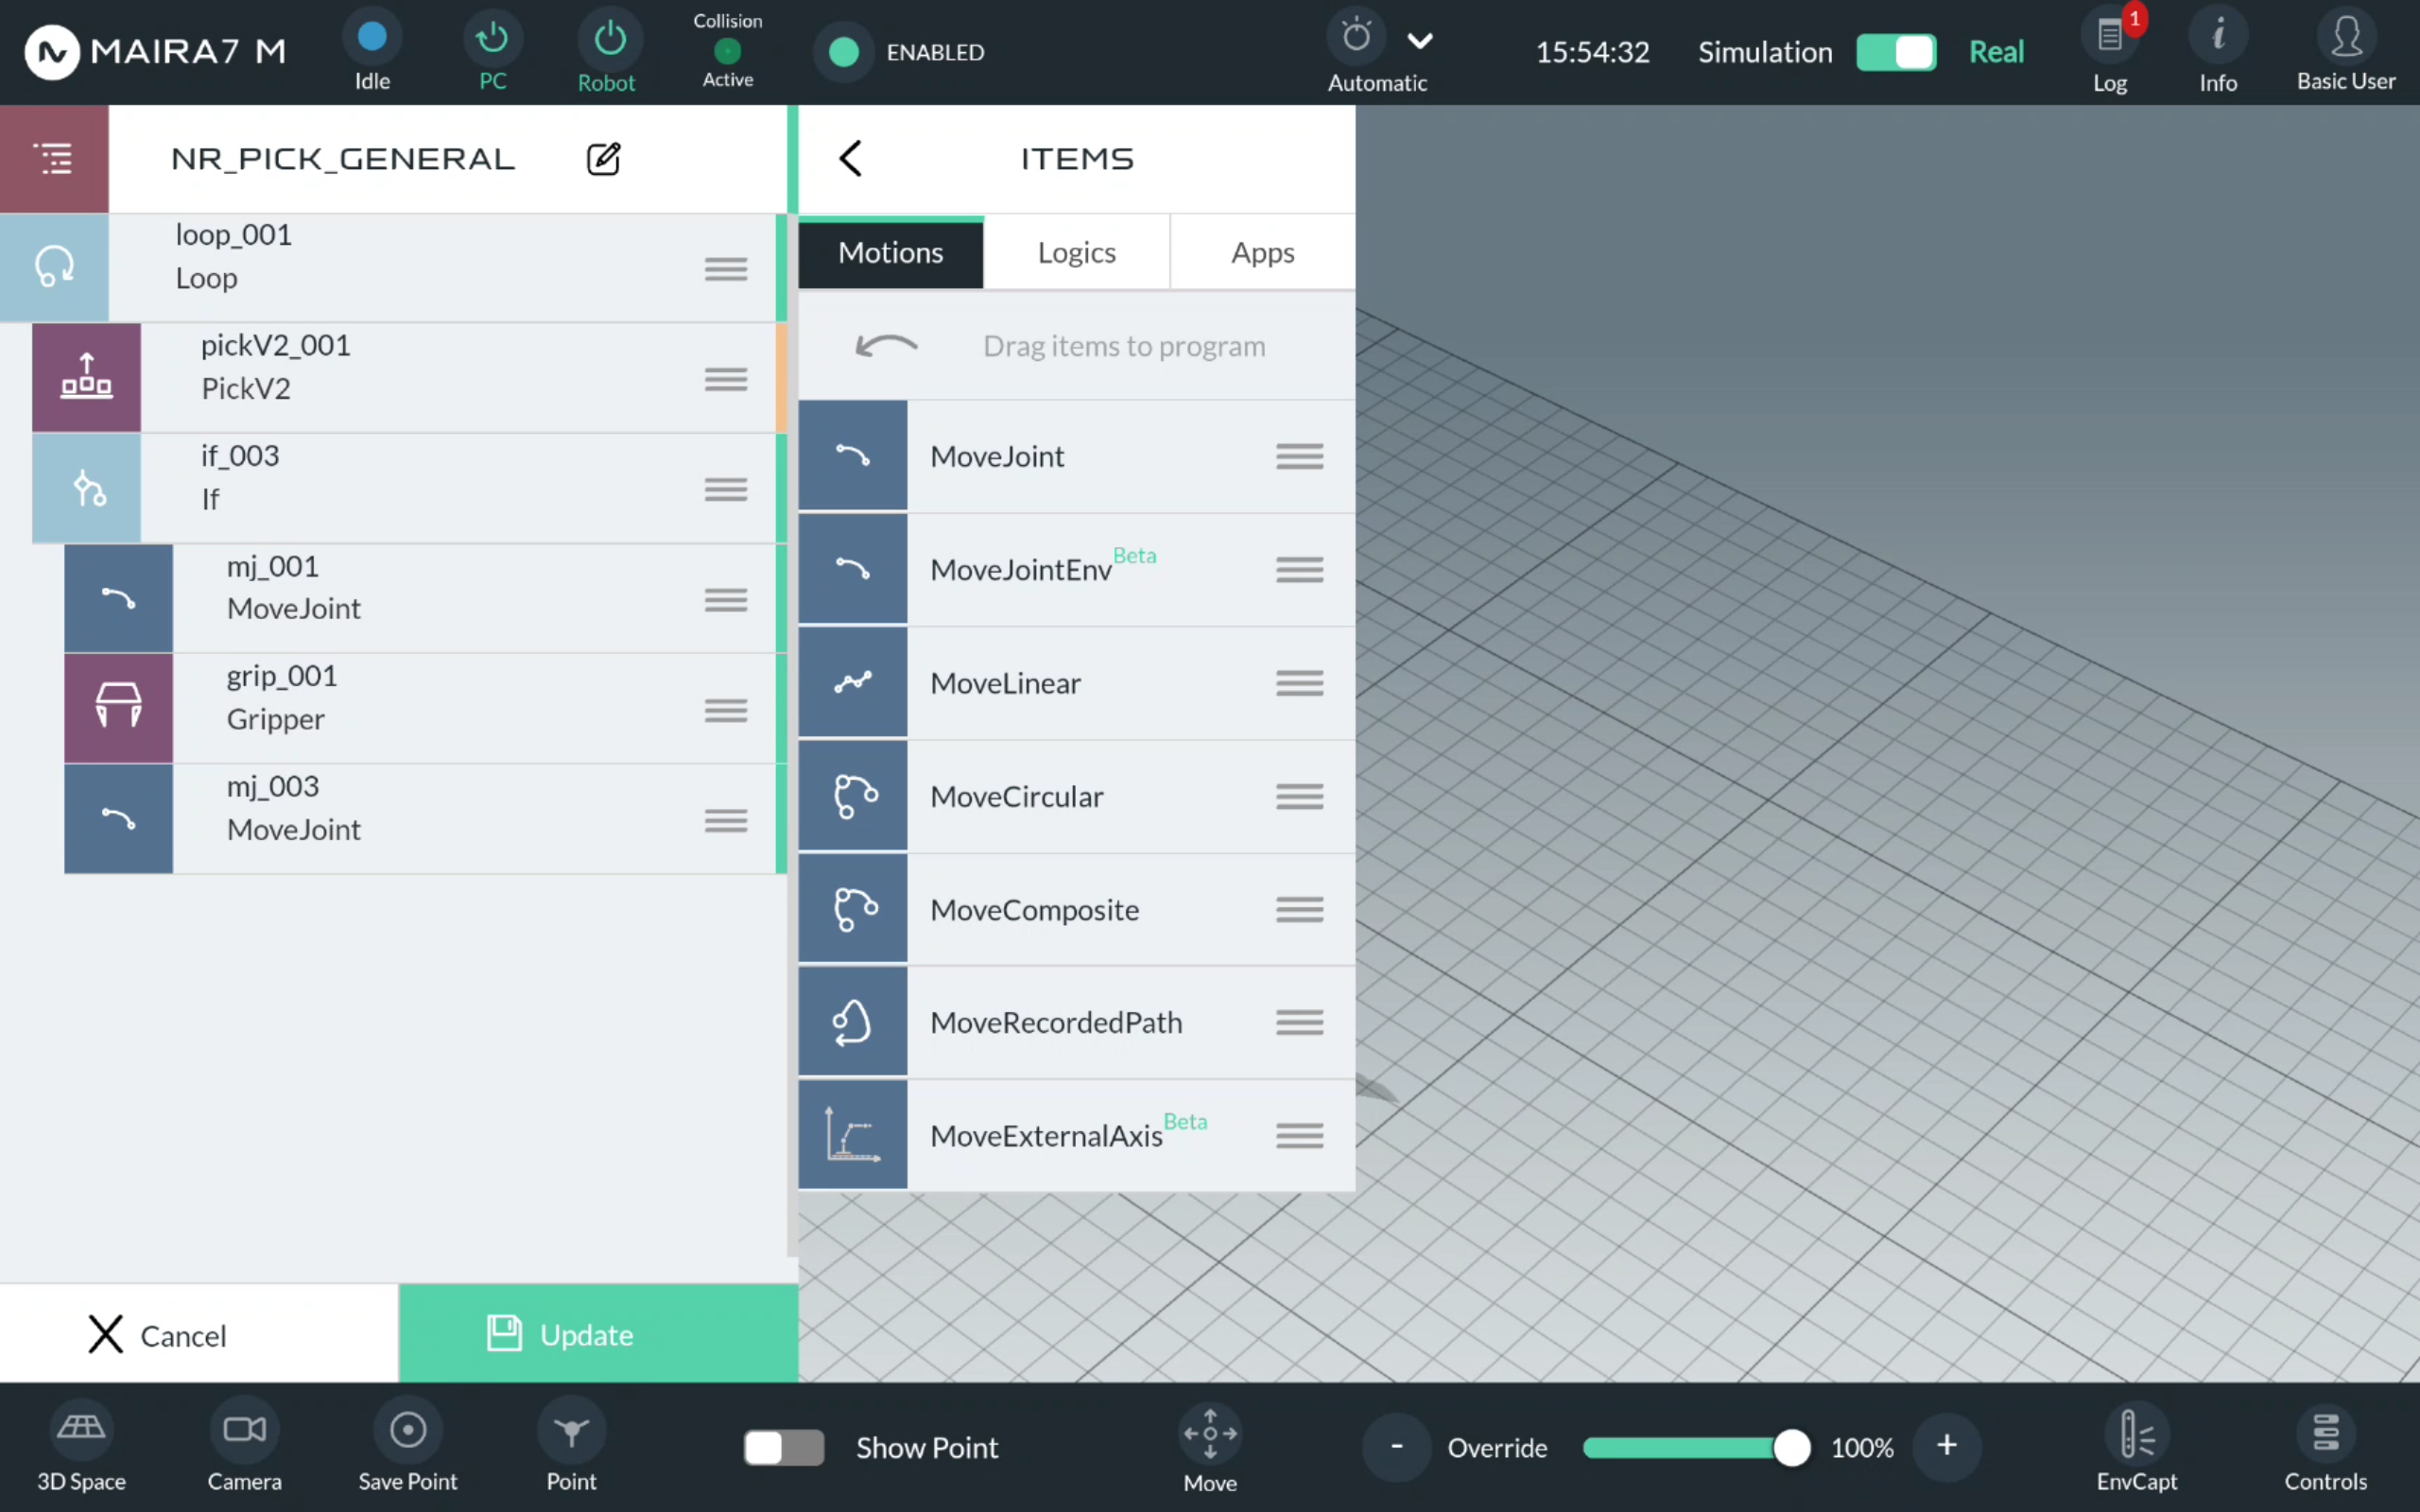
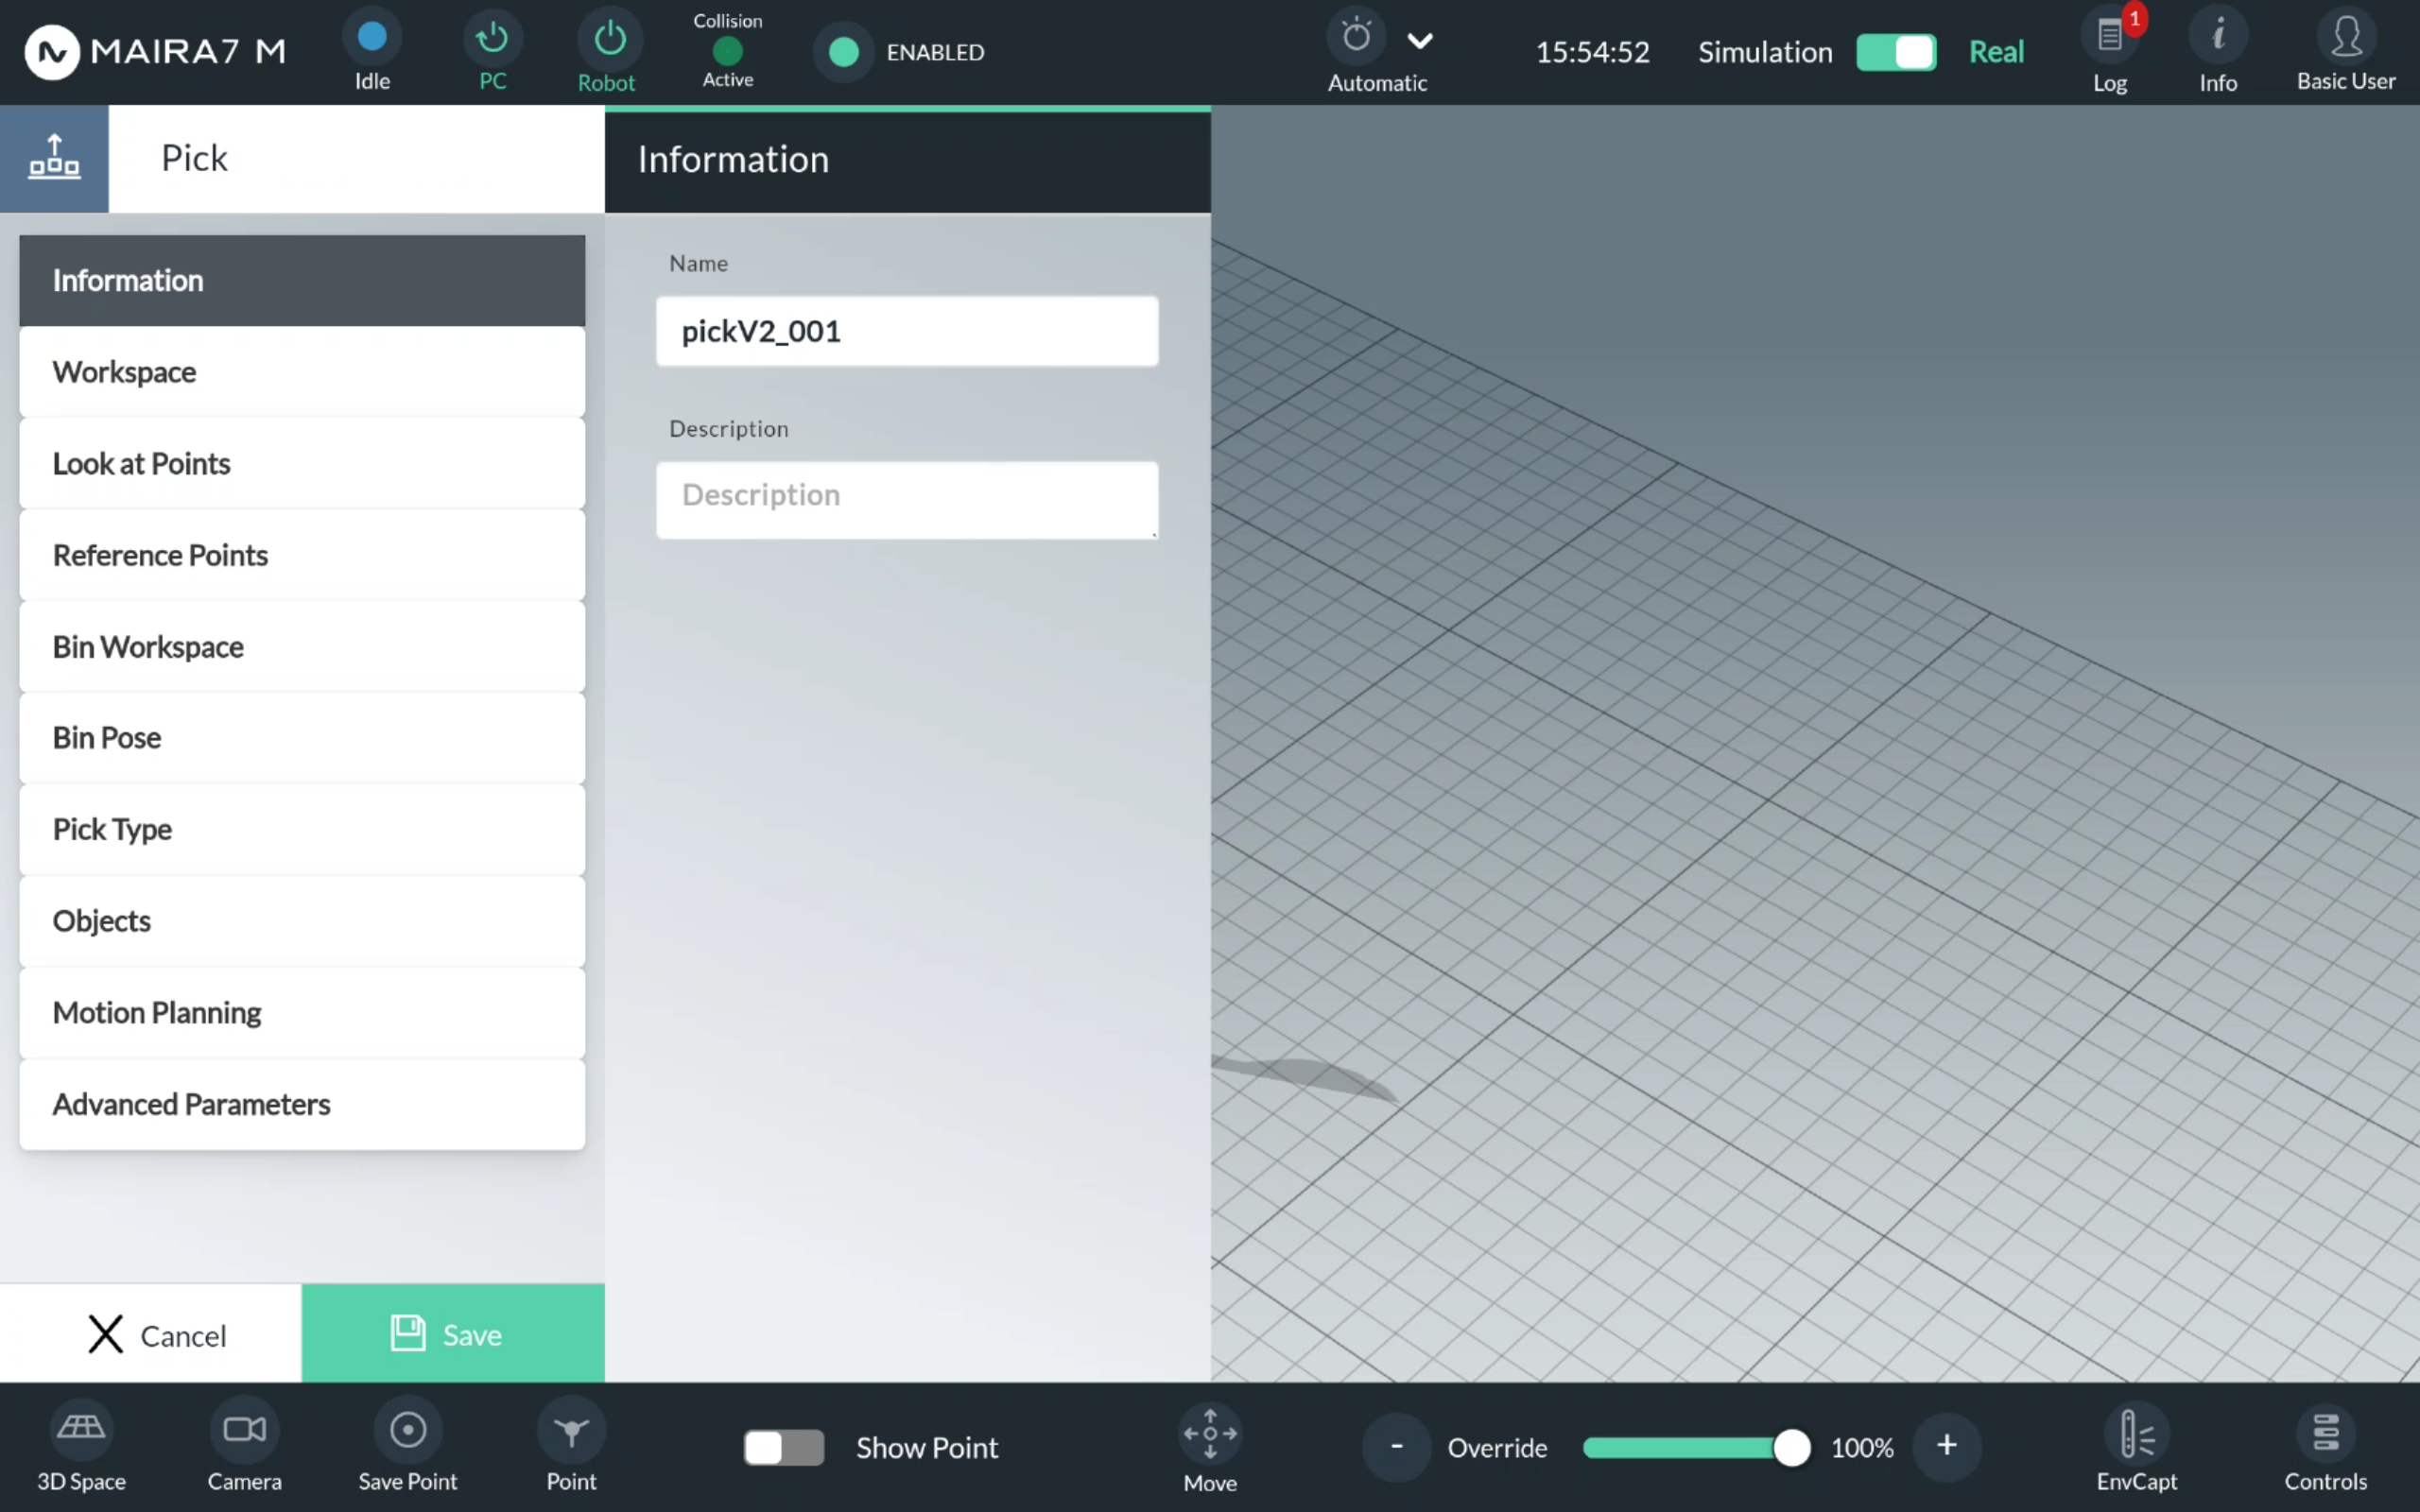
Step 3. Enter Pick Settings
Click on  for Pick to open a pick configuration menu.
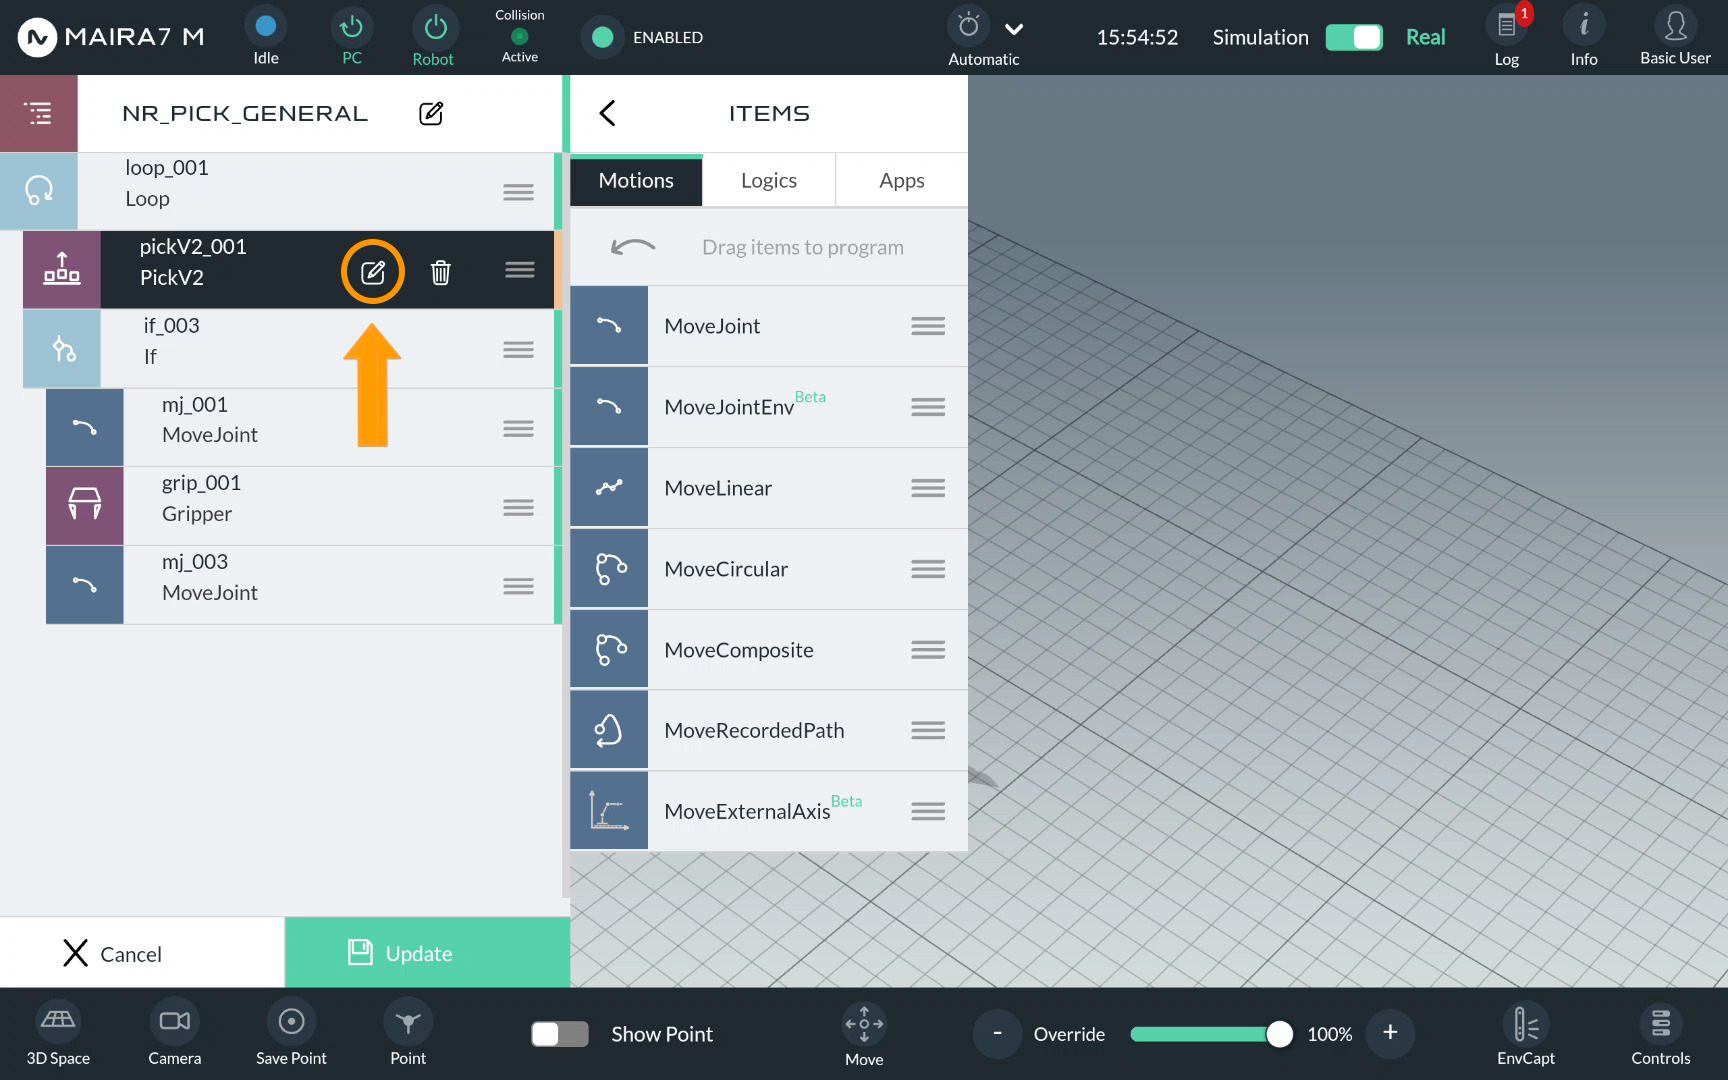
Picks are guided by multiple parameters. Default settings should work in most scenarios. In a simple demo, we only configure some parameters and keep the rest default.
Step 4. Set Up a Bin Workspace
First, a bin workspace should be set up.
Use a Pre-Recorded Bin Workspace
If you have a pre-recorded bin workspace with static bin, and the bin is not supposed to be moved during the execution, then you can simply load the pre-recorded bin workspace. Click on Bin Workspace. The pre-recorded bin workspaces are listed to the right (please refer to Workspace Wizard for a workspace recording guide). Choose the bin workspace from the available options. Drag & drop the selected option to the middle column.
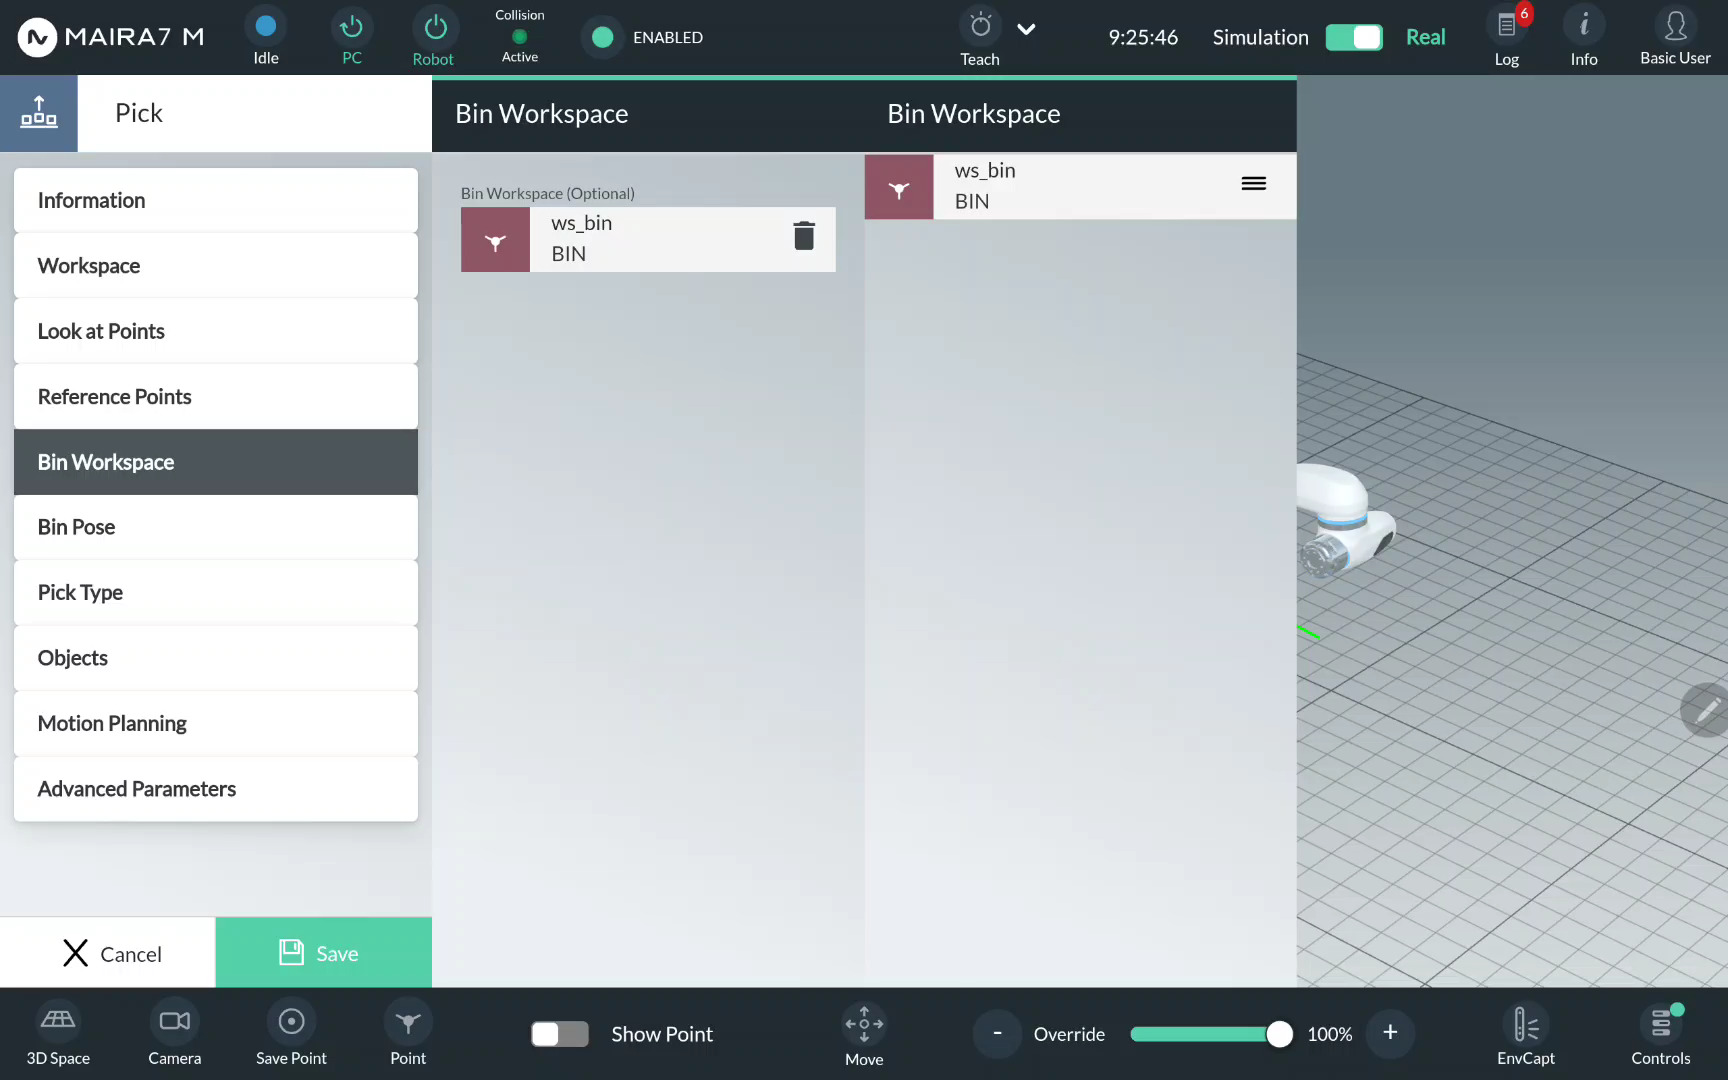
Set Up a New Bin Workspace
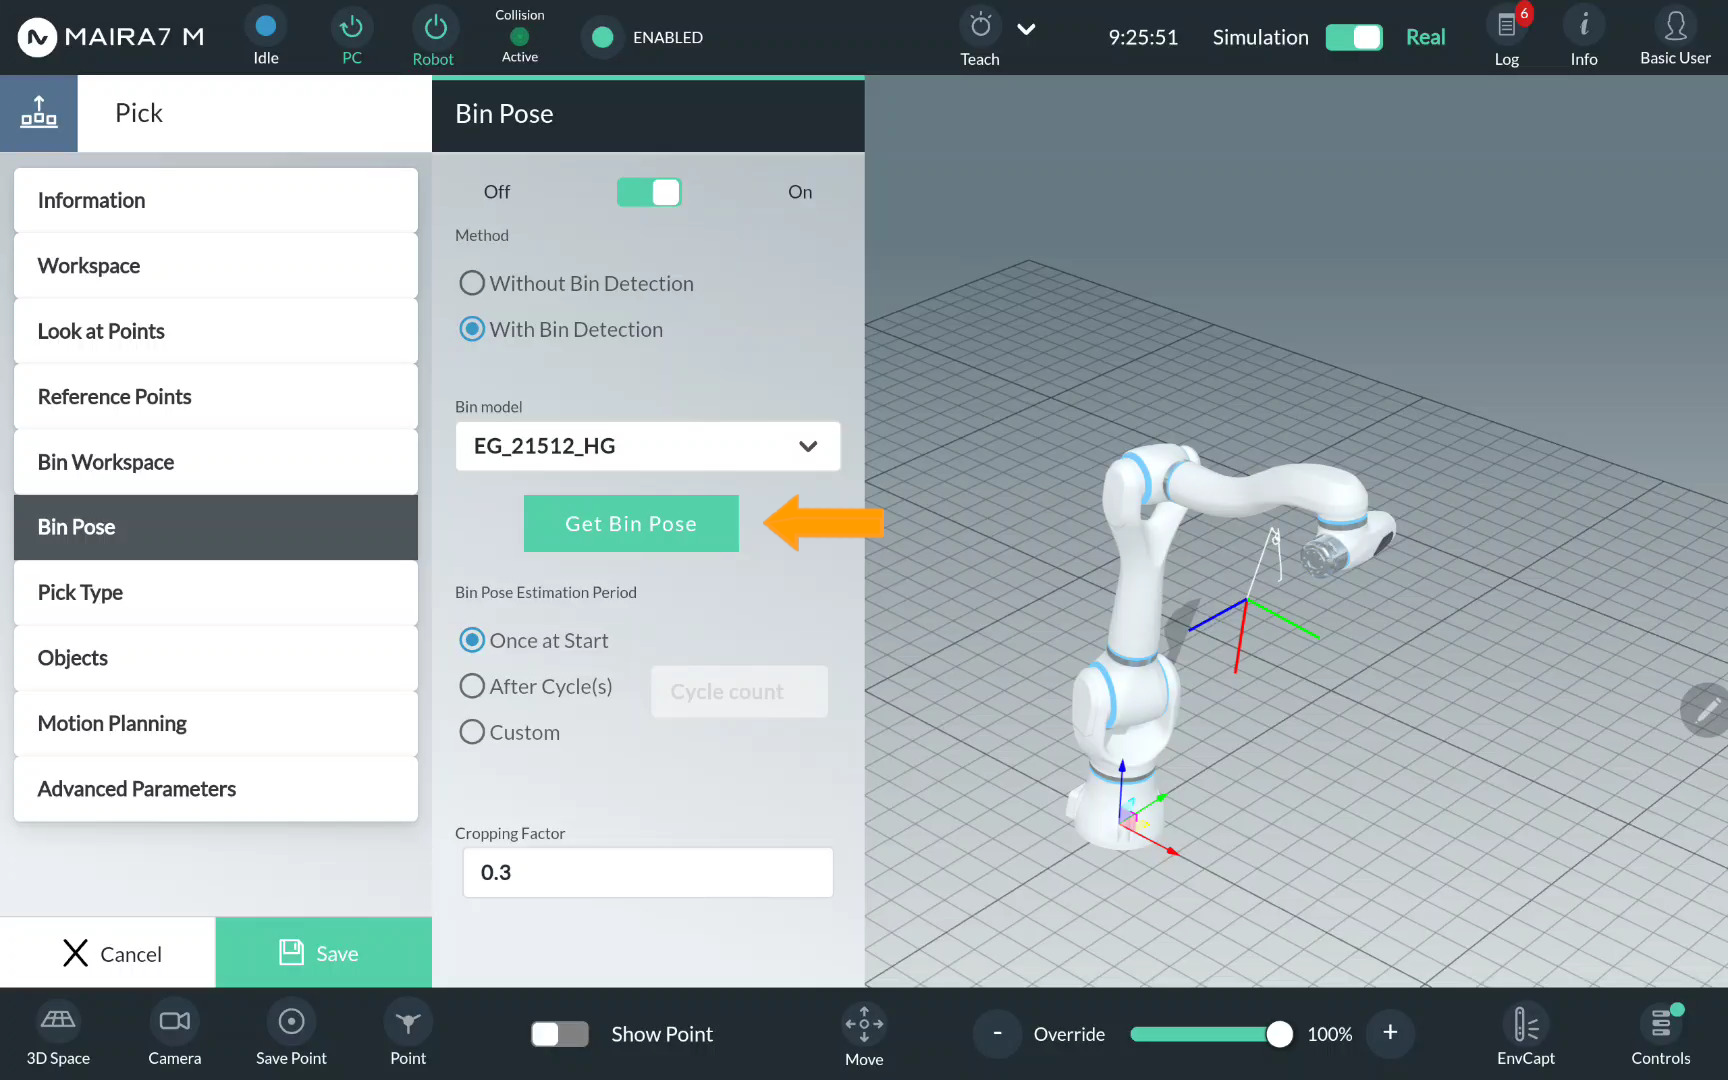
If you do not have a pre-recorded bin workspace, or the pose of a bin has changed since the workspace was recorded, or it the bin is supposed to be moved during the execution, click on Bin Pose. Activate bin pose detection by moving the control to On.
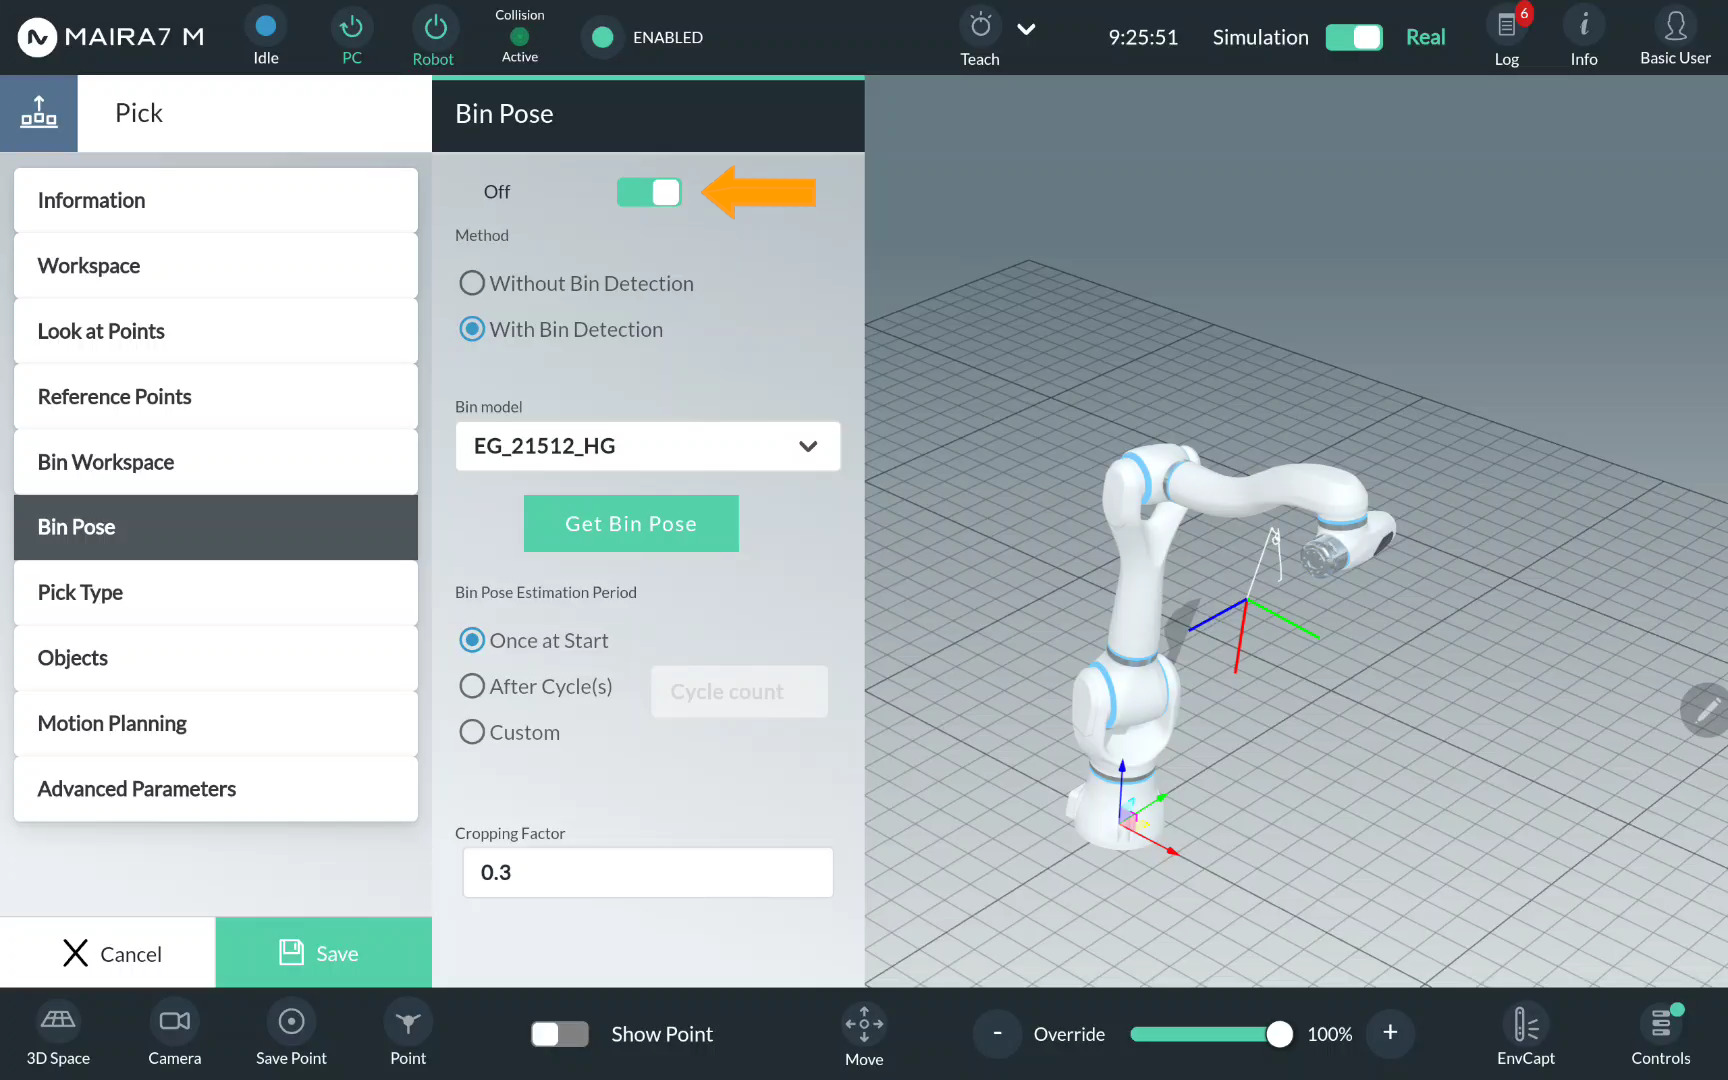
Important
To enable collision filtering for picks, make sure a Bin Workspace is selected. Activating Bin Pose alone is not sufficient, as no collision model will be generated on the Grasp Planning side without it.
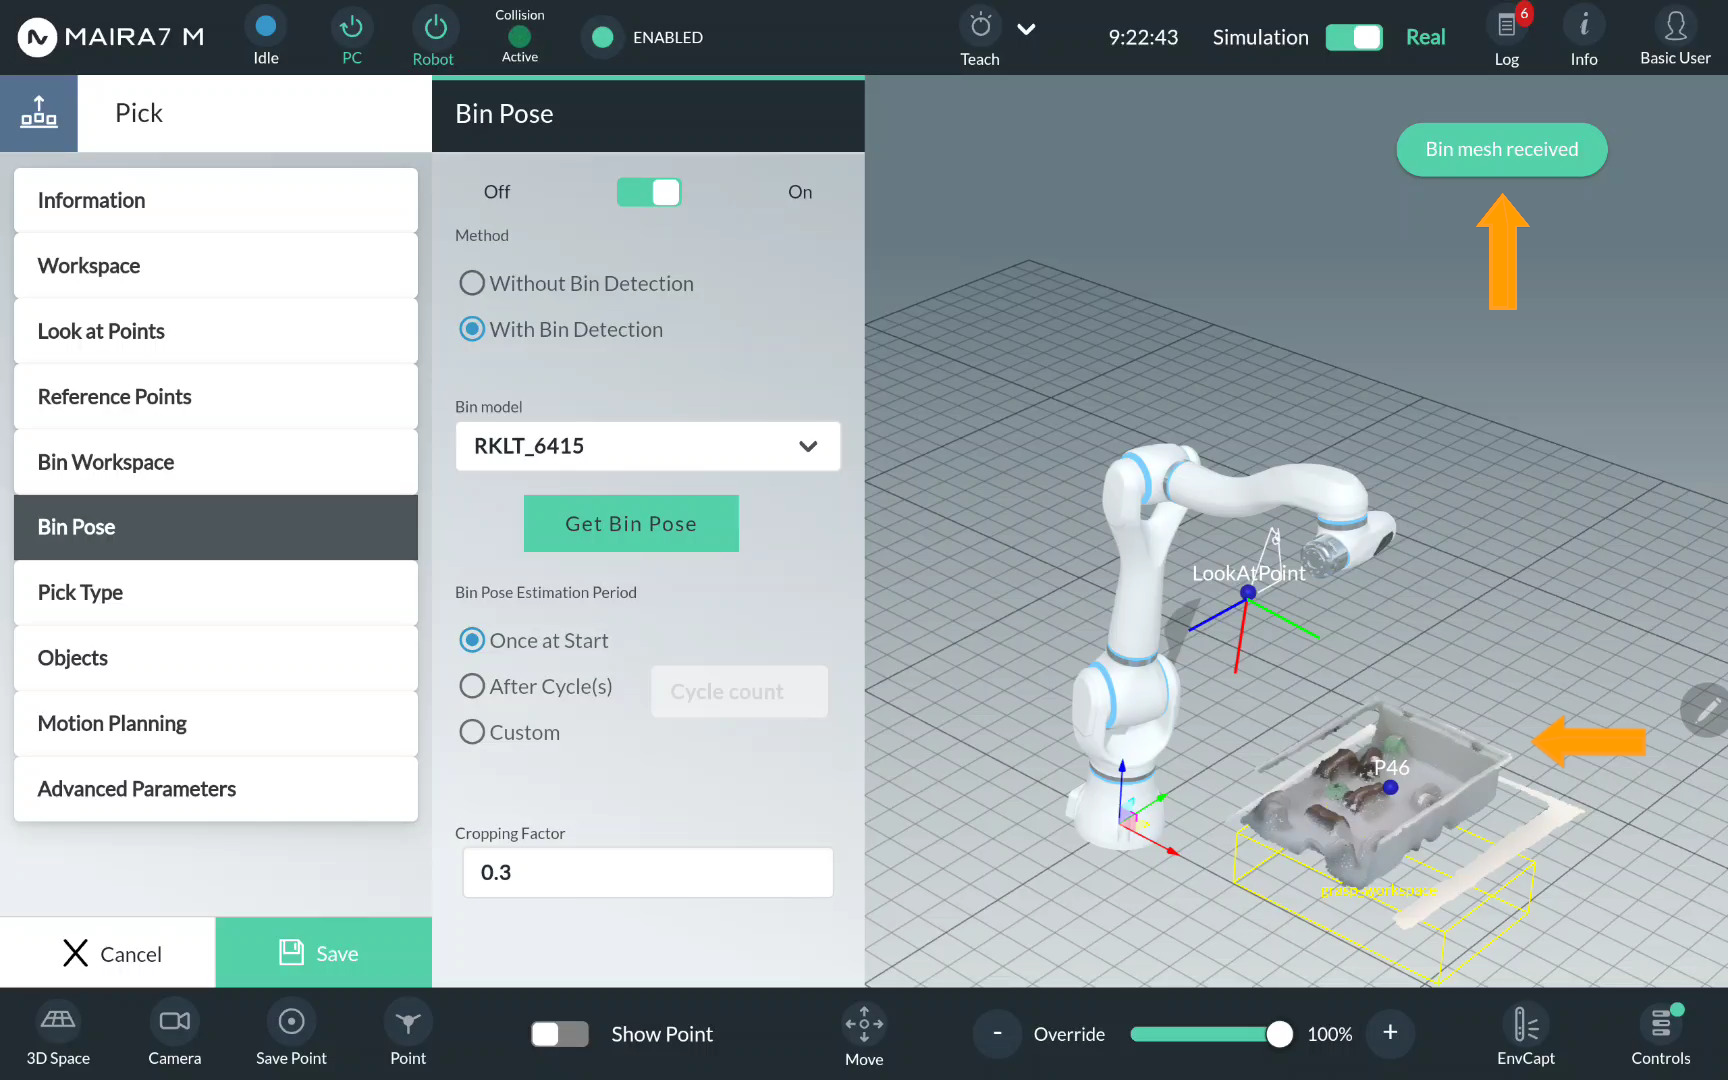
Select a bin mesh model from the list of pre-recorded bin mesh models and click Get Bin Pose.
Wait until the bin mesh is visualized and the notification Bin mesh received appears on the screen.
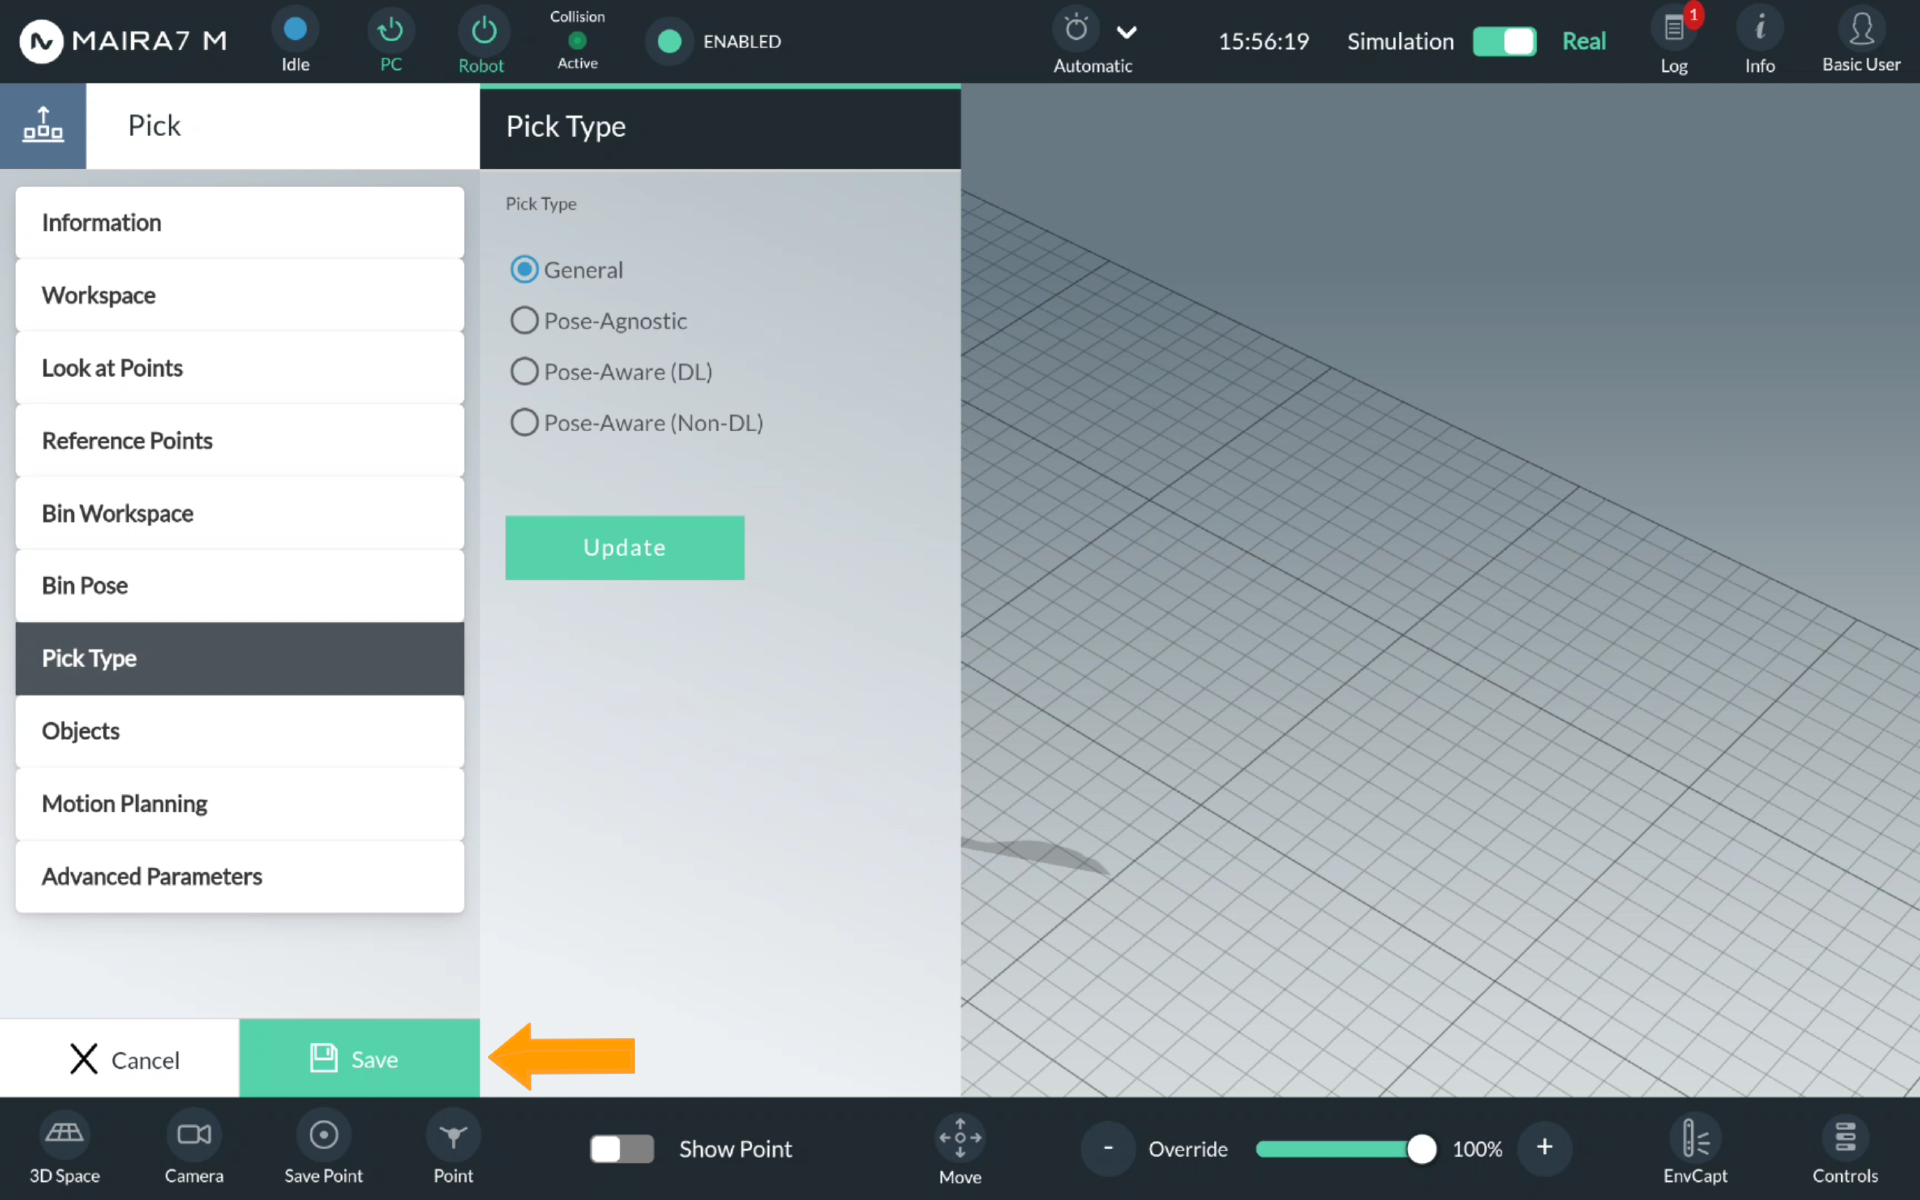
Step 5. Verify a Pick Type
Ensure that the pick type is set properly. Click Pick Type. Normally, as you have selected the type-specific program at Step 1, the pick value would be set by default.
If you want to change the type, click on a corresponding bullet point and confirm the choice by clicking Update.
General Pick
For a General pick, no additional setting should be specified.
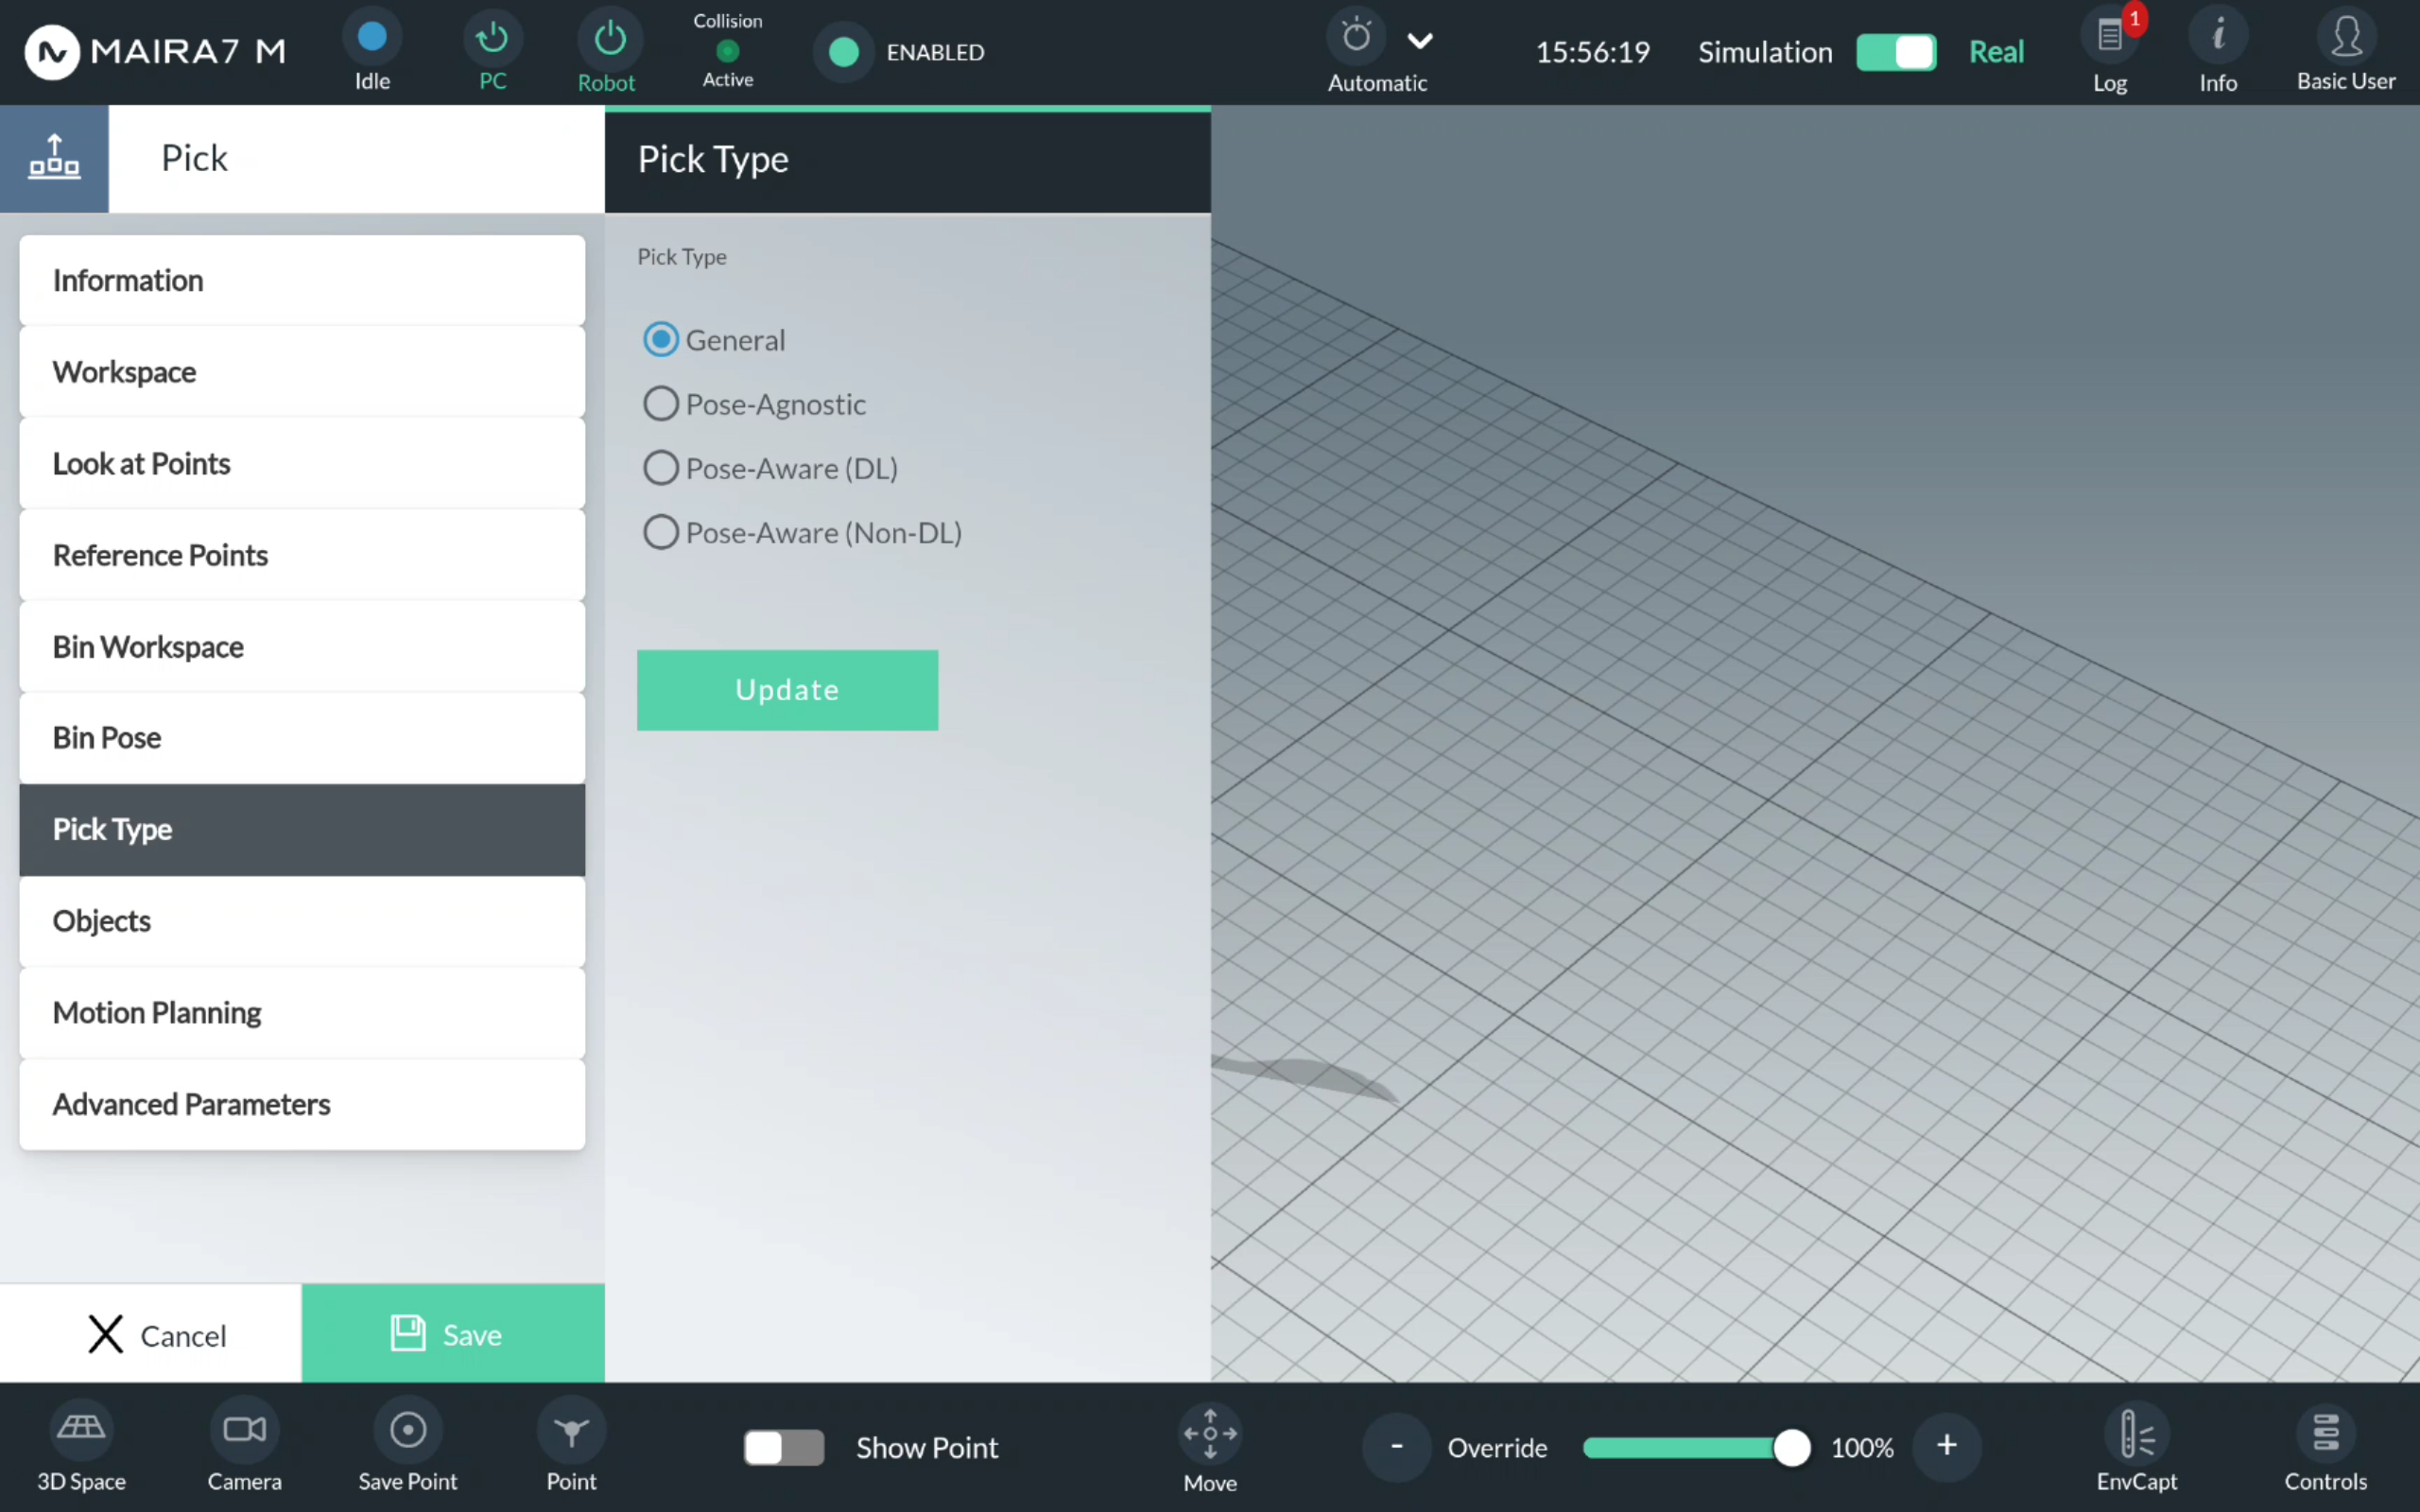
Pose-Agnostic Pick
For a Pose-Agnostic pick, select an object detection model from the list of available models. Please refer to AI Hub for training your own object detection model.
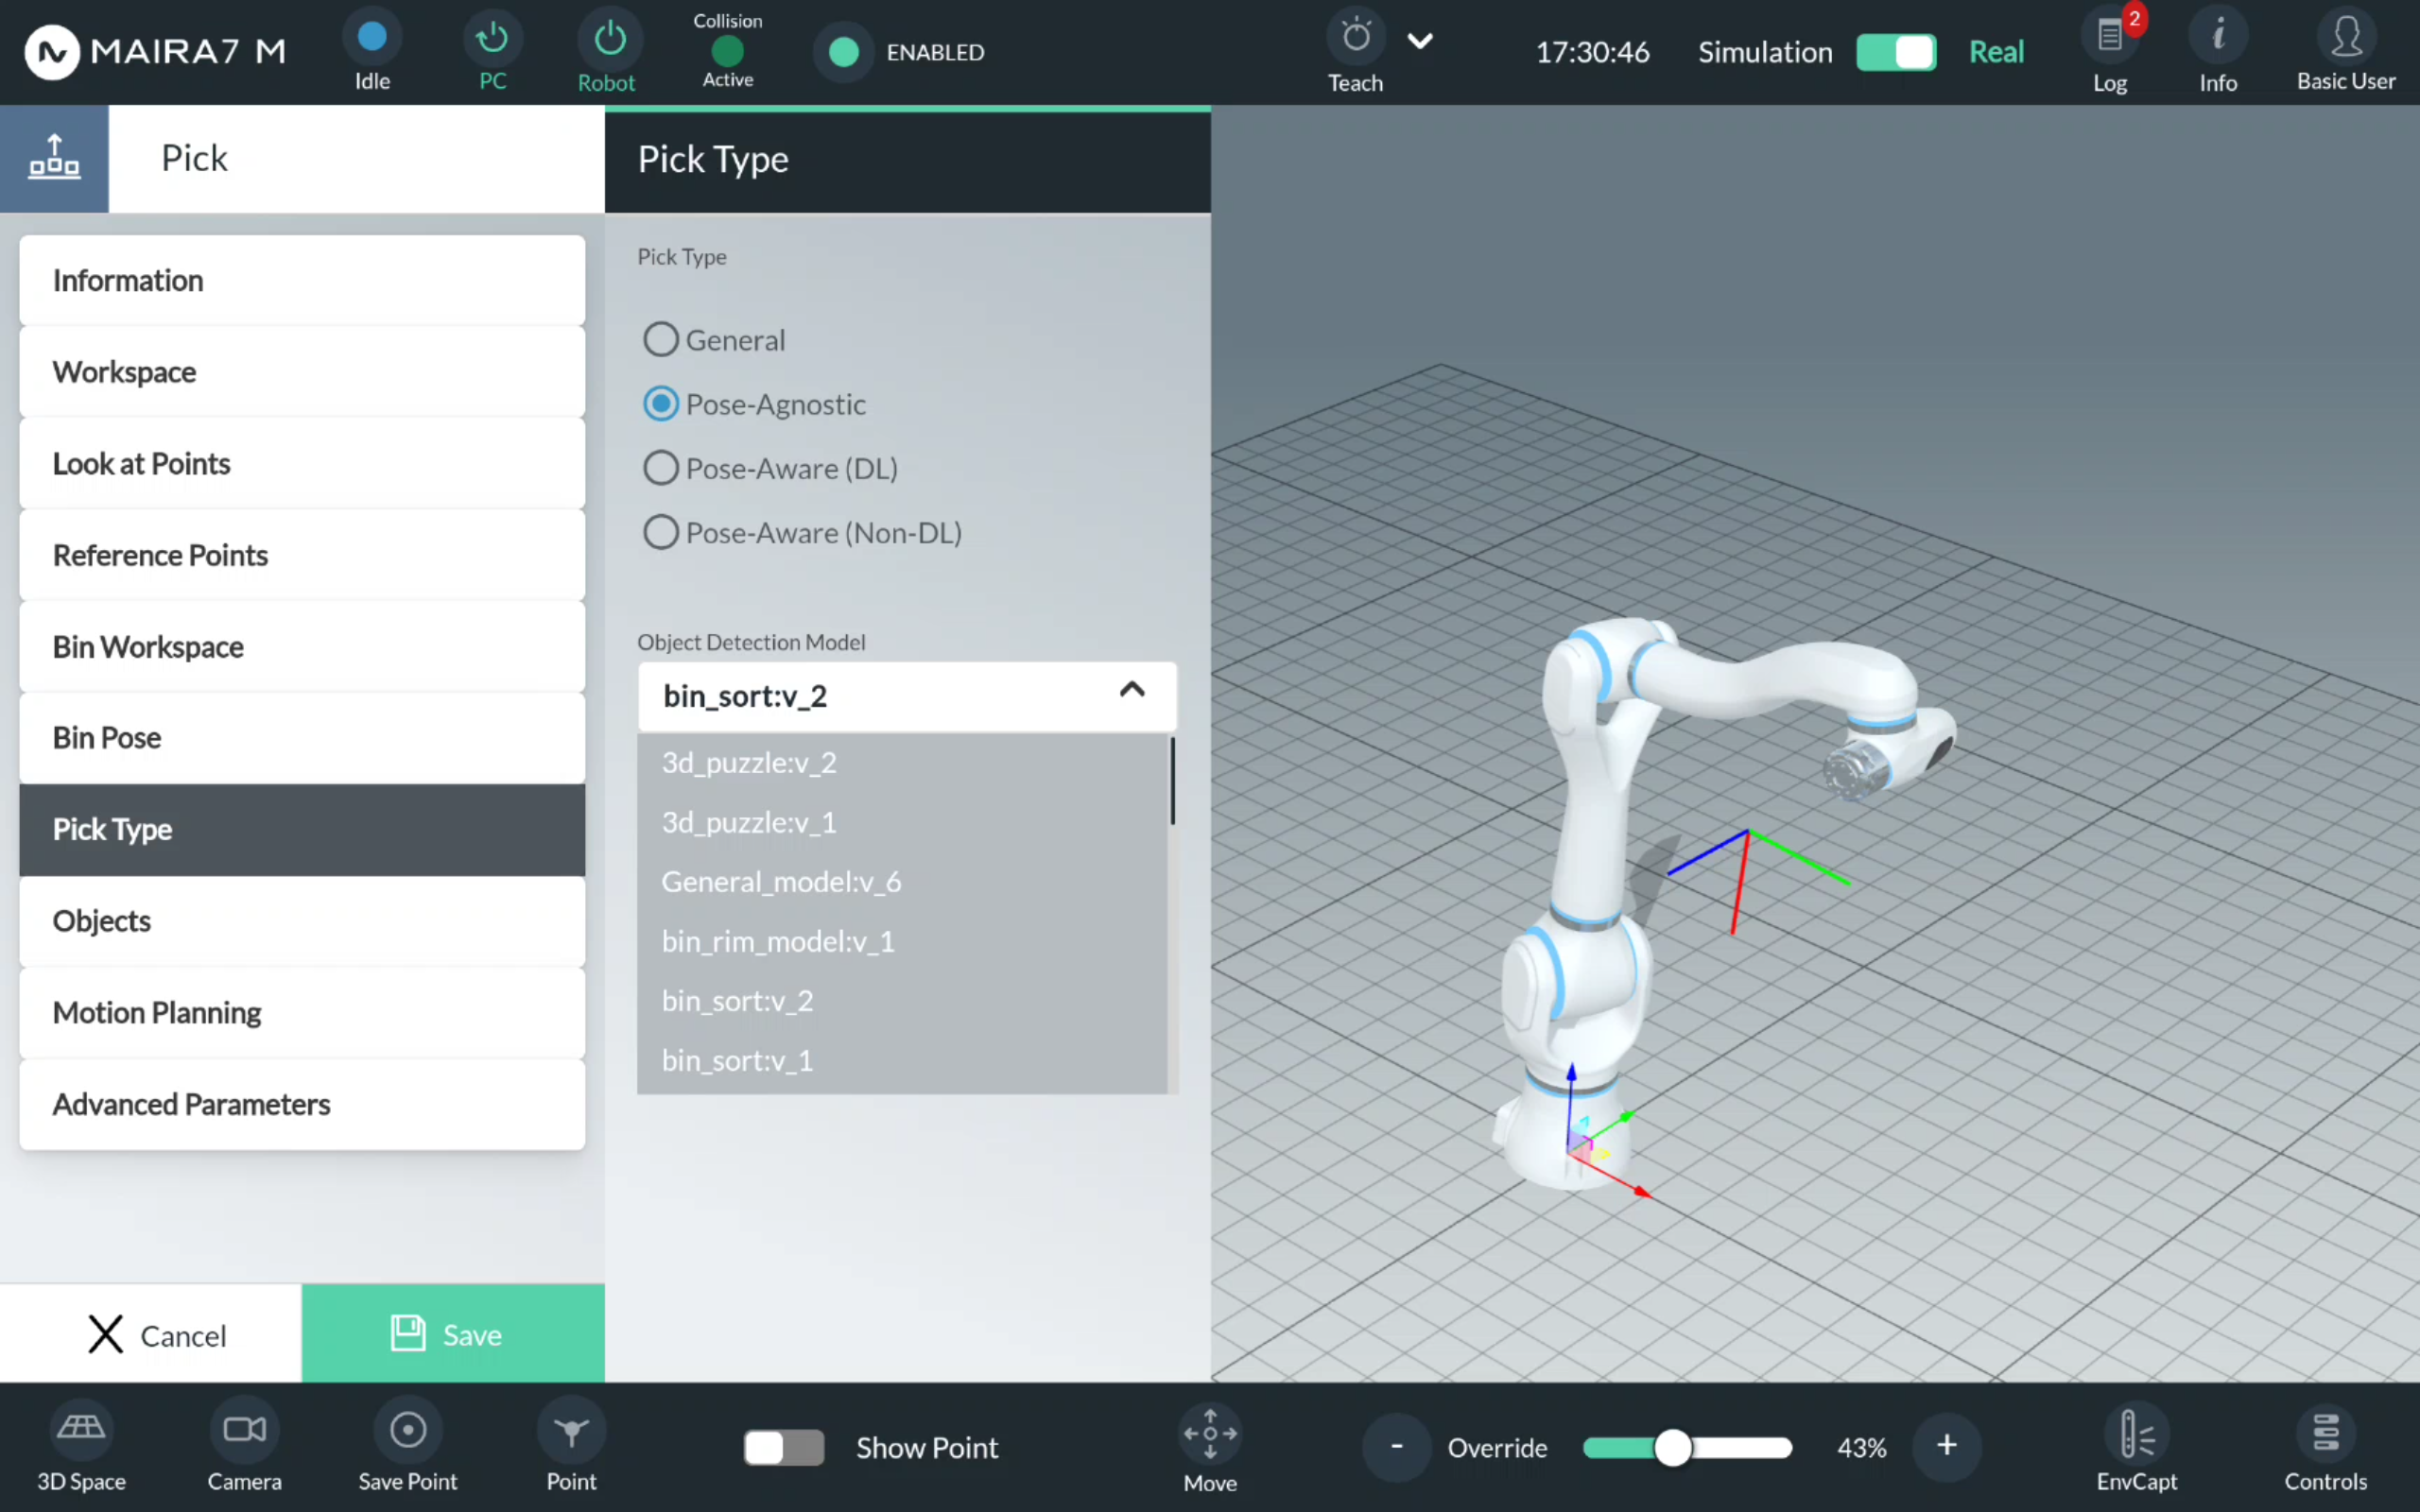
Pose-Aware Pick
For a Pose-Aware pick, select an object detection model from the list of available models. Please refer to AI Hub for training your own object detection model.

Select an object from the list of available objects. Enter a number of objects to be picked.

Step 6. Save a Program
Save the changes by clicking Save.
Step 7. Start a Program
After saving the program, you would be returned to the Program menu at
Step 2. Now, click on  to start the program.
Troubleshooting
- Q: The pick is always too high (above the object) or just gently touched the surface of the object.
Check that:
1.
max_apertureanddefault_openingare not too small. Sometimes due to the inprecise measurements, detected objects appear to be larger than real objects.2. the workspace recorded is not too high for the object to be picked. Take a closer look at the point cloud visualized in GUI to ensure the object is fully shown: if not, reduce the height of the workspace.
A general fix is adding a small value to
general_grasp_offset_z.- Q: The program quits right after I click Run button.
Some components may be started incorrectly, e.g., the spawn time of control was longer than expected, or the camera was not started at first.
Go to Supervisord page, which is the default page of the browser. Refresh the page and check if all components are running (especially motion planning and marker detection). If not, please restart them.
- Q: There is a warning/error that the instance segmentation is not working.
The object detection model might be selected incorrectly. Quit the program, go to AI settings, and select the suitable model.
- Q: There is a warning/error that no object is detected.
Check if the correct model for instance segmentation is selected. If so, please make sure the object is visible. If the problem persists, please retrain your object detection model with other lighting condition and background.
- Q: The pick is not aligned with the object geometry.
Check if the object is close to the workspace boundary. If so, move the object to the middle of the workspace, or enlarge the workspace.
Note
If you change the workspace size, please make sure the updated workspace is fully visible from the current look-at point.
Please also check if the point cloud is of sufficient quality. E.g., if the object to be grasped is dark or shiny, under some lighting conditions the camera may work not as expected. In this case, please adjust the lightning to ensure the point cloud quality is reasonably good.
- Q: There is always a warning about no collision-free pick.
Sometimes, possible picks can be mistaken for collisions due to point cloud quality. In this case, you could adjust
default_opening(+-10mm).Alternatively, if using General picks, you could disablecollision_pcd.- Q: Sometimes objects are picked successfully and sometimes not.
For different objects, the best results can be achieved with different grasp parameters. If your finger tip is flexible, you may also try disabling
collision_workspaceandcollision_pcd.- Q: No valid grasp is generated even after long-lasting object detection.
Please first check if too many irrelevant points are visible. If so, adjust your workspace so that fewer such points are inside the workspace. For small objects, please make sure that the objects are still visible.
Create a Pick Application
This tutorial guides you through the steps to create a simple Pick Program using the various available pick types. You will learn how to configure each pick type and understand when to use them based on your application needs.
Pick Types
The Pick function enables the robot to grasp objects using a gripper within a defined workspace area. It supports multiple pick types, including: General Pick, Pose-Agnostic Pick, Pose-Aware Pick, Marker-Based Pick.
Each pick type offers different capabilities depending on object recognition and pose requirements. For more detailed information about the available pick types and their configuration parameters, please click here.
Preparation
For objects you want to pick, enable:
(Pose-Agnostic pick, Pose-Aware pick) Object Detection
(Pose-Aware pick) Pose Estimation
(Pose-Aware pick) Grasping
Activate the wrist camera.
Ensure the workspace is clearly visible by the wrist camera.
Ensure the workspace is clean and collision-free.
Execution
Step 1: Select a Program
Click on Home > Programs to enter a Program menu.
Step 2. Enter Program Settings
Select Test_pick_place.
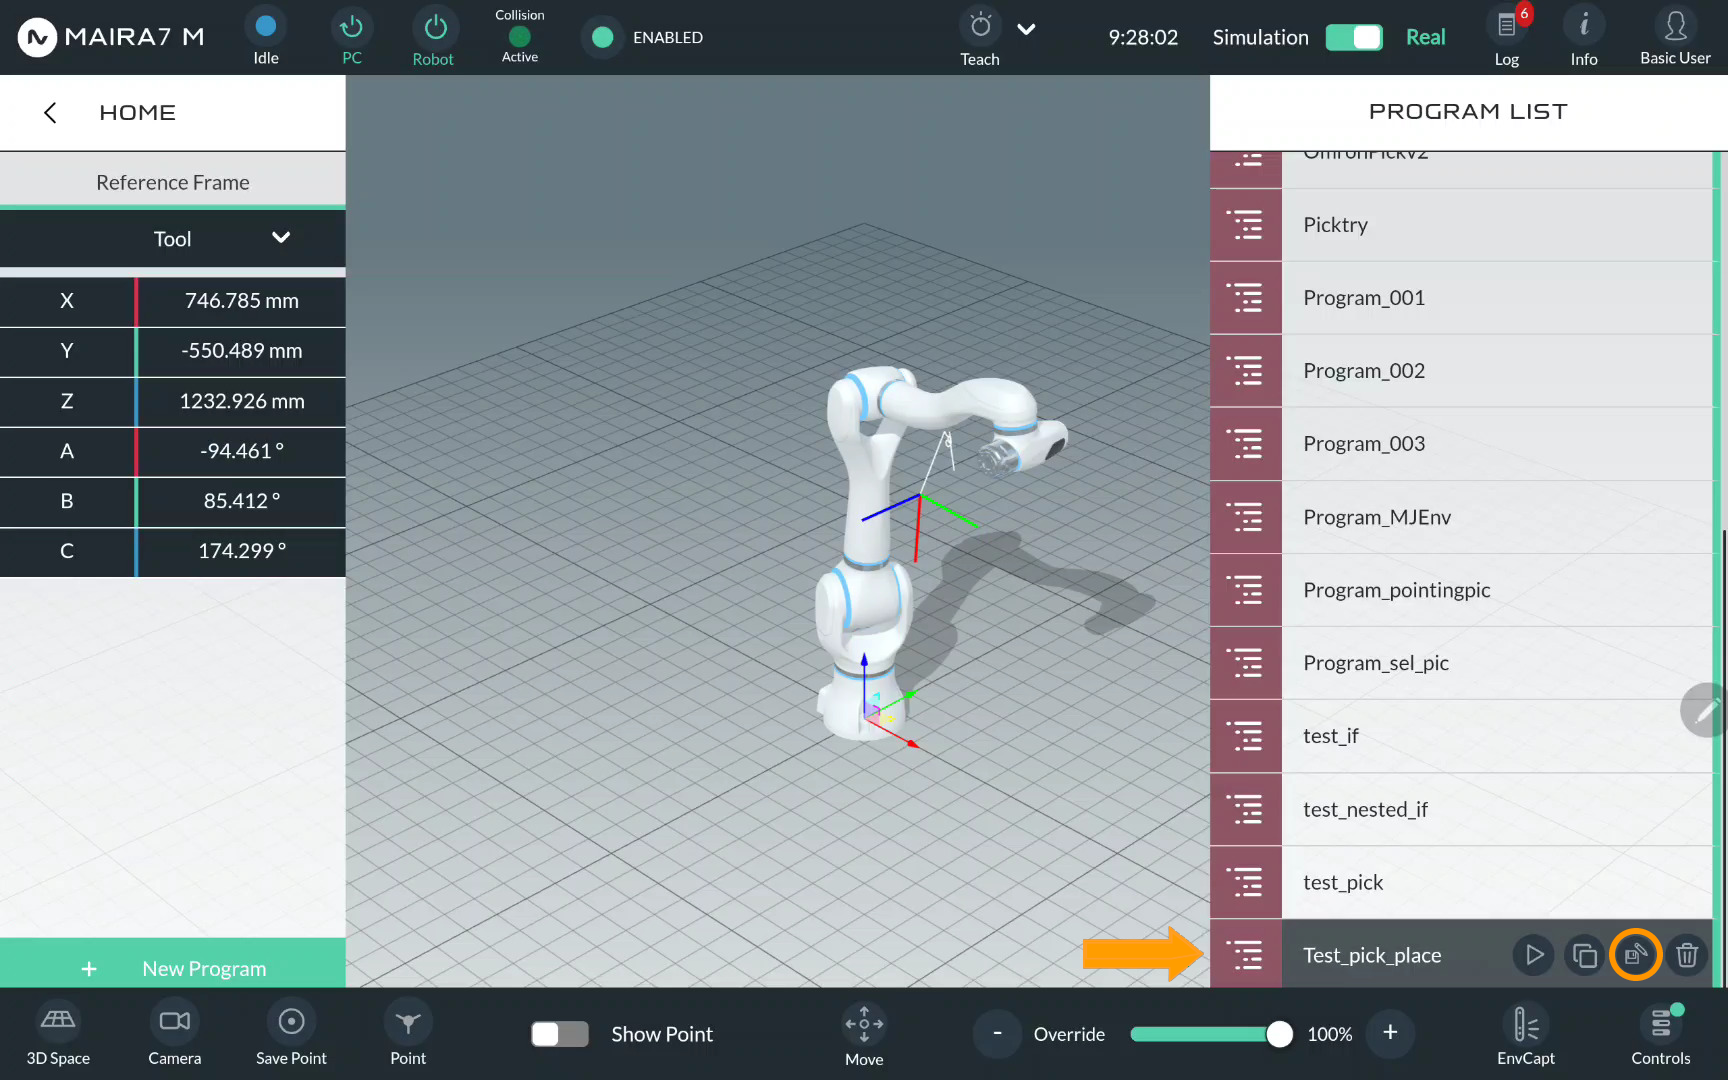
Click to enter the program settings.
After that, you will see the overall scheme of program, comprising motions, logics and apps. Each component of a program belongs to one of these categories. Picks are naturally Motions.
Step 3. Enter Pick Settings
Click for Pick to open a pick configuration menu.
Picks are guided by multiple parameters. Default settings should work in most scenarios. In a simple demo, we only configure some parameters and keep the rest default.
Step 4. Select a Workspace
First, a workspace should be set up.
Click on Workspace. The pre-recorded workspaces are listed to the right (please refer to Workspace Wizard for a workspace recording guide). Choose the workspace from the available options. Drag & drop the selected option to the middle column.

Step 5. Select a Pick Type
Click Pick Type. Choose a pick type and click on a corresponding bullet point. Confirm the choice by clicking Update. To get more information about the available pick types, check out the documention of the Pick v2 App.
General Pick
For a General pick, no additional setting should be specified.
Pose-Agnostic Pick
For a Pose-Agnostic pick, select an object detection model from the list of available models and an object detection method. Please refer to AI Hub for training your own object detection model.
Pose-Aware Pick
For a Pose-Aware (DL) pick, select an pose estimation model and method and an object detecion model and method from the list. Please refer to AI Hub for training your own object detection model.
For a Pose-Aware (Non-DL) pick, select an object detection model and method and an pose estimation method from the list.
Select an object from the list of available objects. Enter a number of objects to be picked.
Marker-Based Pick
For a Marker-Based Pick, start by specifying the type and length of the marker. Then, run the marker detection to obtain the marker’s pose. The detected pose will be displayed in the visualization panel. Optionally, you can define rotational and translational offsets relative to the marker pose to adjust the final grasp pose as needed.
Step 6. Enter Place Settings
Click on for Pick to open a pick configuration menu.

Picks are guided by multiple parameters. Default settings should work in most scenarios. In a simple demo, we only configure some parameters and keep the rest default.
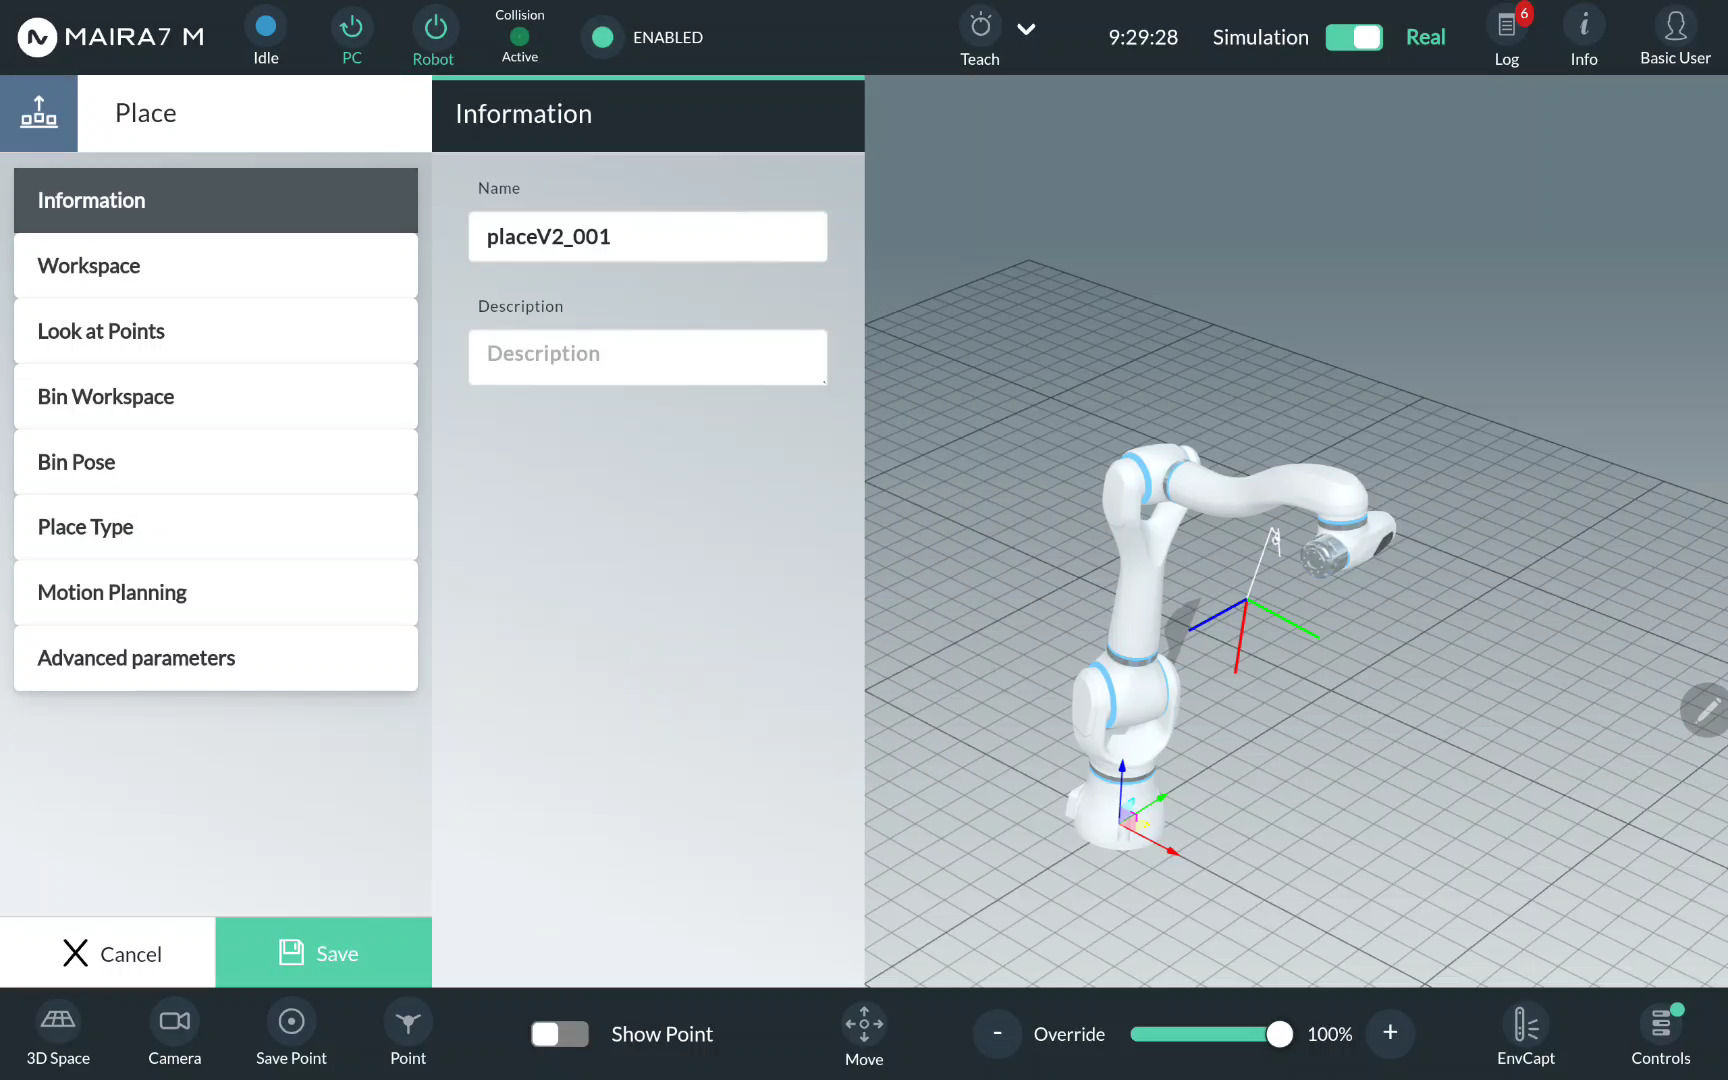
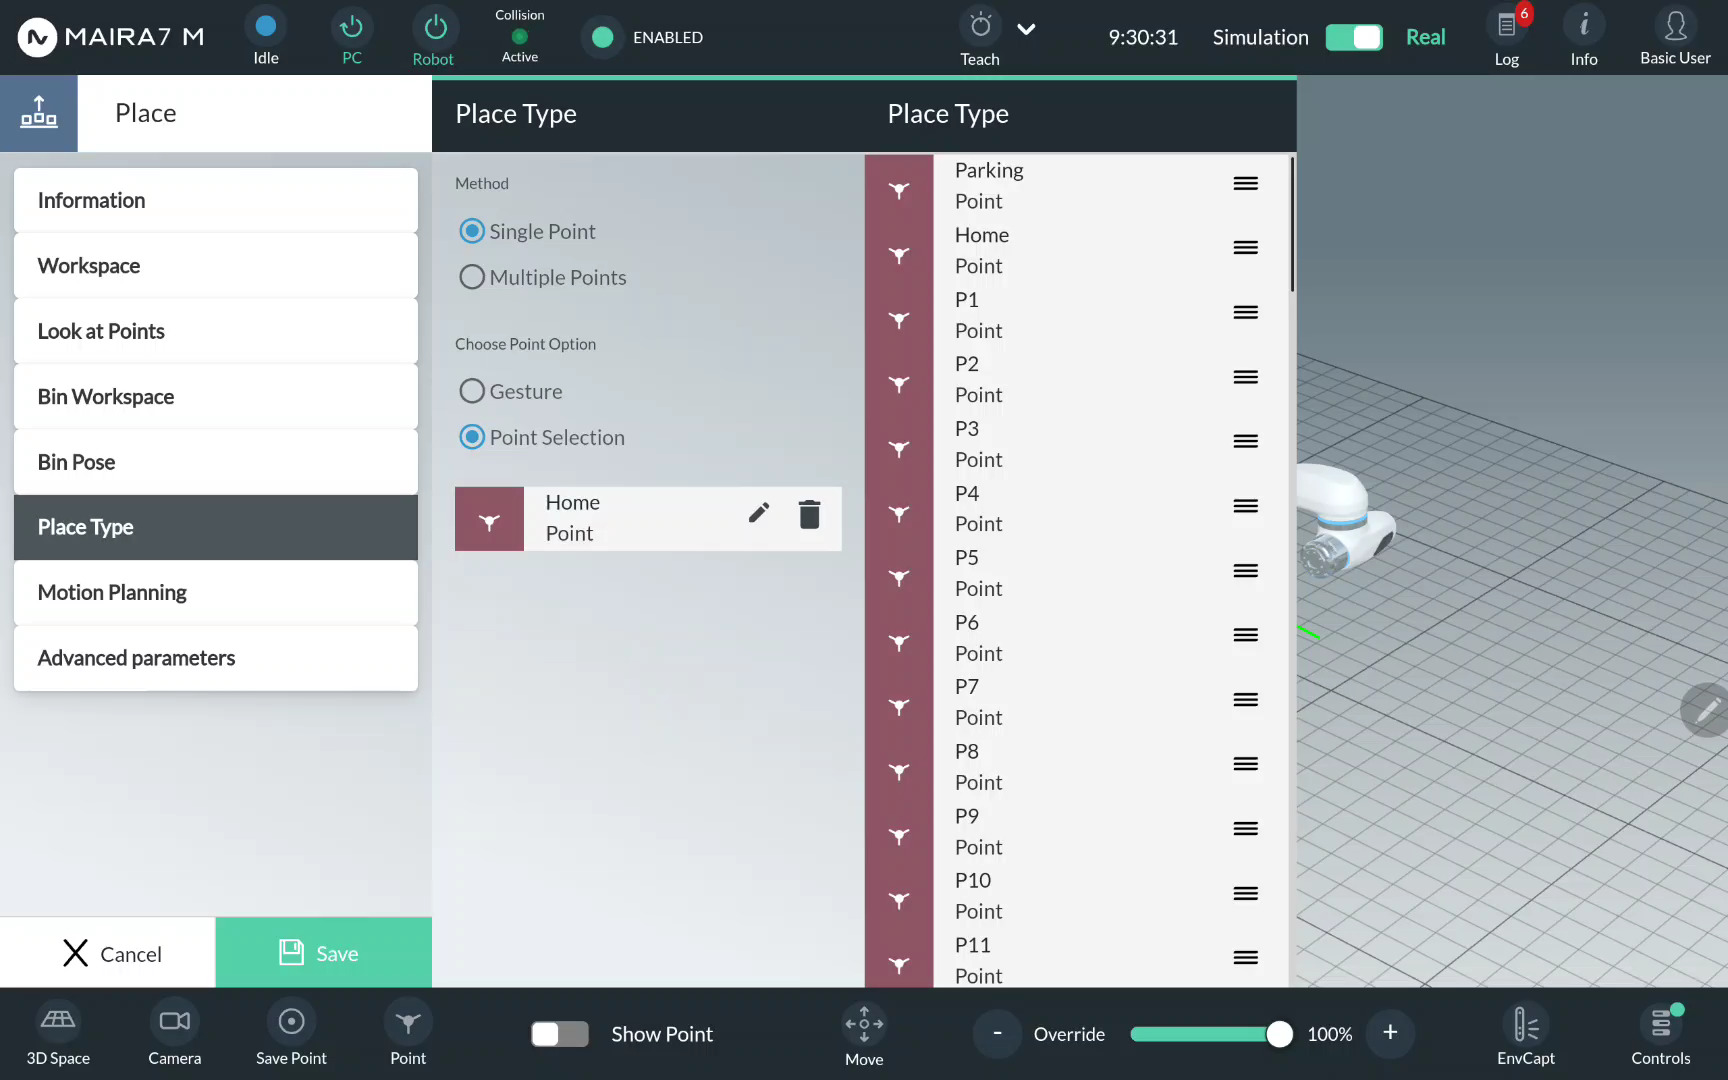
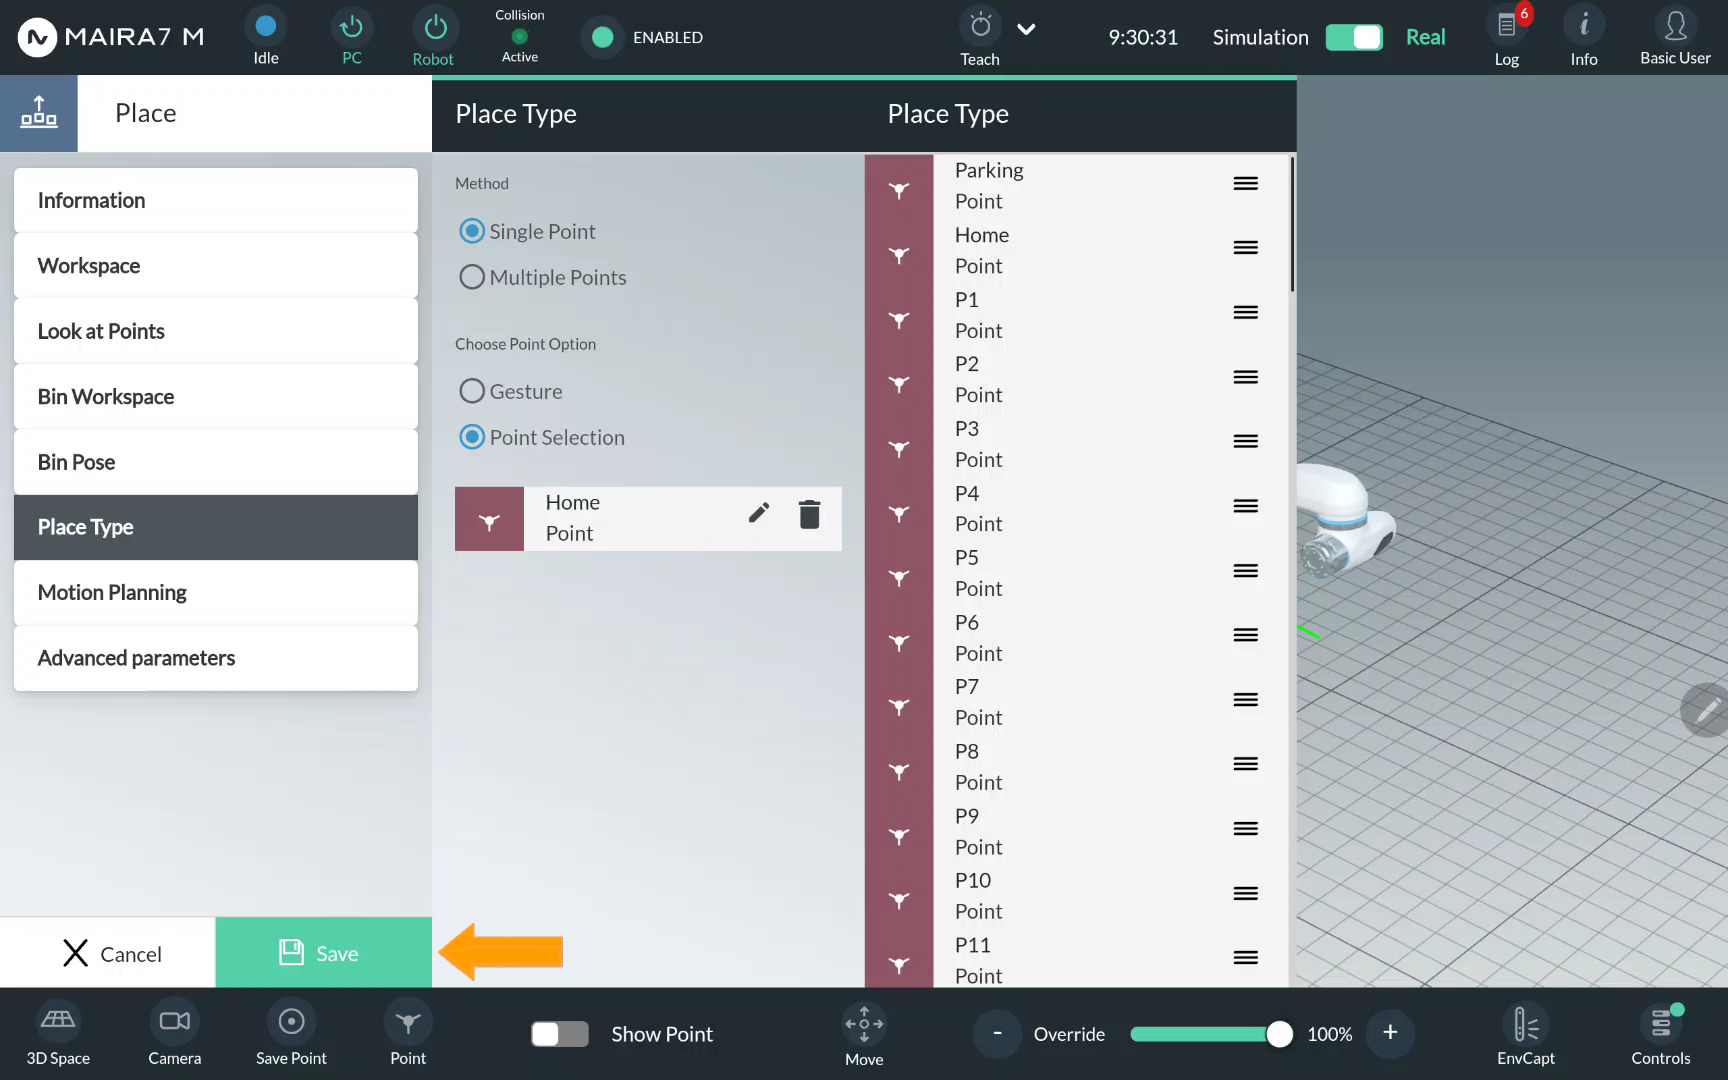
Step 7. Select a Place Type
Click Place Type.
Choose a place type and click on a corresponding bullet point. Confirm the choice by clicking Update.
For a simple placement, i.e. releasing a picked object in a pre-defined place, select Single Point.
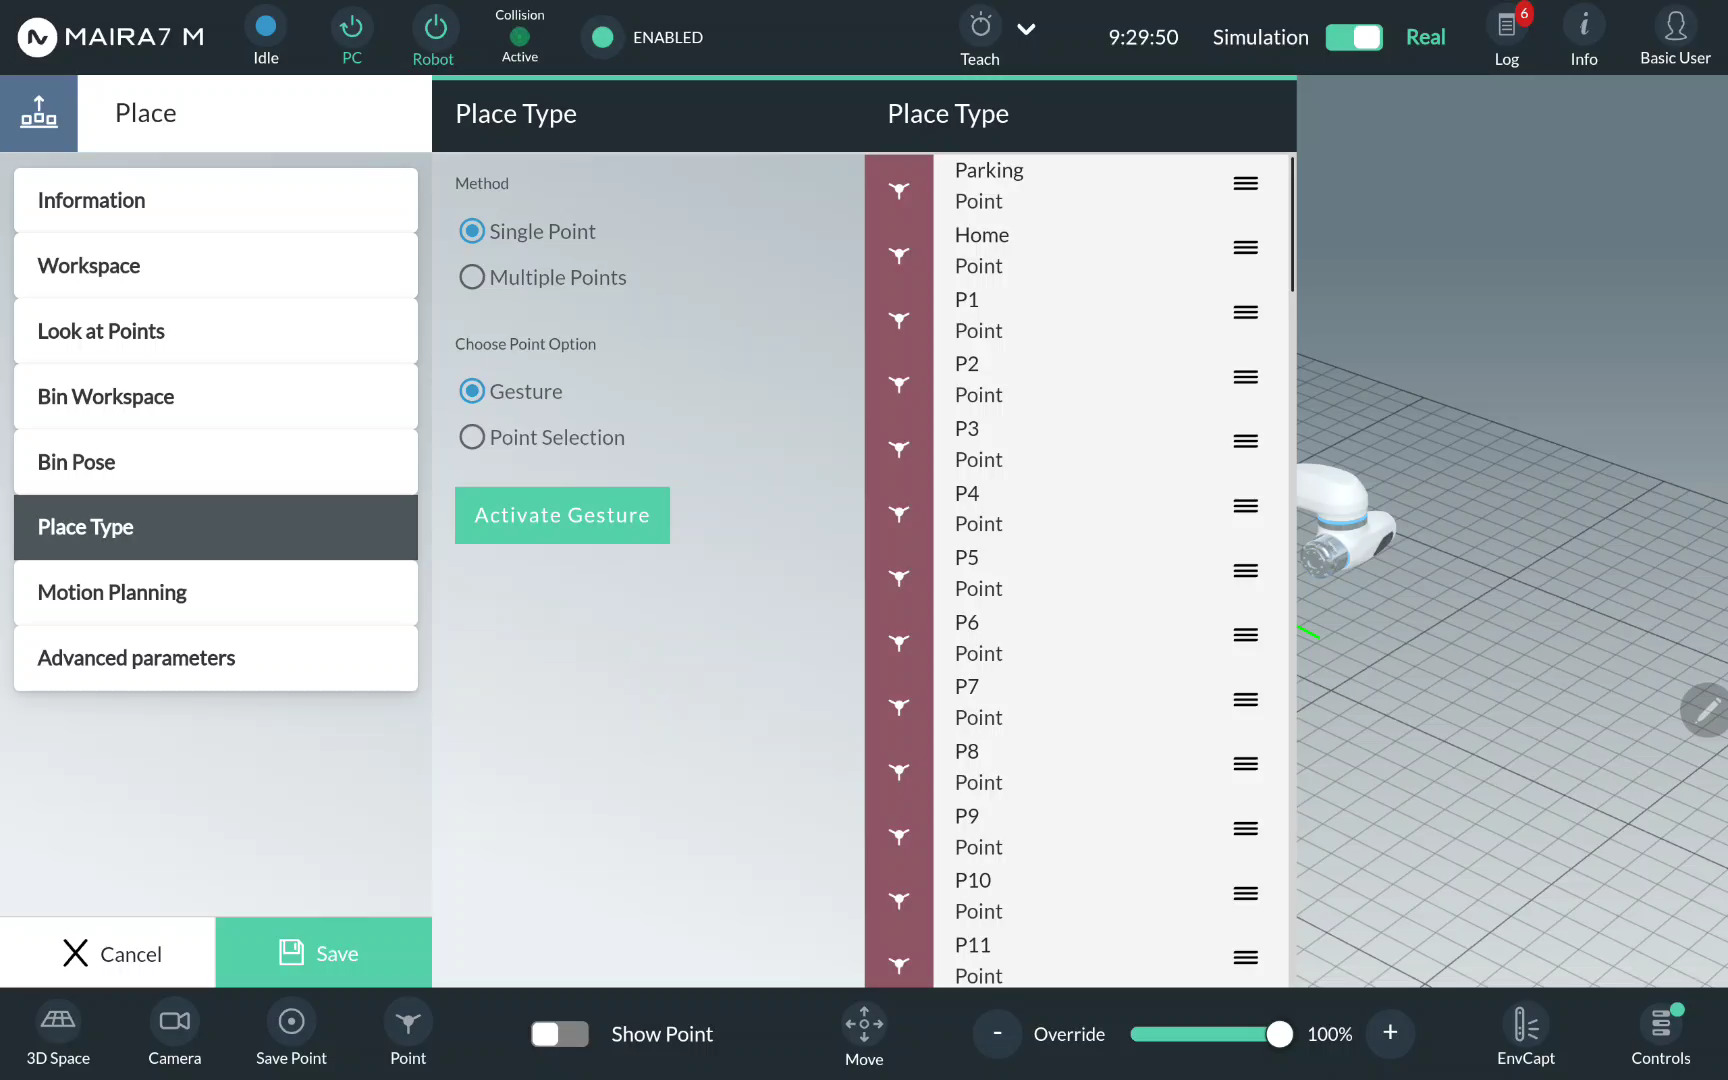
Choose a single place point from the available options. Drag & drop the selected option to the middle column.
Step 8. Save a Program
Save the changes by clicking Save.
Step 9. Start a Program
After saving the program, you would be returned to the Program menu at
Step 2. Now, click to start the program.

Troubleshooting
- Q: The pick is always too high (above the object) or just gently touched the surface of the object.
Check that:
1.
max_apertureanddefault_openingare not too small. Sometimes due to the inprecise measurements, detected objects appear to be larger than real objects.2. the workspace recorded is not too high for the object to be picked. Take a closer look at the point cloud visualized in GUI to ensure the object is fully shown: if not, reduce the height of the workspace.
A general fix is adding a small value to
general_grasp_offset_z.- Q: The program quits right after I click Run button.
Some components may be started incorrectly, e.g., the spawn time of control was longer than expected, or the camera was not started at first.
Go to Supervisord page, which is the default page of the browser. Refresh the page and check if all components are running (especially motion planning and marker detection). If not, please restart them.
- Q: There is a warning/error that the instance segmentation is not working.
The object detection model might be selected incorrectly. Quit the program, go to AI settings, and select the suitable model.
- Q: There is a warning/error that no object is detected.
Check if the correct model for instance segmentation is selected. If so, please make sure the object is visible. If the problem persists, please retrain your object detection model with other lighting condition and background.
- Q: The pick is not aligned with the object geometry.
Check if the object is close to the workspace boundary. If so, move the object to the middle of the workspace, or enlarge the workspace.
Note
If you change the workspace size, please make sure the updated workspace is fully visible from the current look-at point.
Please also check if the point cloud is of sufficient quality. E.g., if the object to be grasped is dark or shiny, under some lighting conditions the camera may work not as expected. In this case, please adjust the lightning to ensure the point cloud quality is reasonably good.
- Q: There is always a warning about no collision-free pick.
Sometimes, possible picks can be mistaken for collisions due to point cloud quality. In this case, you could adjust
default_opening(+-10mm).Alternatively, if using General picks, you could disablecollision_pcd.- Q: Sometimes objects are picked successfully and sometimes not.
For different objects, the best results can be achieved with different grasp parameters. If your finger tip is flexible, you may also try disabling
collision_workspaceandcollision_pcd.- Q: No valid grasp is generated even after long-lasting object detection.
Please first check if too many irrelevant points are visible. If so, adjust your workspace so that fewer such points are inside the workspace. For small objects, please make sure that the objects are still visible.
Add a New Object
This tutorial guides you through the process of adding a new object primarily using AI Hub. The steps include registering a 3D mesh model, preparing an object detection model, and configuring pose estimation and grasping capabilities. Follow these steps to enable your robot to recognize, locate, and manipulate new objects.
Step 1. Register a 3D Mesh Model
You can upload a pre-existing 3D mesh model of an object to the AI Hub using AI Hub: Data Management. See Tutorial: Upload A Mesh Model
See also
For a programmatic approach to perform data management, refer to API: Data Management Client.
Use AI Hub: 3D Object Scanning (Scan Box only) to create a texturized 3D mesh model of your desired object(s).
See also
For a programmatic approach to perform workspace/environment scanning, refer to API: Robot Scan Client.
Step 2. Prepare an Object Detection model
Use AI Hub: Data Generation to generate one/several dataset(s) consisting your desired object(s).
For detailed instructions on creating synthetic and/or real datasets, refer to:
See also
To programmatically generate a dataset, refer to the following client APIs:
Utilize AI Hub: Model Training and Testing to train an object detection model on your registered dataset(s). See Tutorial: Train an Object Detection Model
See also
For a programmatic approach to train and infer an object detection model, go to API: Instance Segmentation Client
Step 3. Prepare a Pose Estimation model
The default pose estimation model general/v_1 that uses the method
neura_nonDLPE1 is a deterministic pose estimation algorithm. After
registering the object mesh model, no additional action is required to use
this model to perform 6D object pose estimation.
Attention
Currently, no pose estimation method that require training are available.
See also
For a programmatic approach to infer a pose estimation model, go to API: Pose Estimation Client
Step 4. Enable Grasping
To perform pose-aware picks in an application, one is required to record grasps of the objects that will be picked. See Tutorial: Enable Grasping of New Object to learn how to teach grasp poses.
Enable Grasping of New Object
In pose-aware picking applications, grasp generation is a required step. To enable grasping for a specific object, first collect a dataset of valid grasps for that object, then use this dataset to train a grasp generation model. Once trained, the model can predict feasible grasp poses for the object during operation.
Preparation
Activate the robot.
Ensure ZeroG is available.
Upload your object folder to
/data/object_perception/objects/user_objects(only needed if object not already loaded).Ensure the workspace is clean and collision-free.
Caution
The object should not be moved during the whole recording process, because the captured data is transformed into the object’s coordinate frame.
Usage
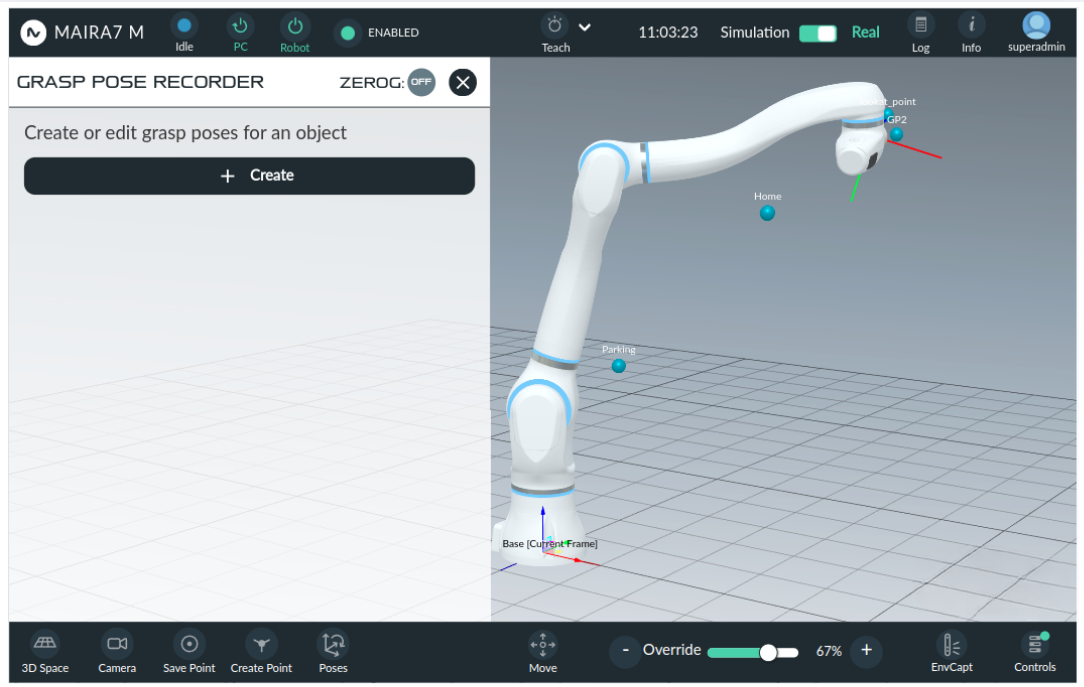
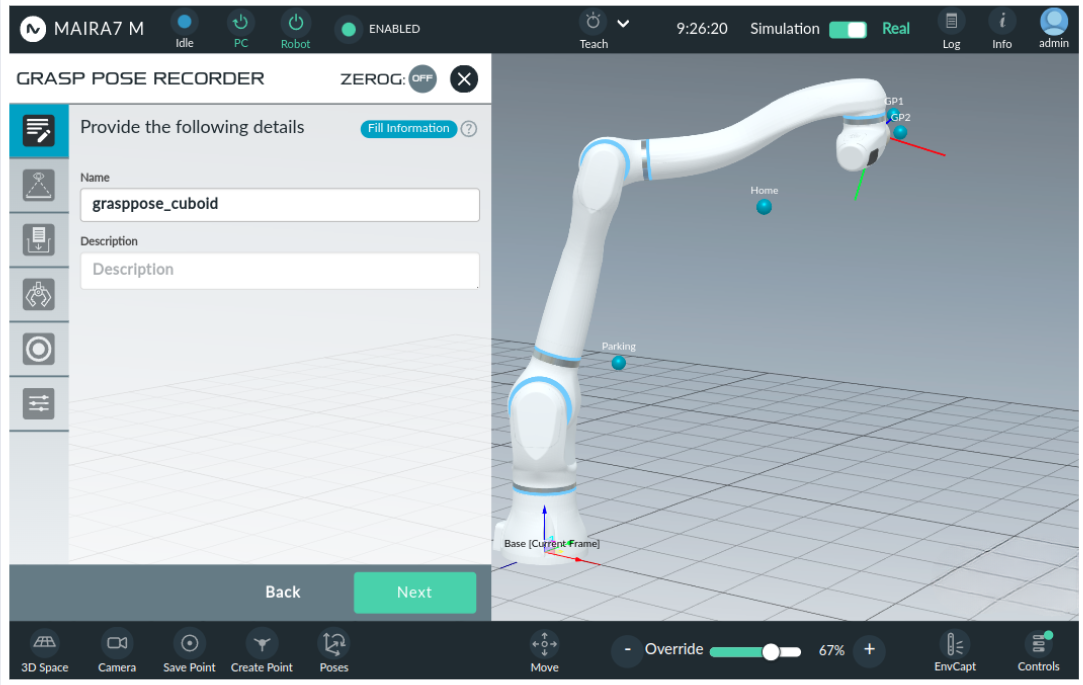
Step 1: Start Grasp Recorder Wizard
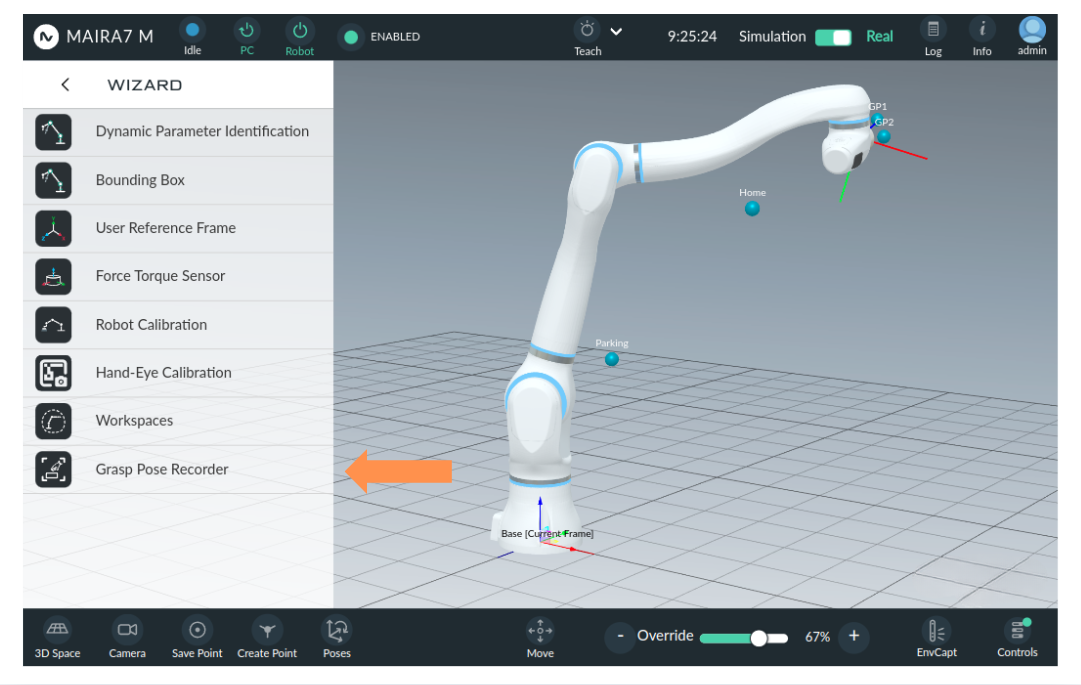
You can find the Workspace Wizard by navigating to Home Menu > Wizard > Grasp Pose Recorder.
Hint
If a gripper is mounted, verify that the correct tool is selected in the system settings. When the tool transformation is defined for the gripper’s closed state, ensure the gripper is physically open during recording. This guarantees accurate referencing and proper alignment of the recorded data.
Step 2: Add a New Grasp Recording Configuration
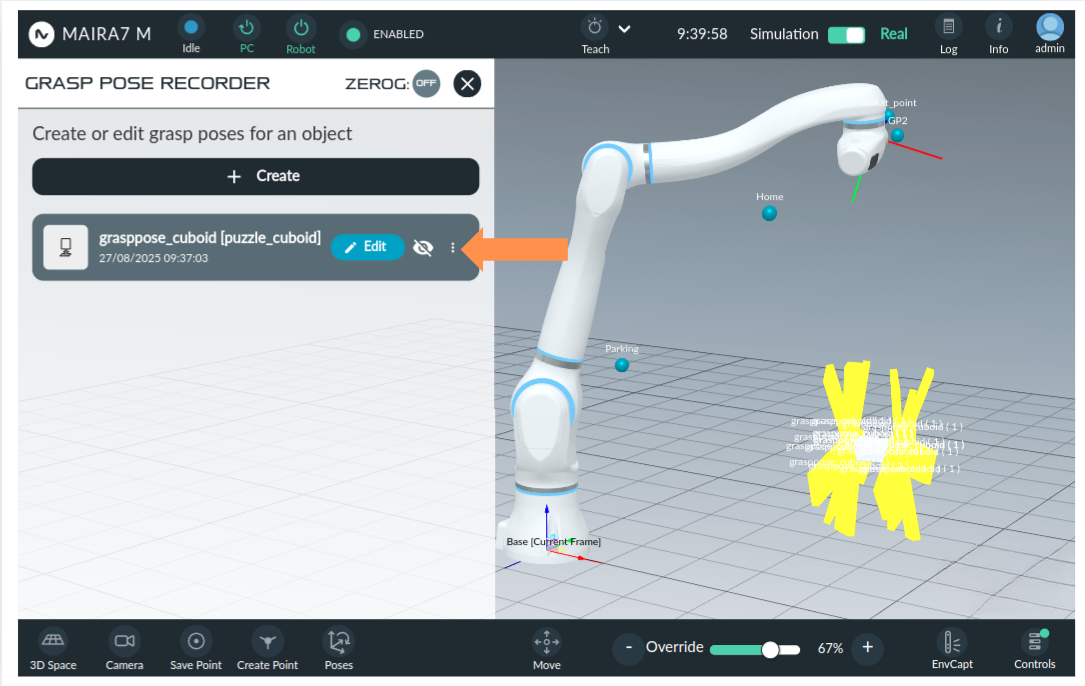
On the front page, you can view and manage all recorded grasp configurations or create new ones. To create a new configuration, click . Saved configurations typically display the object name, the last activity timestamp, and the configuration name for easy identification.
To visualize pre-recorded grasps in the GUI, select the desired configuration. Then, use the eye button to display the grasps. To modify the a pre-defined configuration, click Edit.
To create a new configuration, click . Give a unique name to the new grasp recording configuration.
Step 3: Select a Look-at Point
A look-at point is the position the robot moves to before scanning the workspace. Select the desired look-at point from the list of pre-recorded points.
Important
Select a look-at point that provides a clear view of the entire workspace.

Step 4: Choose Gripper, Gripper Type and Teach Method
Set up the configuration by specifying the following parameters:
Gripper: Choose the gripper from the list of tools already defined in the system settings.
Gripper type: Select either Two Finger Gripper or Suction Gripper.
Teach method: Choose between Robot and Hand for the teaching mode.
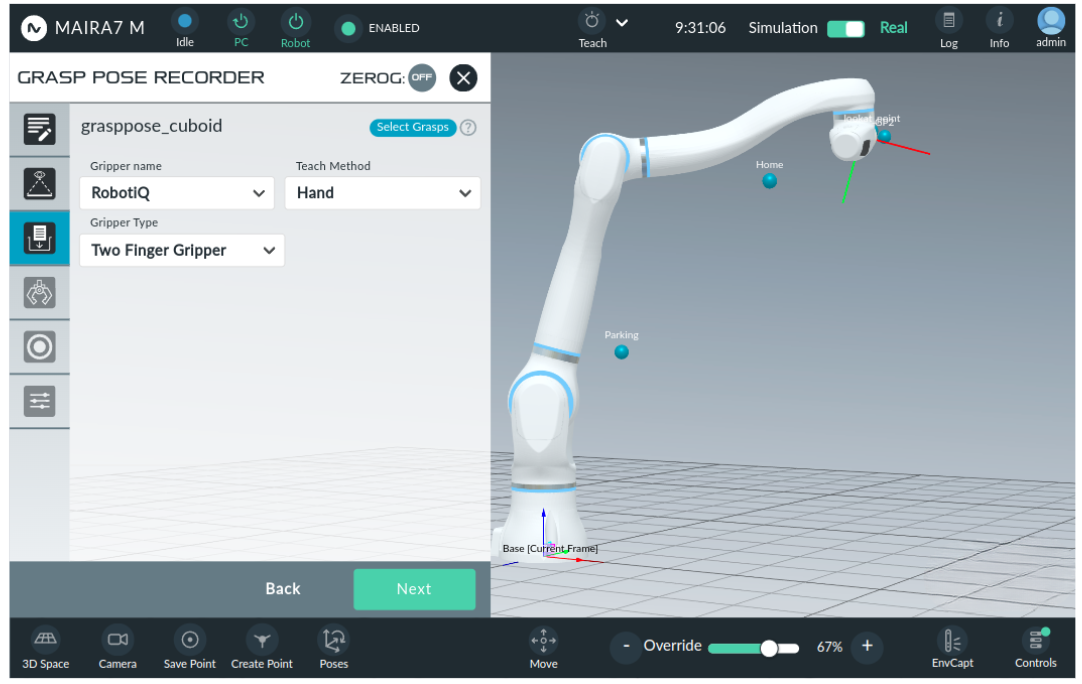
Hint
If the gripper is not listed in the drop-down menu, it is likely not yet defined. Create a new tool in the system settings.
Robot Mode:
When using Robot mode, you can move the robot to a desired position, and that position is saved as the grasp pose for the object. You can also define the grasp quality and specify the gripper’s opening width.
Hand Mode:
In Hand mode, you demonstrate the grasp manually using your right hand. Position your index finger and thumb to indicate the grasp on the object. The system detects your hand and displays it in the GUI for guidance.
Step 5: Object Detection and Pose Estimation
Before recording a grasp pose, the object must be detected, and its current pose must be defined. This step requires selecting the appropriate AI models.
Object detection and pose estimation method: Select the detection method and model for Object Detection and Pose Estimation.
Object: Select the object from the drop-down list of objects which is supported by the selected detection method and pose estimation model.
Click Detect Pose to initiate object pose detection. Wait until the object is detected and displayed in the GUI.

Attention
Ensure the object is fully visible and not occluded by any other items. This is the final opportunity to verify visibility before recording begins.
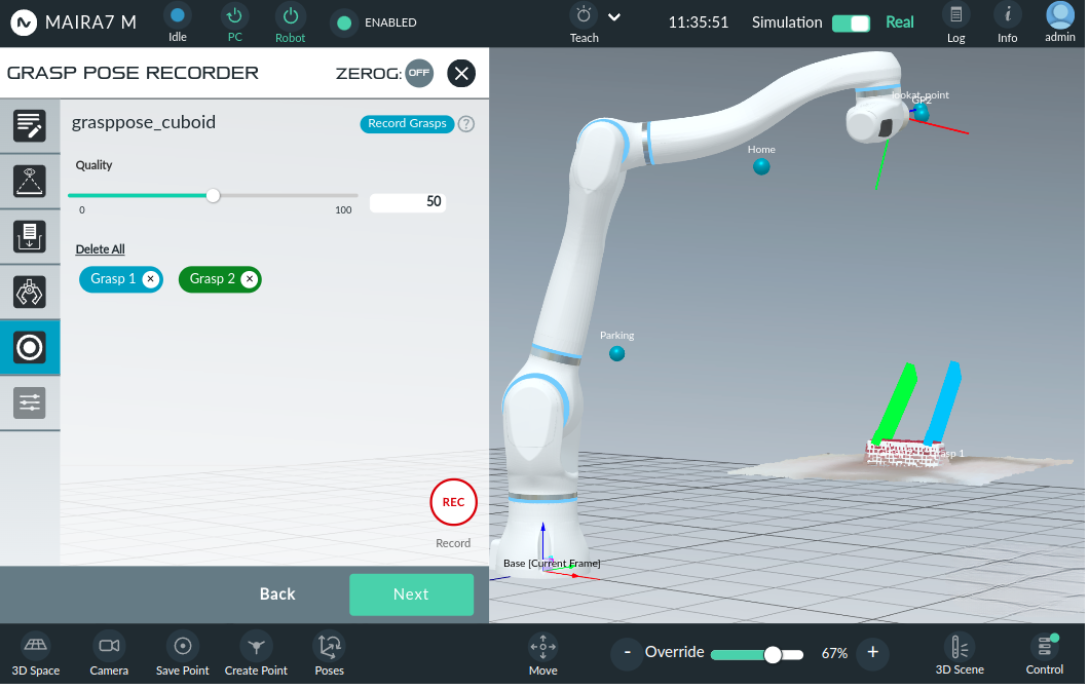
Step 6: Record Grasp Candidates
Set the grasp quality. This is defined as a numeric value between 0 and 100, where 100 represents the most preferred grasp and 0 the least preferred.
During the picking application, the grasping algorithm filters out invalid grasp options (e.g., those failing collision or orientation constraints). The remaining grasps are then ranked by their quality scores, with higher-scored candidates prioritized at the top of the execution list and lower-scored grasps attempted later.
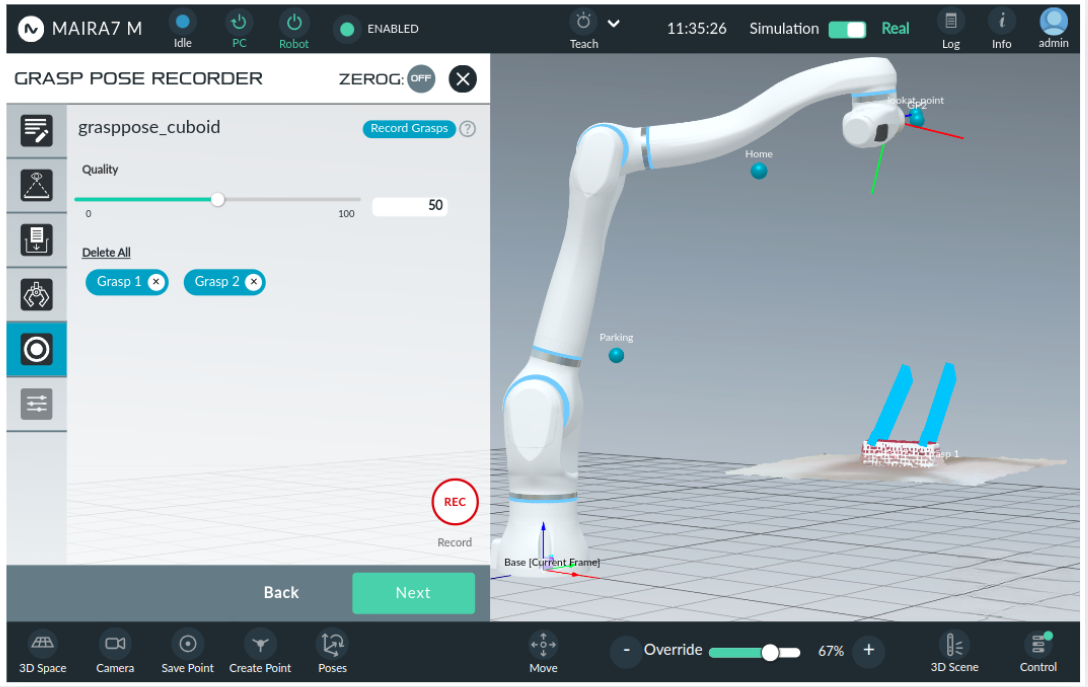
In the following example, we use the Hand method to record a grasp. Click on the red Rec button to start the recording. A window will appear showing the current camera view. Position your right hand where you want to grasp the object, keep it steady for a few seconds, and wait for a positive beep sound. The grasp is now saved - You should see an icon with its name displayed, and a simplified gripper visualization next to the object on the screen.
If you are using the Robot method, first move the robot to the desired grasp position, then press the Rec button. Make sure the object remains stationary during this process.
To check and visualize a particular grasp, click on the grasp icon with the name. To discard a specific grasp, click the discard button (X) next to the recorded grasp. To remove all recorded grasps at once, click the button.
Step 7: Post-Process
Once the recorded grasps are saved, they can be fine-tuned during post-processing, which offers options to enhance, visualize, and adapt the grasps.
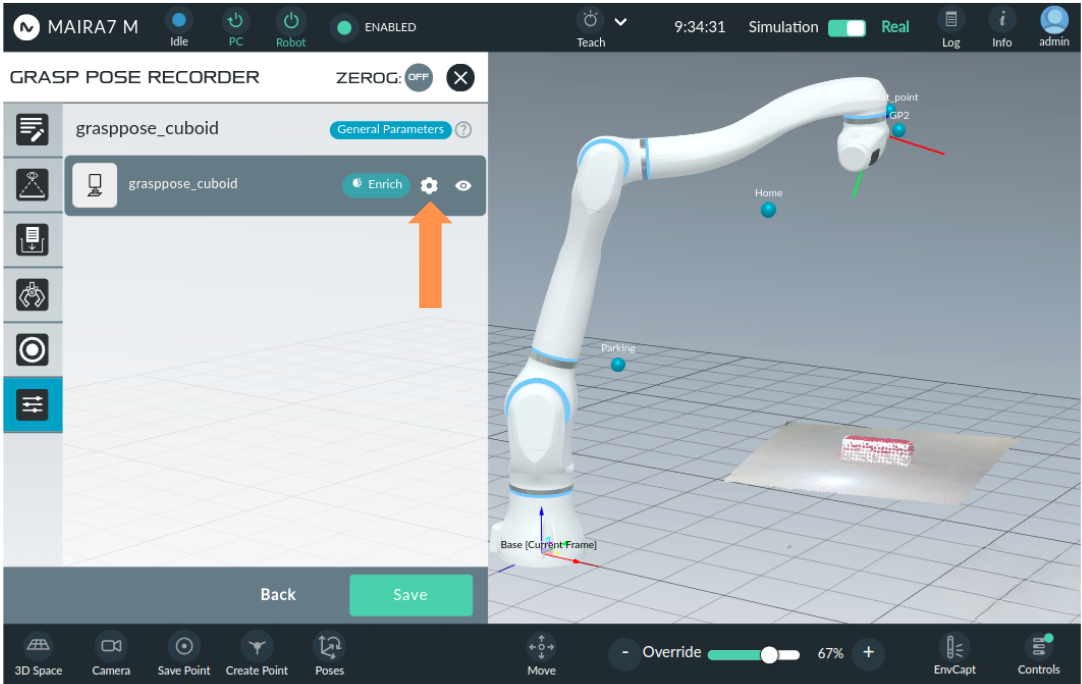
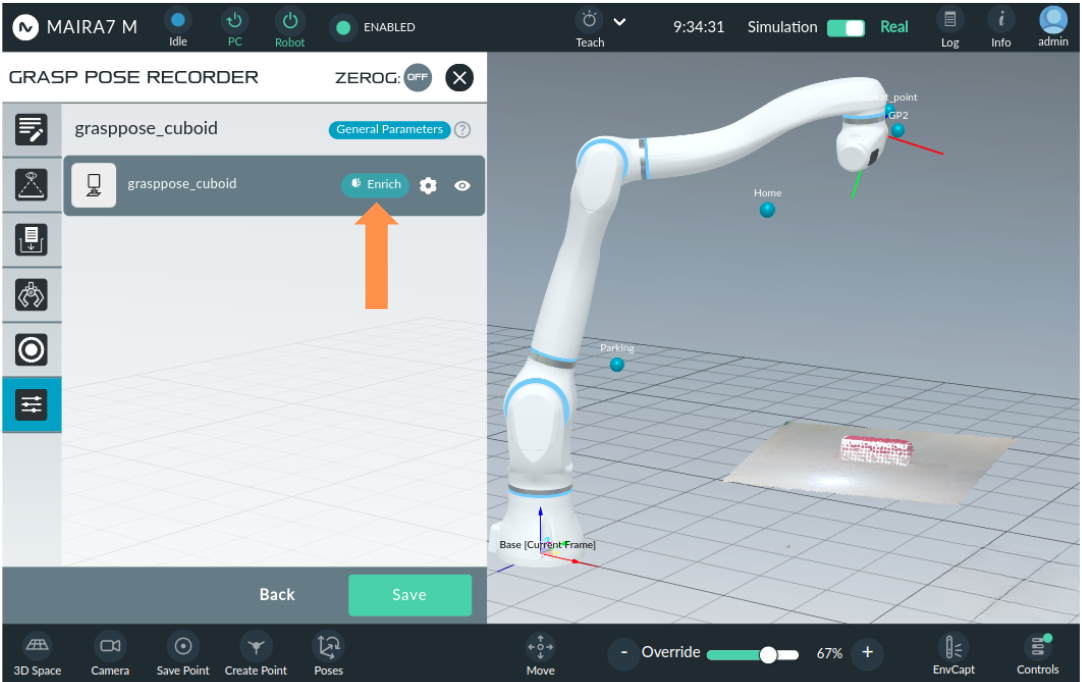
Enrich:
Enrich is a feature that generates multiple grasp candidates from the recorded grasps. Users can provide as few as one recorded grasp to create multiple candidate grasps. Click on the Settings button, to update the parameters for the enrichment process.
- Parameters:
x_angle_min: the minimum x-rotation interval of enriched candidates [-3.14 - 3.14]x_angle_max: the maximum x-rotation interval of enriched candidates [-3.14 - 3.14]y_angle_min: the minimum y-rotation interval of enriched candidates [-3.14 - 3.14]y_angle_max: the maximum y-rotation interval of enriched candidates [-3.14 - 3.14]z_angle_min: the minimum z-rotation interval of enriched candidates [-3.14 - 3.14]z_angle_max: the maximum z-rotation interval of enriched candidates [-3.14 - 3.14]x_displacement_min: the minimum x-translation interval of enriched candidates [-1.0 - 1.0]x_displacement_max: the maximum x-translation interval of enriched candidates [-1.0 - 1.0]y_displacement_min: the minimum y-translation interval of enriched candidates [-1.0 - 1.0]y_displacement_max: the maximum y-translation interval of enriched candidates [-1.0 - 1.0]z_displacement_min: the minimum z-translation interval of enriched candidates [-1.0 - 1.0]z_displacement_max: the maximum z-translation interval of enriched candidates [-1.0 - 1.0]x_rotate_times: the number of steps to rotate the grasp pose around the x-axis during enrichment [0 - 1000]y_rotate_times: the number of steps to rotate the grasp pose around the y-axis during enrichment [0 - 1000]z_rotate_times: the number of steps to rotate the grasp pose around the z-axis during enrichment [0 - 1000]x_translate_times: the number of steps to translate the grasp pose on the x-axis [0 - 1000]y_translate_times: the number of steps to translate the grasp pose on the y-axis [0 - 1000]z_translate_times: the number of steps to translate the grasp pose on the z-axis [0 - 1000]sample_points: the number of samples points from mesh to pointcloud [0 - 500000]leaf_size: the downsampling leaf size [0.001 - 0.1]min_percentage: the minimum percentage of points that should be close enough to the fingertips [0.0001 - 1.0]middle_difference: the minimum allowed difference in percentage of distance between the object and the left and right finger [0.0001 - 1.0]touch_threshold: the points of object that have less distance than touch_threshold will be treated as touched points [0.0001 - 1.0]friction_angle: the friction angle for stability check [0.0 - 1.57]mesh_scale: the scale factor of the current object mesh, e.g. 0.001 for mm [0.001 - 1000]
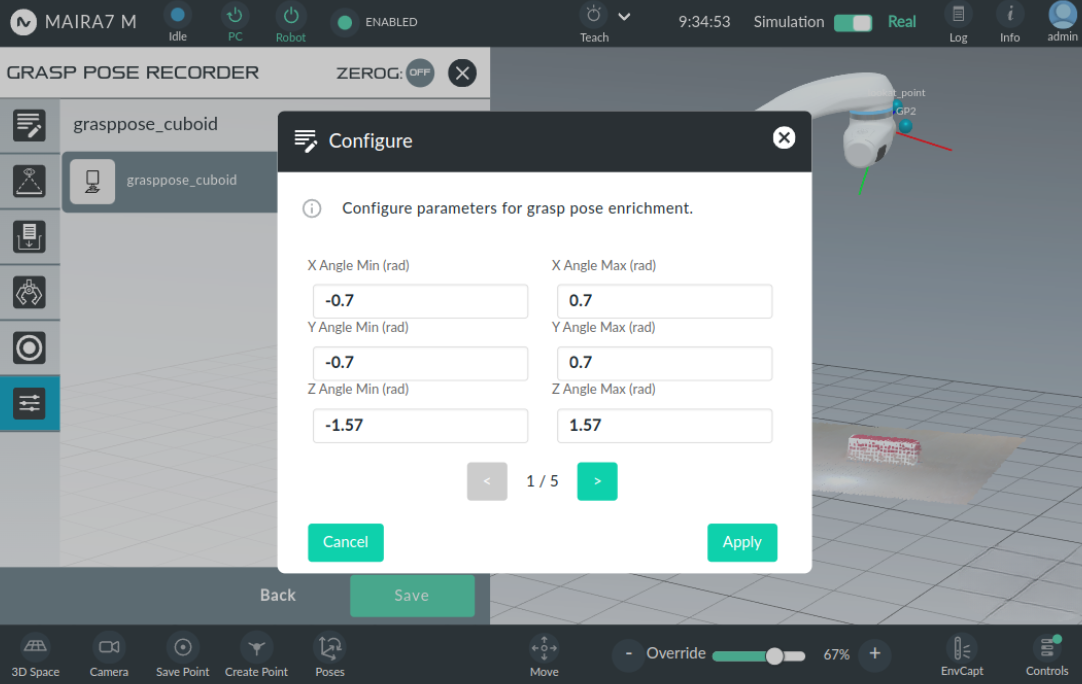
Once the parameters are set, click Apply to save them and Enrich to generate the enriched grasps. The enrichment process may take few seconds to complete.
Once it is done, use the eye symbol to visualize the graps on the screen.
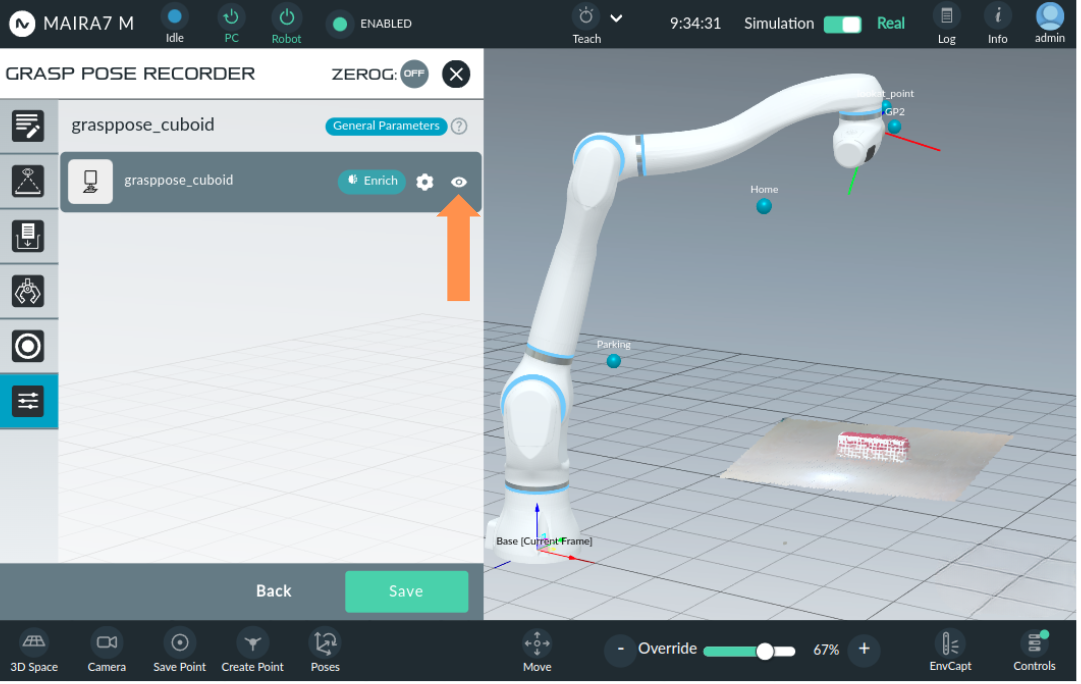
The visualize button will pop up a window with the following options:
: all pre-saved grasp poses are shown (parent and child grasp poses).
: only taught grasp poses are shown (parent pose).
: only child grasp poses are shown.
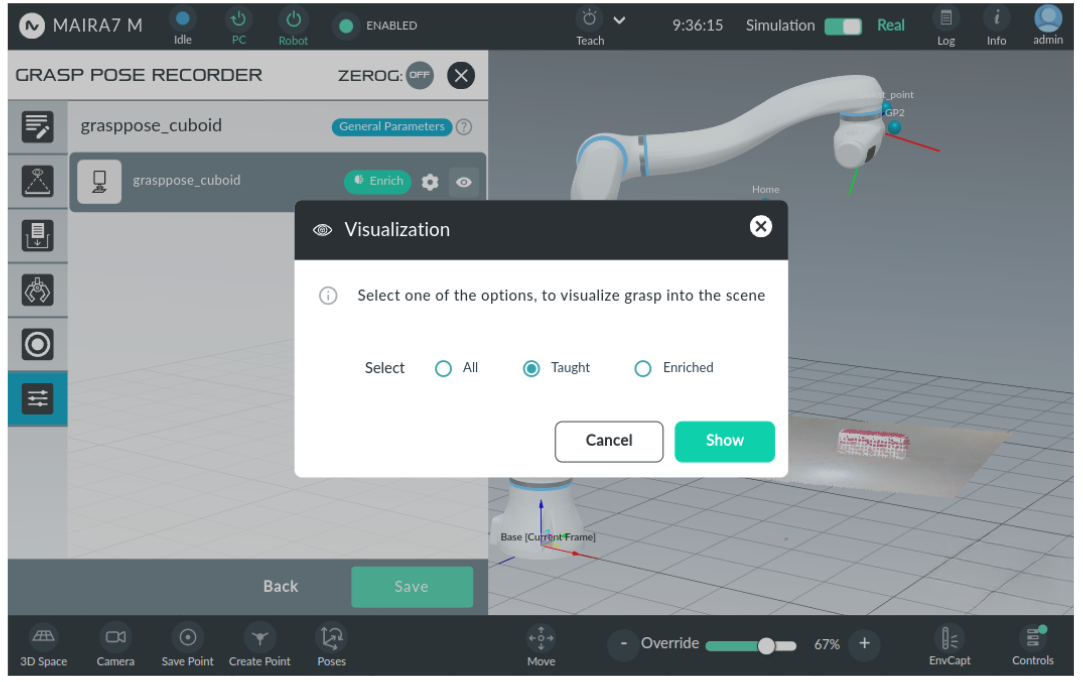
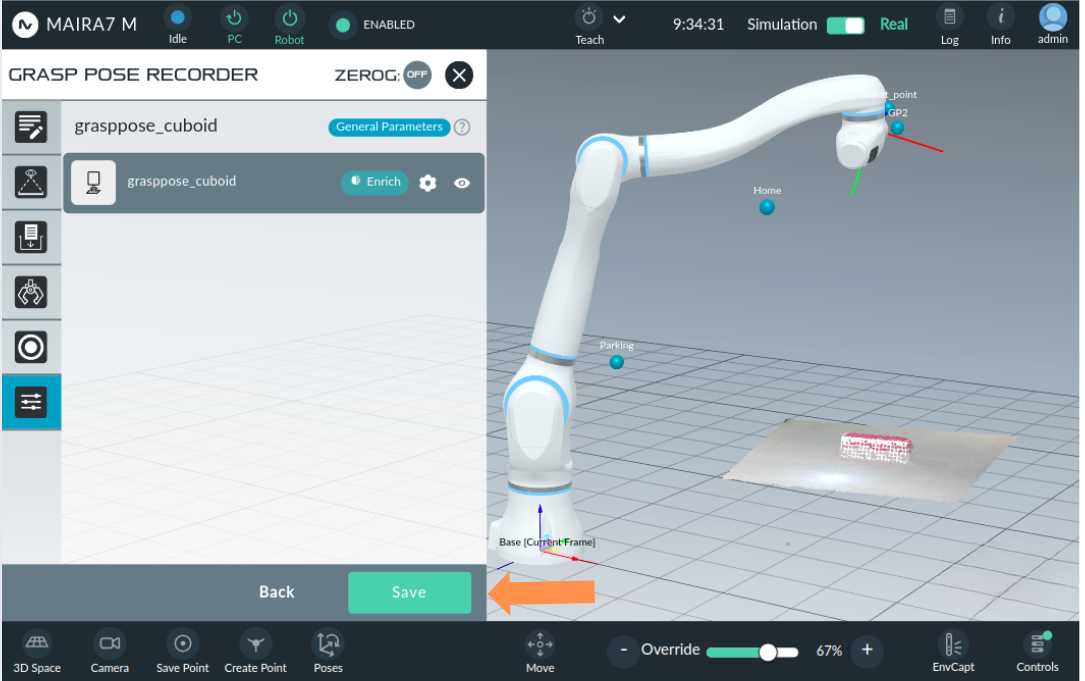
To complete the grasp pose recording procedure, click the Save button to save the recorded grasps.
Troubleshooting
- Q: After click Detect object pose, application waits for long time
It may happen if you are trying to use object detection or pose estimation model for the first time during the current session, as it takes time to set the model up. Please wait.
- Q: Detect object pose failed
Please check if you loaded the correct object detecion and pose estimation model. Please also check if the object is fully visible.
- Q: There is no object visualized in the GUI
Please check if
<your object name>_downsampled.objfile exists.- Q: My hand pose not recorded correctly.
1. Please make sure you are using your index finger and thumb on your right hand. 2. Please make sure that these fingers are fully visible during the recording.
- Q: My recorded pose is wrong in Robot mode.
Please make sure you are using the correct gripper and the offset of the TCP of the gripper is set correctly. Please make sure that ZeroG if turned off.
- Q: I want to record grasps on the opposite side of the object.
First, the user can create a configuration and record a few grasps on one side of the object, save it. Later, the user can rotate the object, open the same configuration in edit mode, and add more grasps from the other side.
- Q: My enrich failed.
It may happen if the origin recorded grasps are not close enough to a perfect grasping pose. Or the object shape is not suitable under the current parameter settings.
Try setting larger values for
sample_points,touch_threshold, andleaf_sizeparameters, if recording grasps for small objects.Try increasing translation/rotation times for a better result (note that it will increase the computation time respectively).
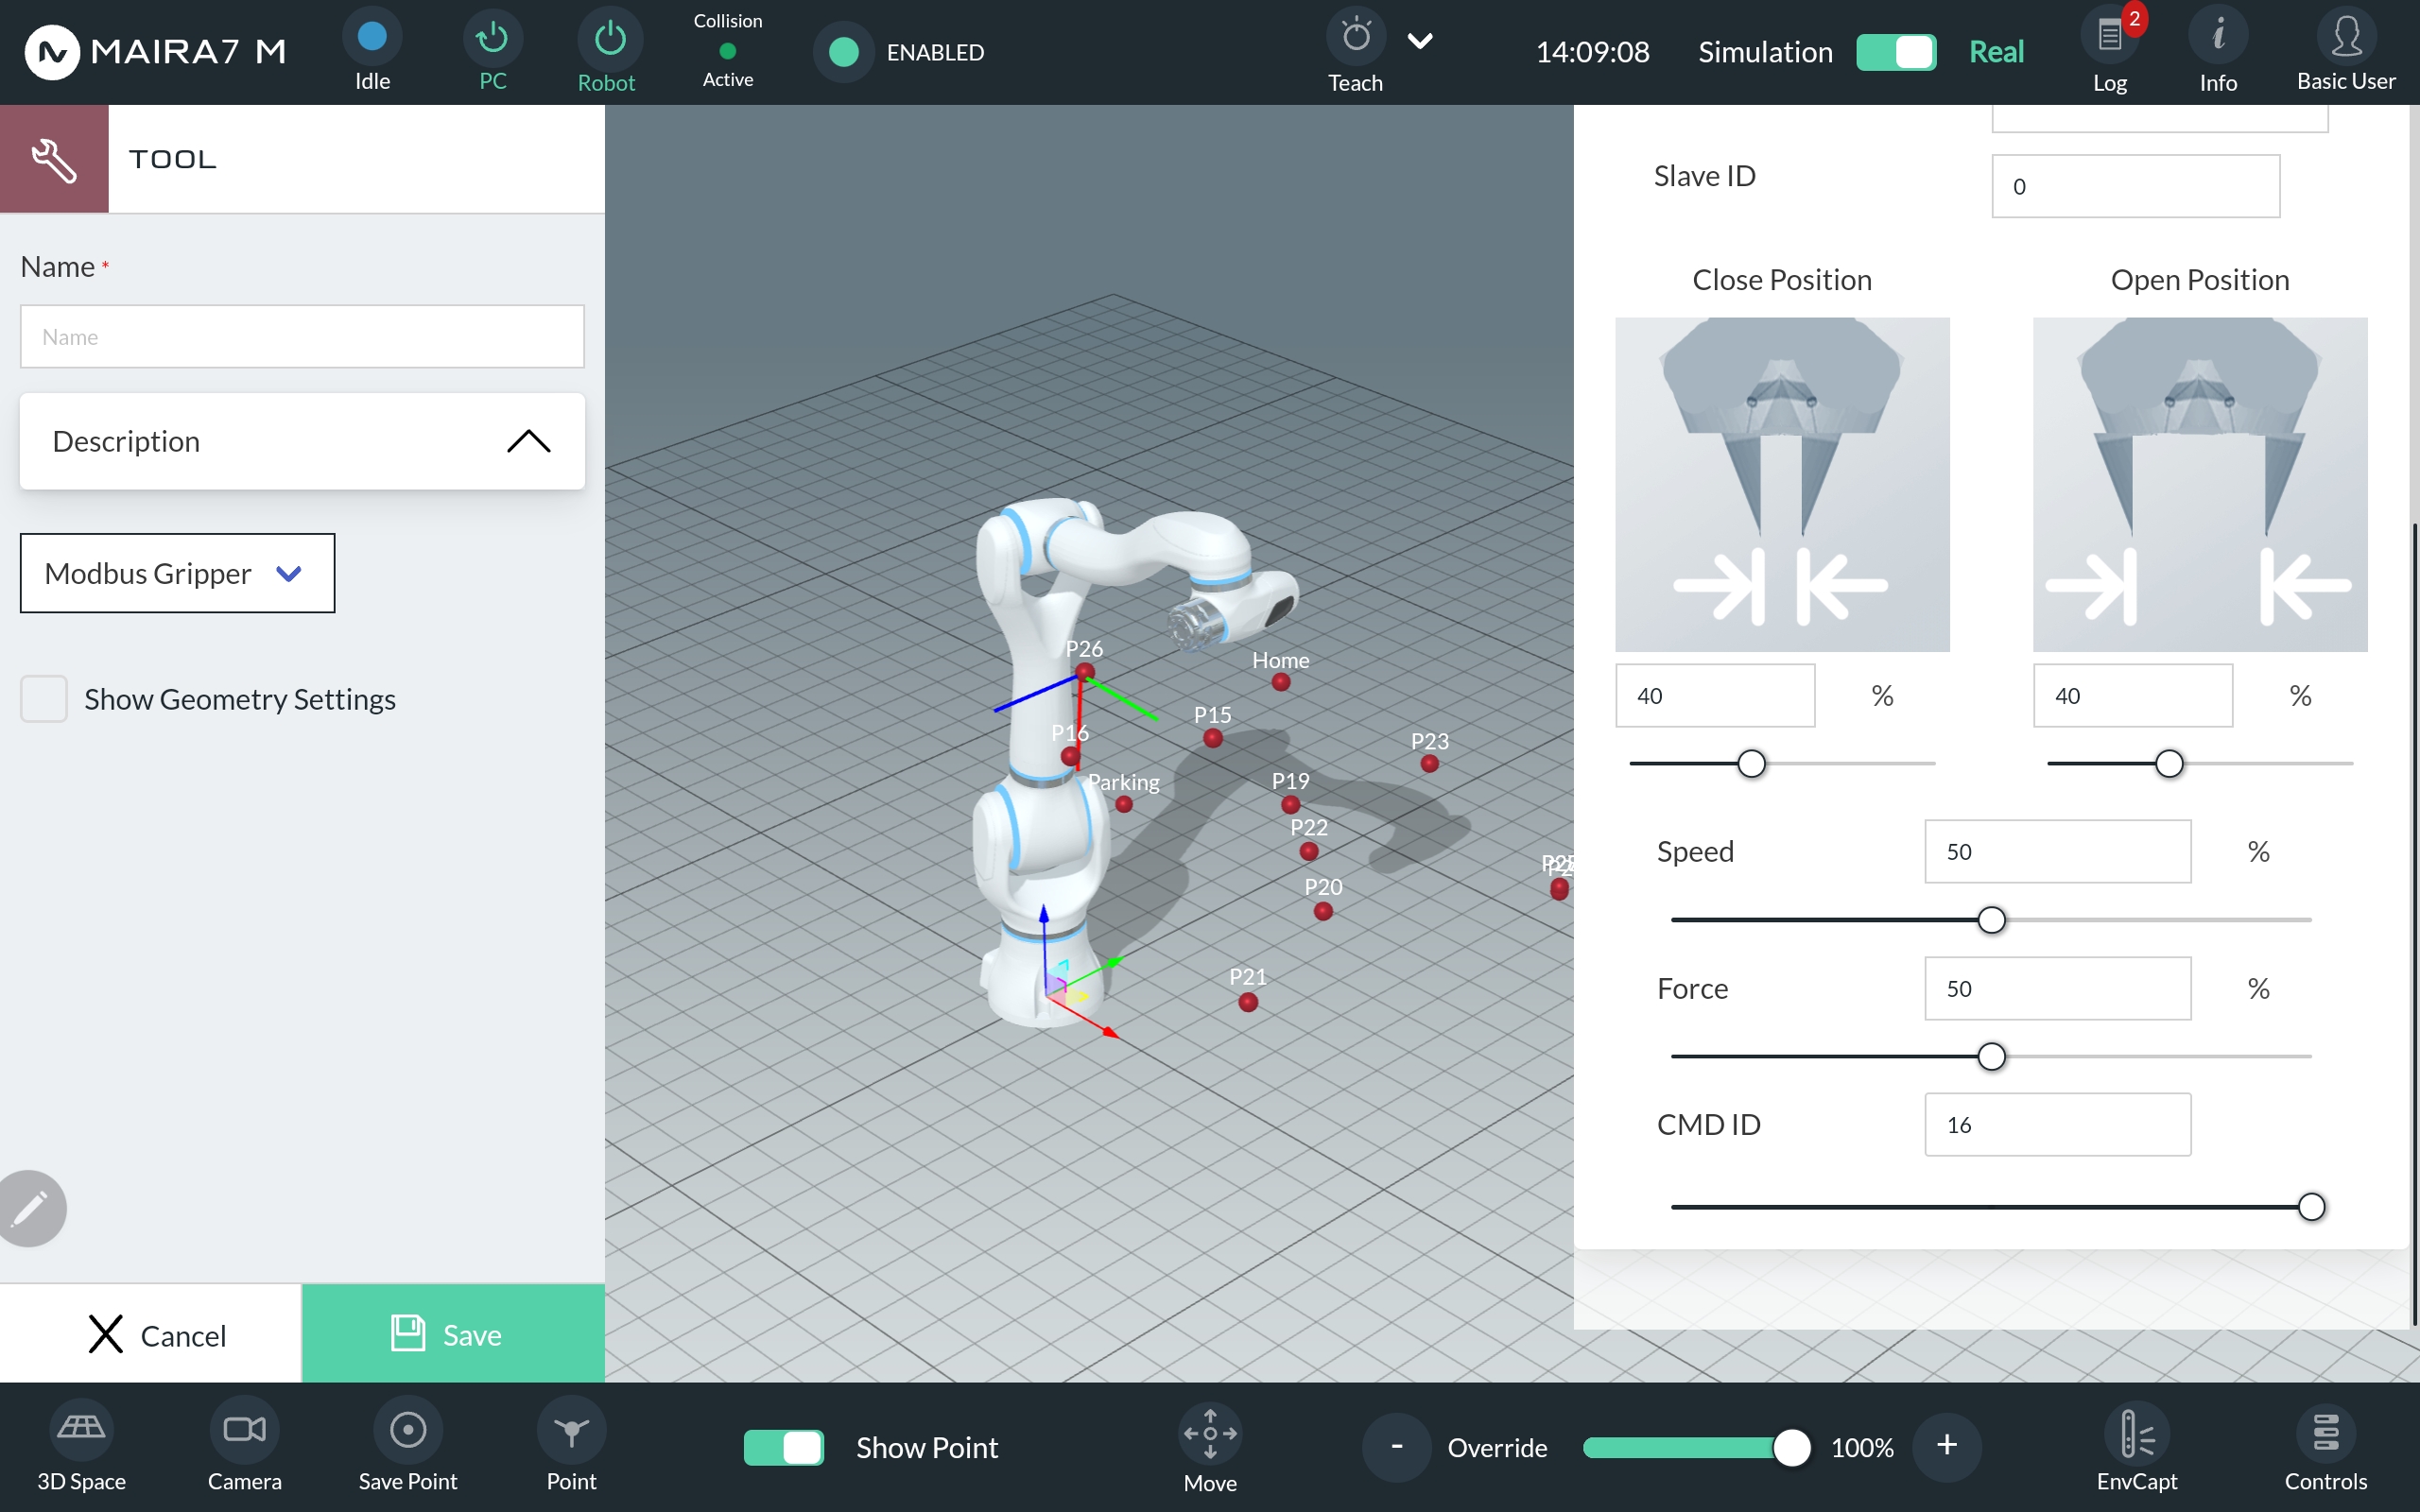
Add a New Tool
Step 1: Create a New Tool
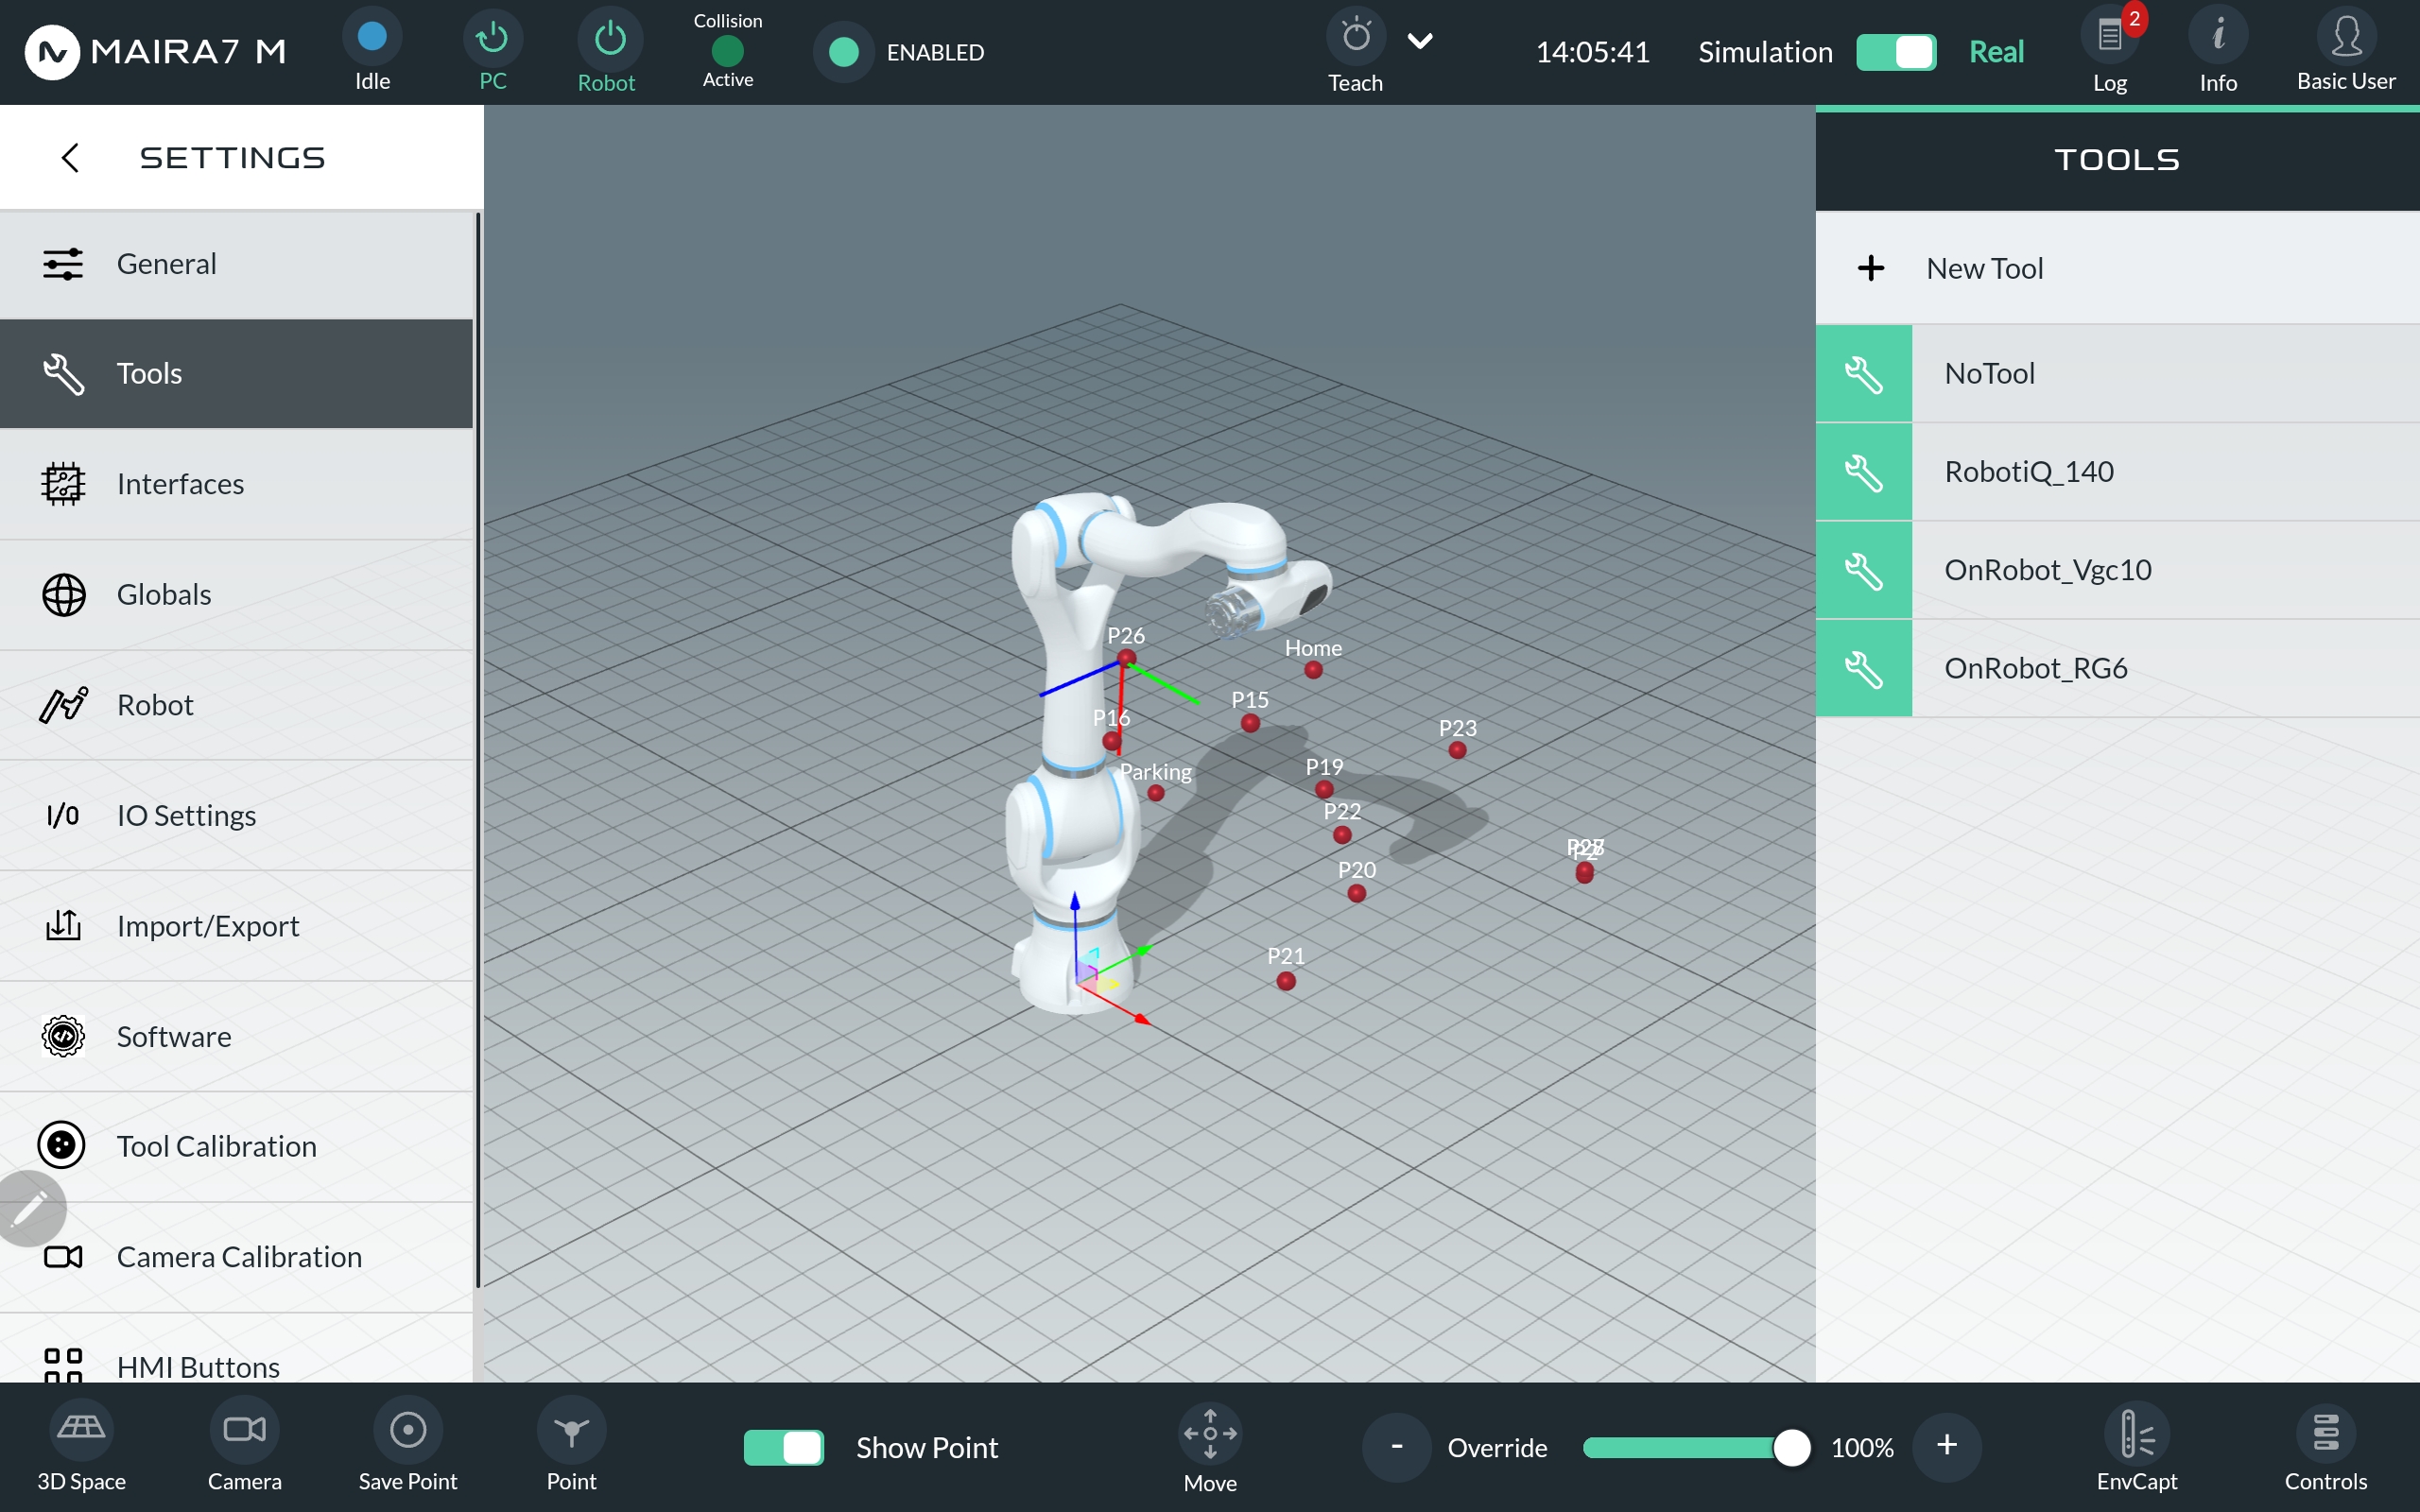
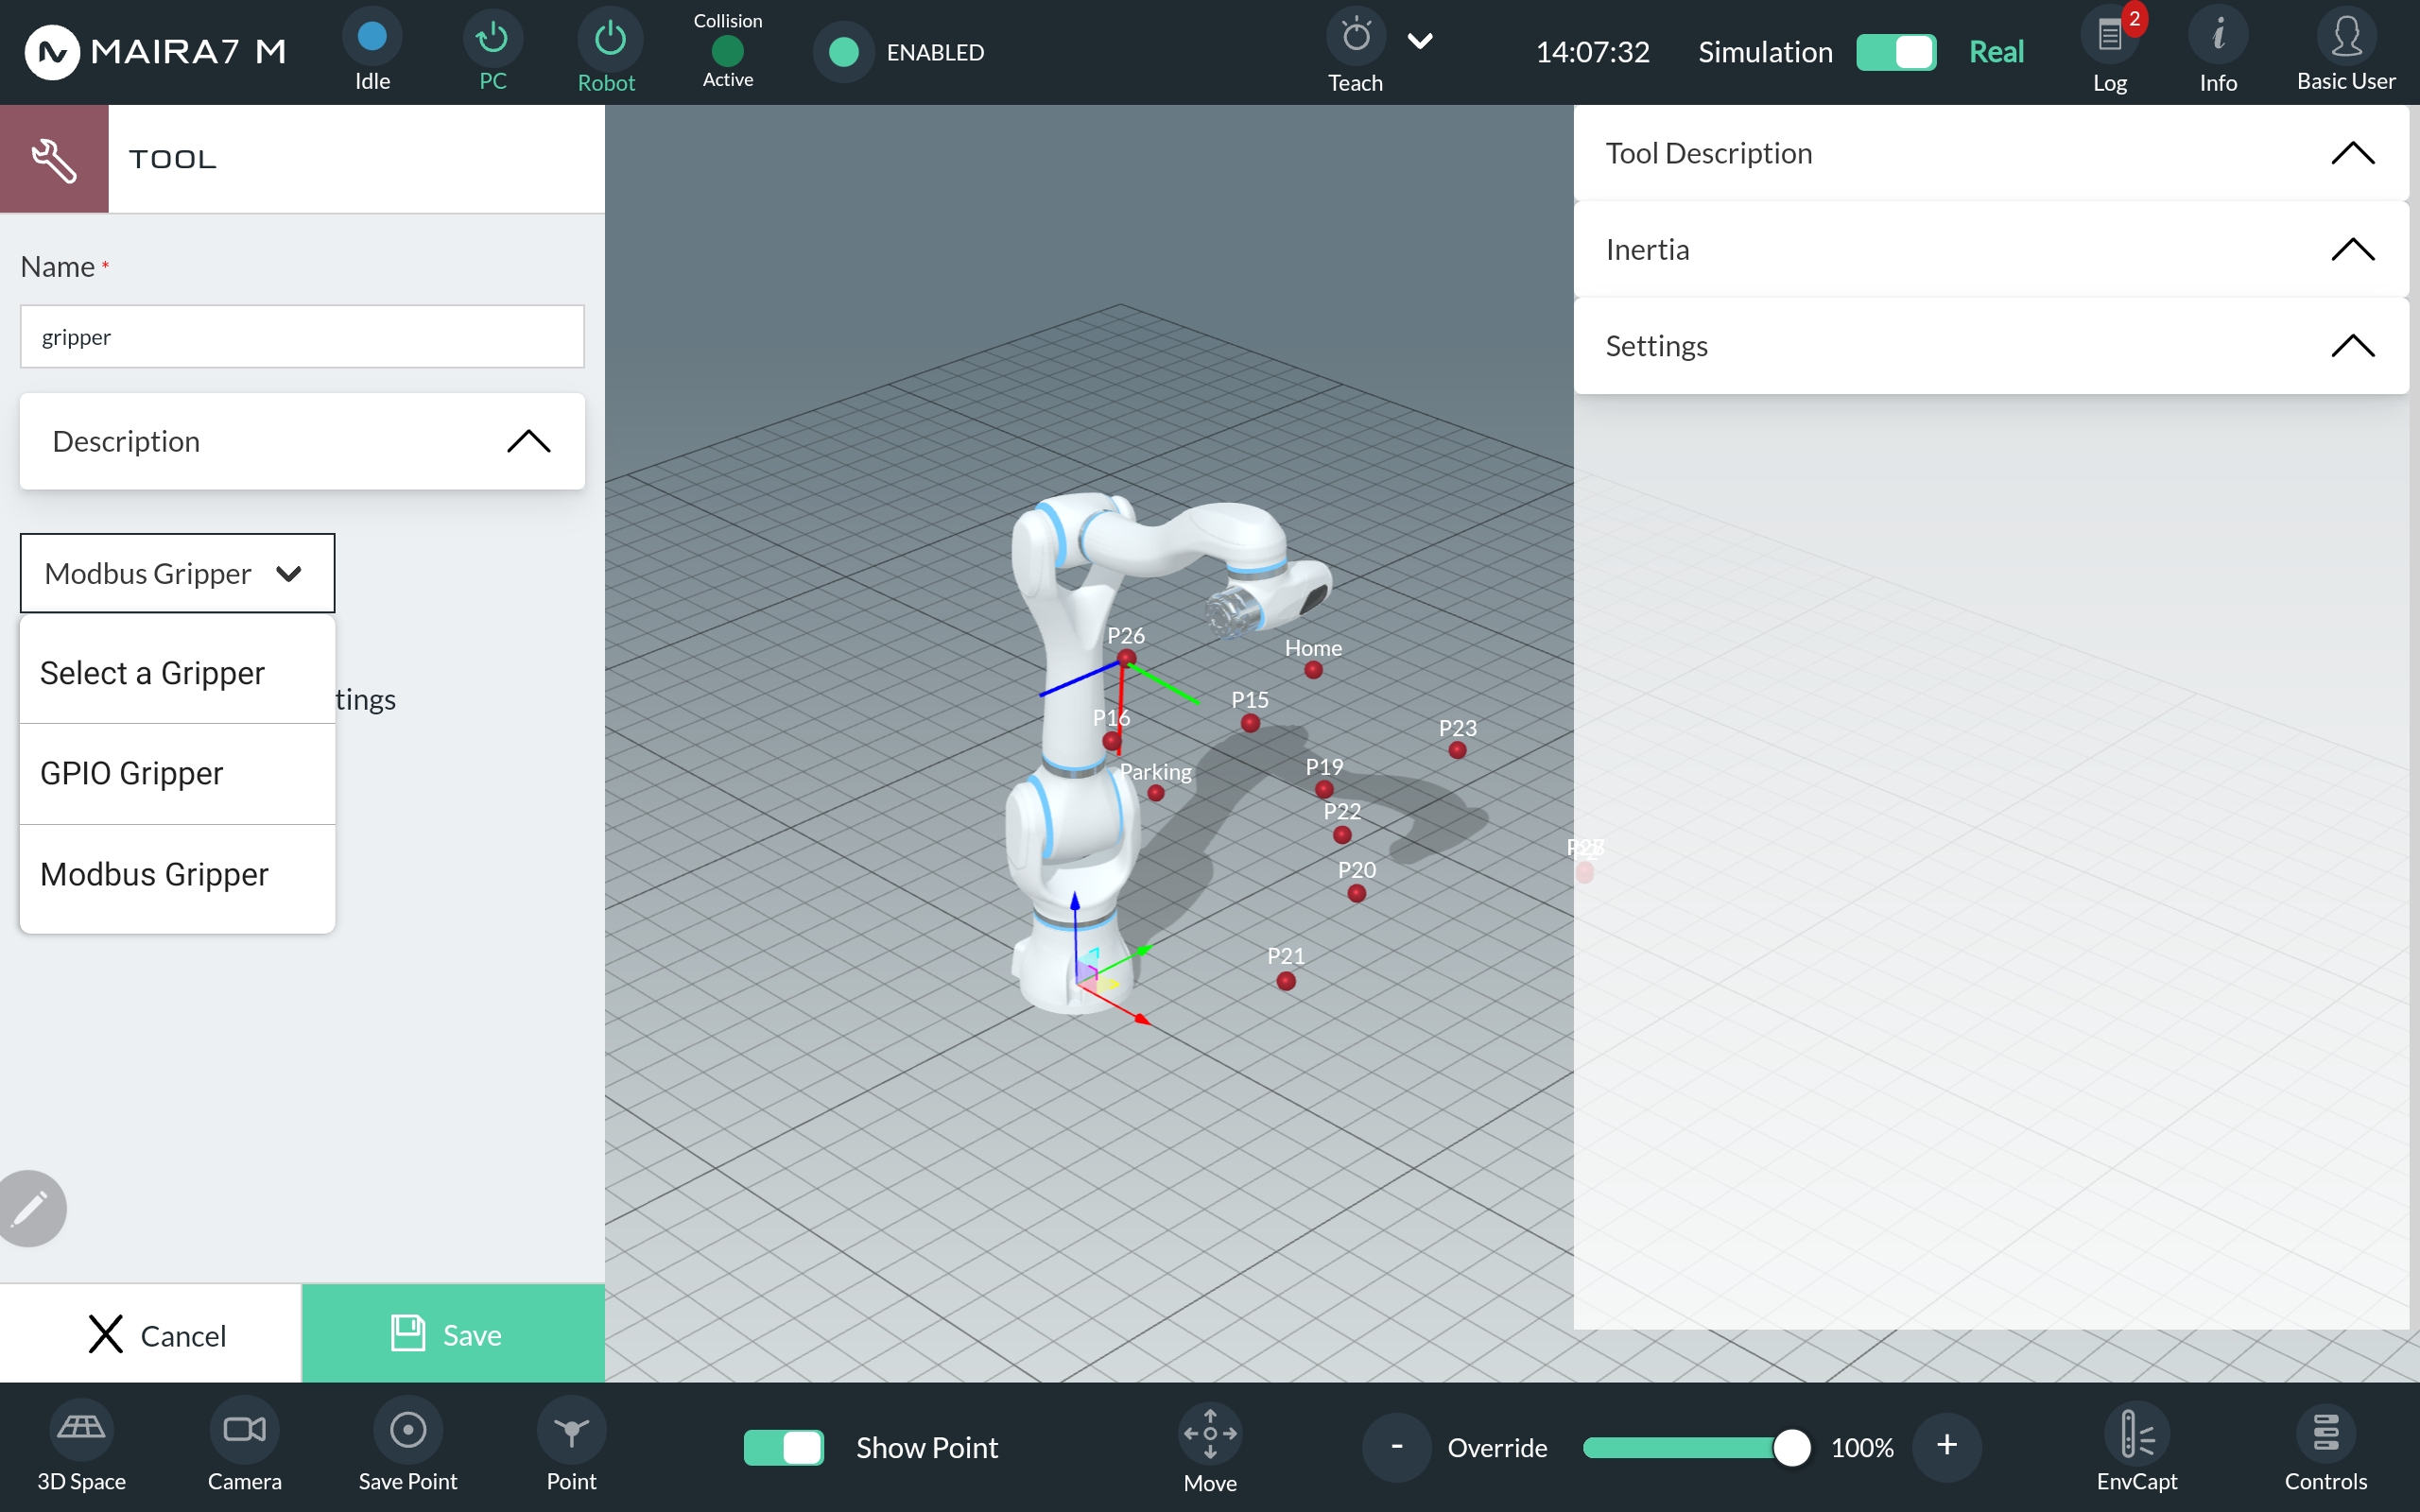
In the settings, navigate to the Tools section. To add a new tool, click on + New Tool in the left navigation bar. To delete or edit an existing tool, select the specific tool from the list and choose the desired action.
Define a name for the new tool and optional add some tool description. Next select the hardware interface (GPIO or Modbus) to control and communicate the gripper and for the GPIO Gripper a port:
Tool Analog Output
Tool Digital Output
Controller Analog Output
Controller Digital Output
Step 2: Define TCP and Center of Mass
The Tool Center Point (TCP) Offset defines the pose of the TCP relative to the robot’s flange. Specify the position in millimeters and the orientation in degrees within the Tool Description. Additionally, provide the position of the tool’s center of mass relative to the robot’s flange.
Step 3: Define Inertia
Add values for the moment of inertia of the tool.
Step 4: Define further Settings
In the settings section, select the type of gripper. Currently the following types are supported:
OnRobot: RG2, RG6, VG10, VGP20, SG, 2FG7
Robotiq: 2F85, EPick
Choose a communication protocol, port and slave ID.
Set the close and open position as a percentages of the gripper’s maximum opening aperture and speed and force as percentages of the gripper’s maximum capabilities.
Upload A Mesh Model
Here’s how you can upload object meshes and bin meshes to the database from an external drive.
Note
Managing your data with AI Hub: Data Management
Step 1: Preparing meshes in a Storage Device
Format the external storage device to FAT32 or exFAT format. This ensures compatibility with the robot system.
Prepare the mesh files according to the requirements listed in Mesh model file requirements.
Transfer the mesh files to the external storage device. If you have multiple files for an object and you have multiple objects to upload, it is recommended to use one directory per object.
Step 2: Transferring the mesh model from a storage device
Using an external PC, access Maira GUI at
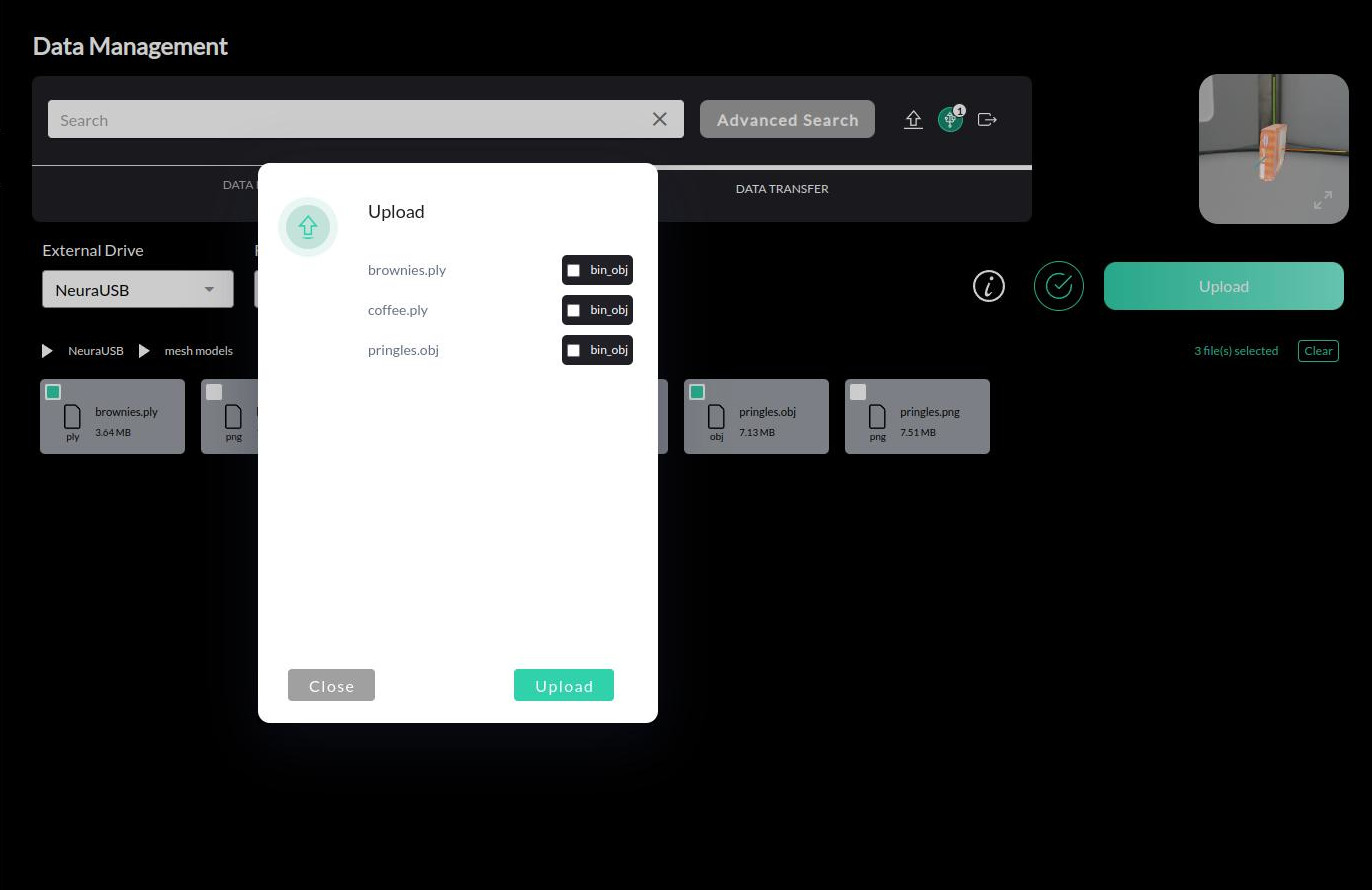
http://192.168.2.14:8080and switch to AI Hub Mode.Plug the USB containing the mesh files to the control box.
Go to section and select sub-tab.
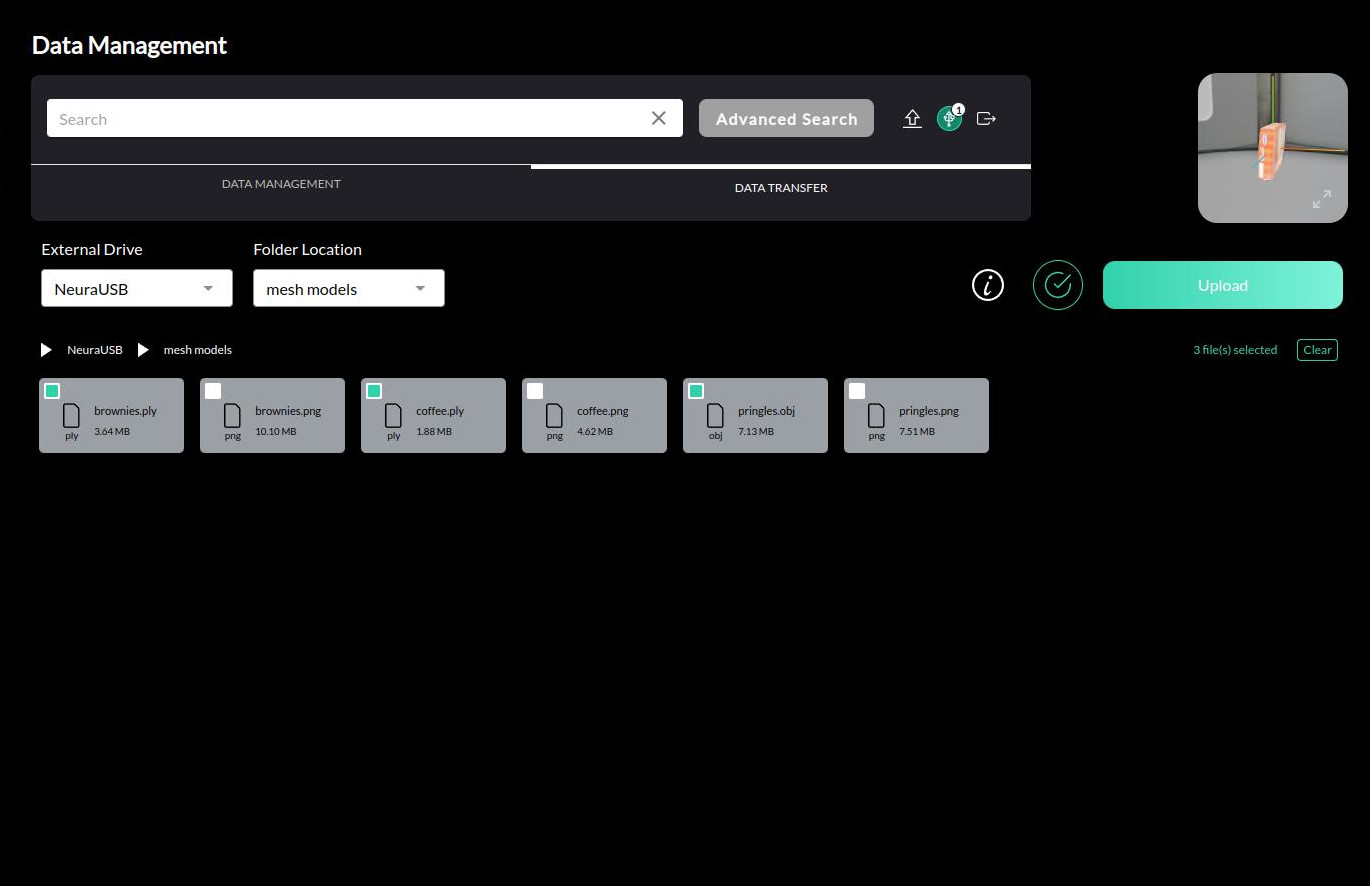
Select your storage drive and navigate the pseudo file system to your mesh file(s).
Select the mesh file(s) to upload. You could inspect the selected meshes in the preview window. You could hit Validate to run a preliminary check if the mesh file requirements are fulfilled. Use the status message to guide on how to remedy the issue in cases of failure and try again.
Hint
If your model includes a texture file, there is no need to select it as it will be automatically uploaded with the mesh file.
Click on Upload to upload the selected mesh files to the database.
In the file review, check the bin_obj checkbox if it’s a bin mesh file. Once satisfied, click on Upload to initiate the upload process.
The upload process may take some time depending on the size of the files and the number of files selected. Use the status message to guide on how to remedy the issue in cases of failure and try again.
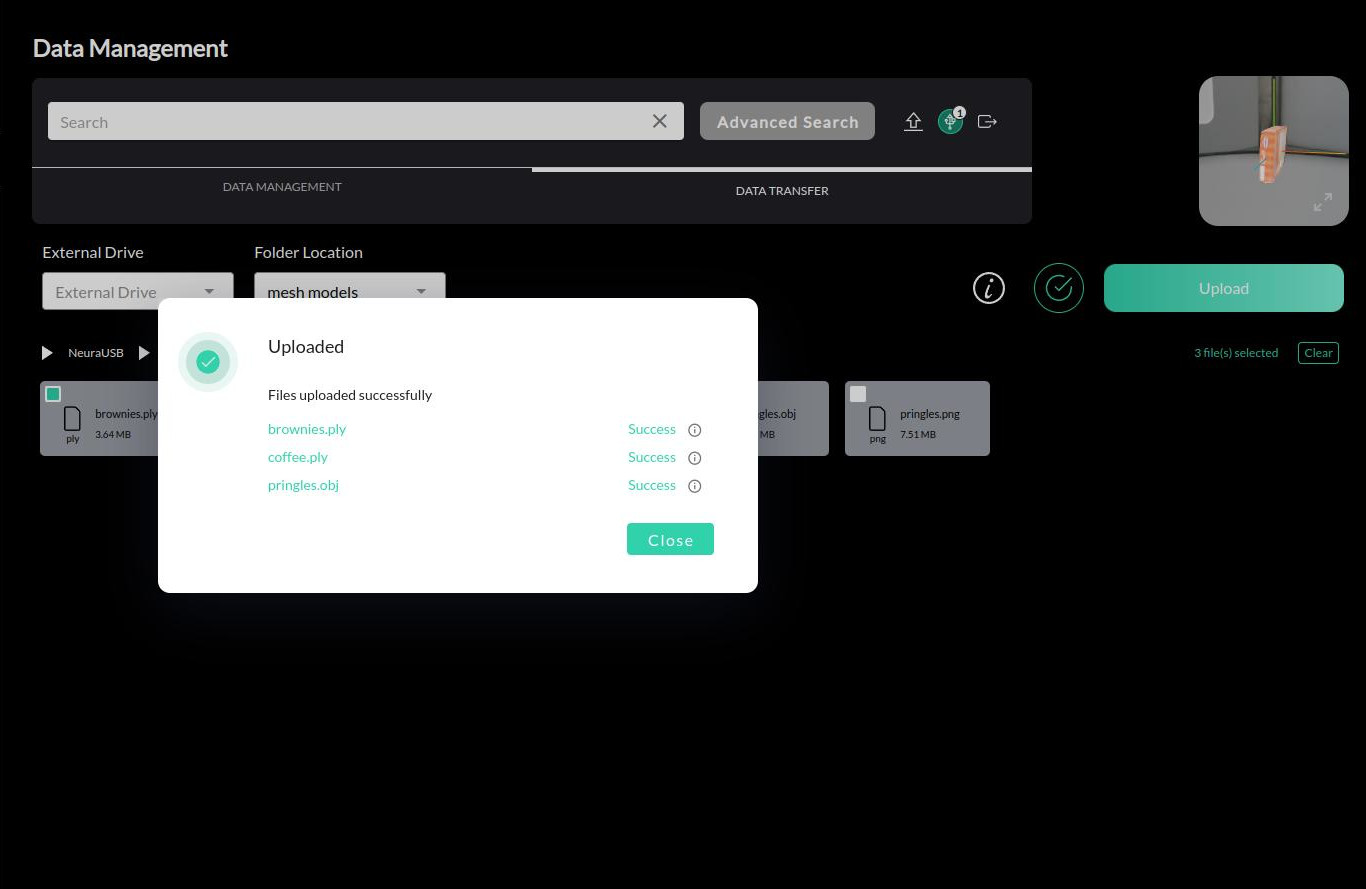
Successfully uploaded meshes can be found under > . Database search allows finding the uploaded mesh by the assigned name.
Video Guide
Note
The video is a demonstration of the upload process. The actual interface may differ slightly from the one shown in the video.
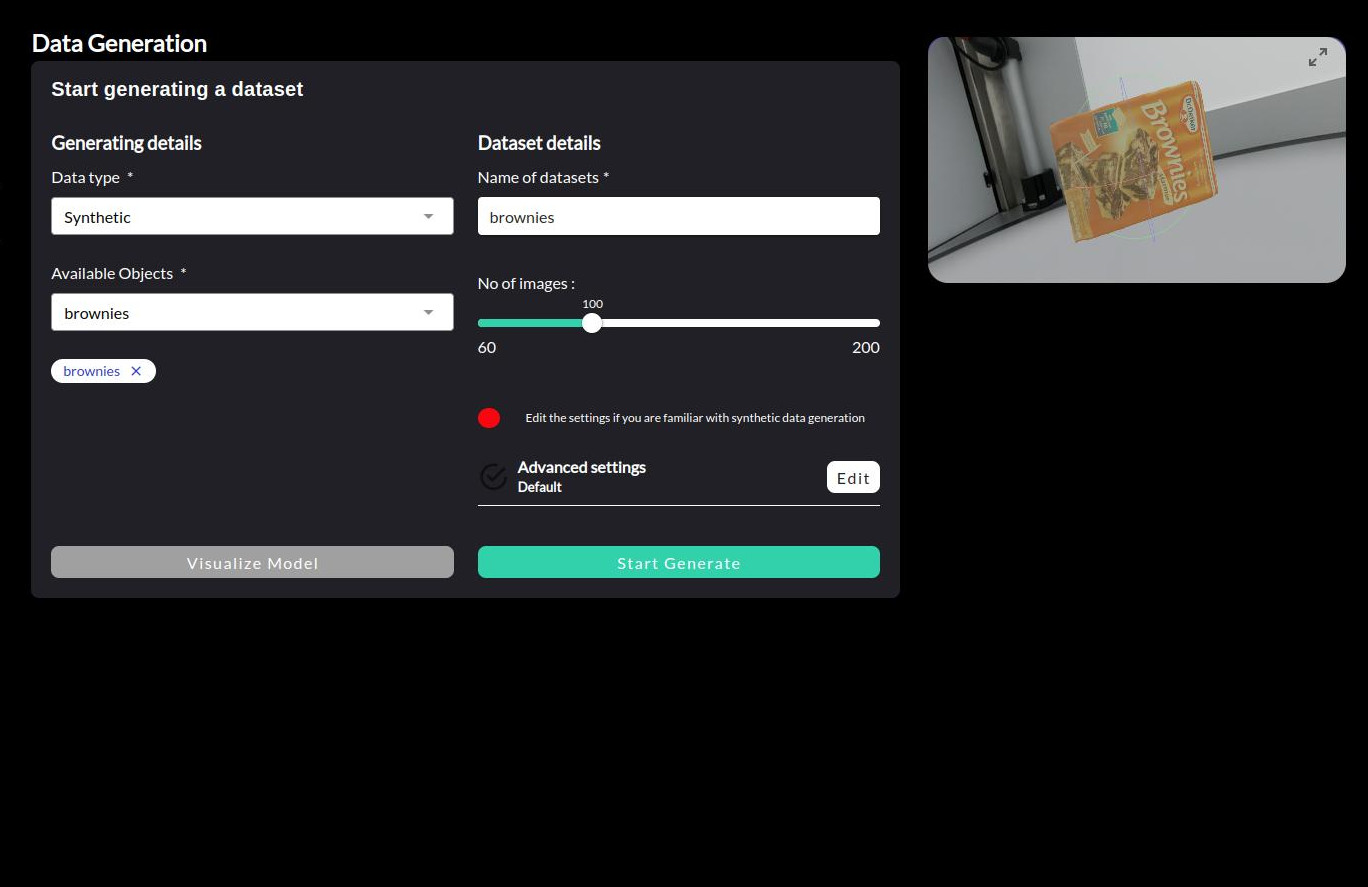
Generate Synthetic Dataset
This is how you can generate a synthetic dataset using AI Hub. Find more detailed information about generating data with the AI Hub here.
Hint
Ensure the object mesh model is registered in the database before generating a dataset. See Tutorial: Upload A Mesh Model for more details on uploading an externally sourced mesh model.
Using an external PC, access Maira GUI at http://192.168.2.14:8080 and switch to AI Hub Mode.
Click .
Select the type Synthetic from the Data type dropdown menu.
Select the object(s) you want to generate a dataset for from the list of registered objects in the Available Objects dropdown.
Hint
Click on to preview the last selected object in the right upper corner of the screen.
Provide a distinct name for the dataset in the Dataset Name field.
Specify the number of images to be generated in the Number of Images field. The number of images can be adjusted to suit your needs, but starting with around 100 images is a good approach.
Note
The more images you generate, the more diverse your dataset will be, which can improve the performance of your model. However, generating too many images can also lead to longer processing times and larger file sizes, so it’s important to find a balance that works for your specific use case.
To start the object generation, press the Start Generate button.
The progress bar should gradually fill up and some sample generated images would display. The generation process may take some time depending on the number of images selected.
Once the generation is complete, you will see a message indicating that the process has finished.
Successfully generated datasets can be found under > . Database search allows finding the generated dataset by the assigned name.
Video Guide
Note
The video is a demonstration of the generation process. The actual interface may differ slightly from the one shown in the video.
Collect Real Data
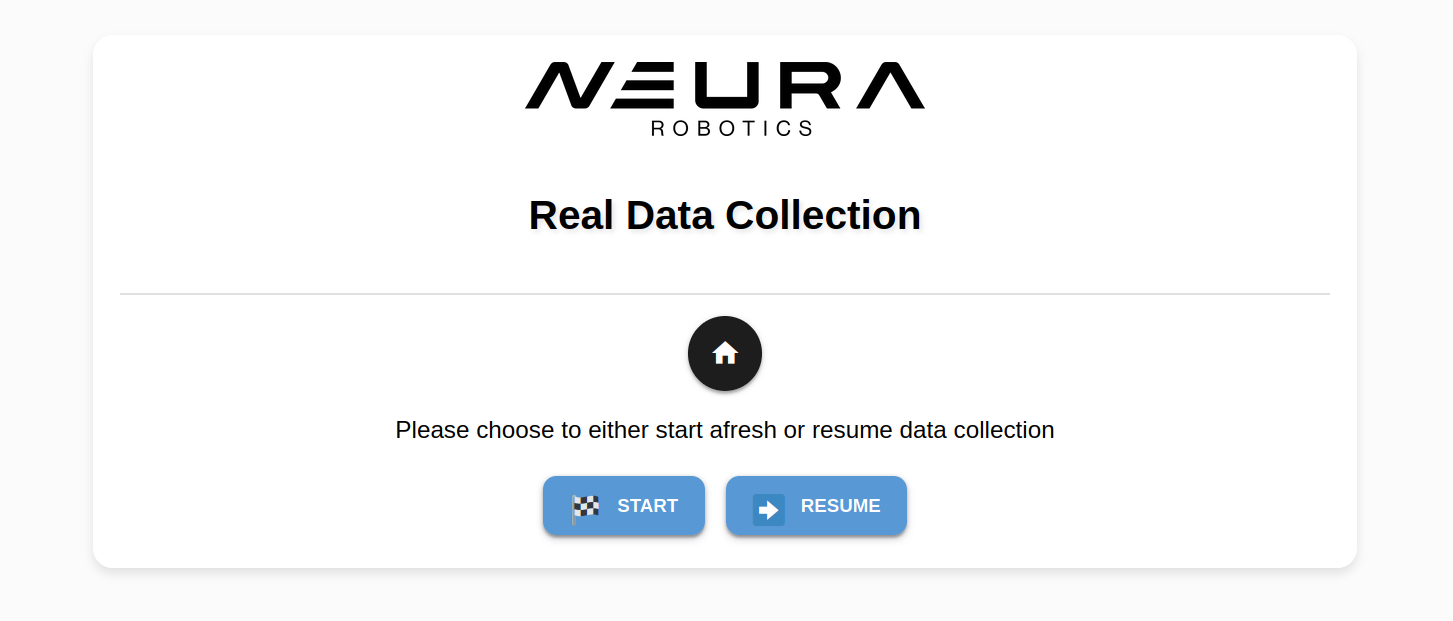
Follow this guide to learn how to collect real, live data using a robot that can be used in performing cognitive tasks.
Using the Real Data Collection Wizard
Note
What is Real Data Collection Wizard?
Using an external PC, access Maira GUI at http://192.168.2.14:8080 and switch to AI Hub Mode.
Click and a new tab to AI Dev Arena opens.
Click to open the wizard.
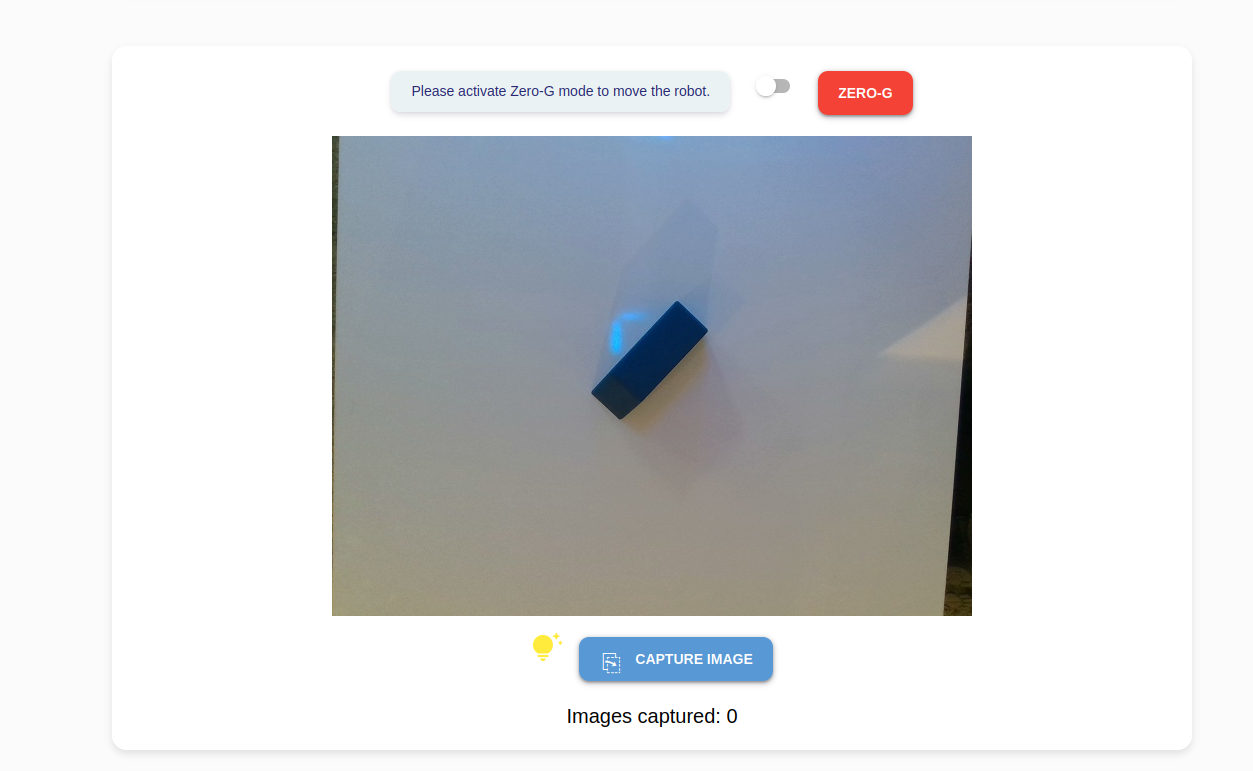
Press the Start button to begin capturing new images.
Place the objects of interest on your workspace. Click the Capture Image button to capture an image. There is an image counter on the bottom for your reference.
Hint
For better results, introduce variations e.g.,
capture images of the object in different orientations, backgrounds and lighting conditions.
capture images of an object from different angles by adjusting the robot’s position using ZeroG mode.
place the object at off-center positions in the camera view
introduce some occlusions to the object by placing other distractor objects in front of it.
Caution
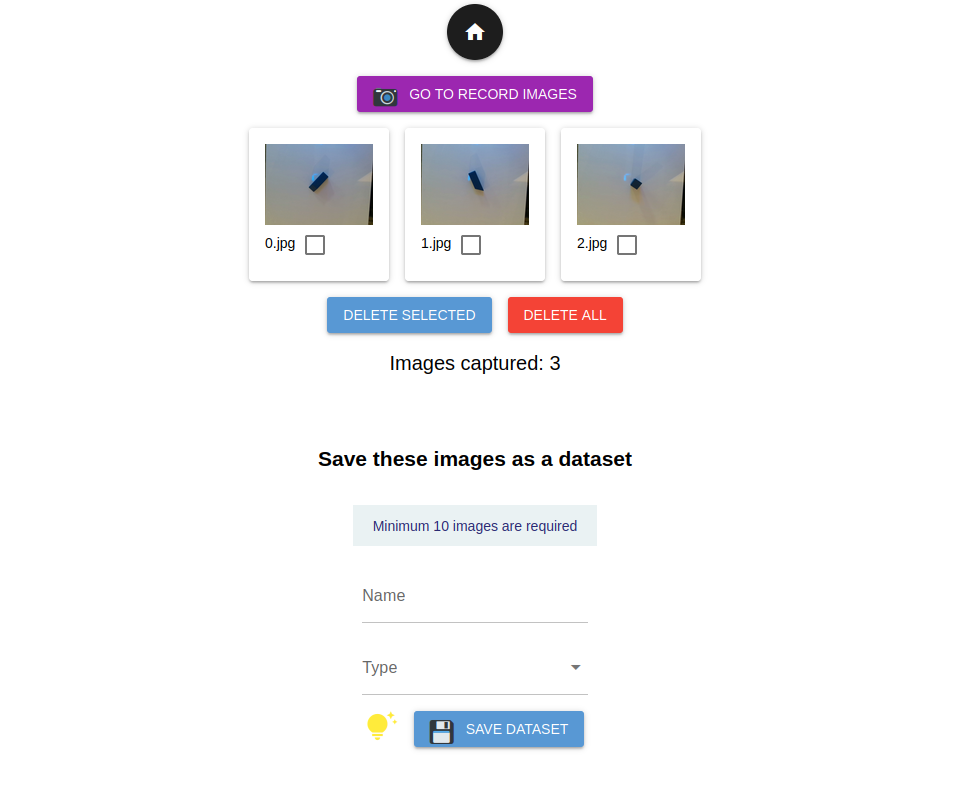
To save a dataset, a minimum of 10 images is required.
Click Go To View Images to review the collected images and delete any unwanted ones. To capture additional images, click Go To Record Images.
To save the dataset, simply enter a descriptive dataset name and select a suitable type. Click Save Dataset to save the dataset.
Type |
Description |
|---|---|
|
indicates that every image consists of objects of interest and is intended to be annotated using Neura CVAT. |
|
indicates that there are no objects of interest in the dataset. |
|
for images that will be used in the Object Onboarding Wizard. |
Note
If you saved a TO_LABEL type dataset, the following tutorial will guide you on
annotating the dataset using Neura CVAT.
Annotate Real Data
Follow this guide to learn how to use Neura CVAT for uploading images, creating annotations, and generating an exportable dataset suitable for AI model training.
Uploading Images
Using an external PC, access Maira GUI at http://192.168.2.14:8080 and switch to AI Hub Mode.
Click and a new tab to Neura CVAT will open.
Sign up if you are a new user or log in if you already have an account.
Create a new Project.
Create a new Task.
Note
If you have collected images using the Real Data Collection Wizard and exported it using the option, you may import that unlabeled dataset directly into a CVAT task by selecting and selecting the name of the exported, unlabeled dataset.
Annotating Images
Go to the relevant project & task. Click on the blue Job #X to begin the annotation process. Upon clicking, you should see the images you uploaded along with toolbars on the left and right side of the screen.
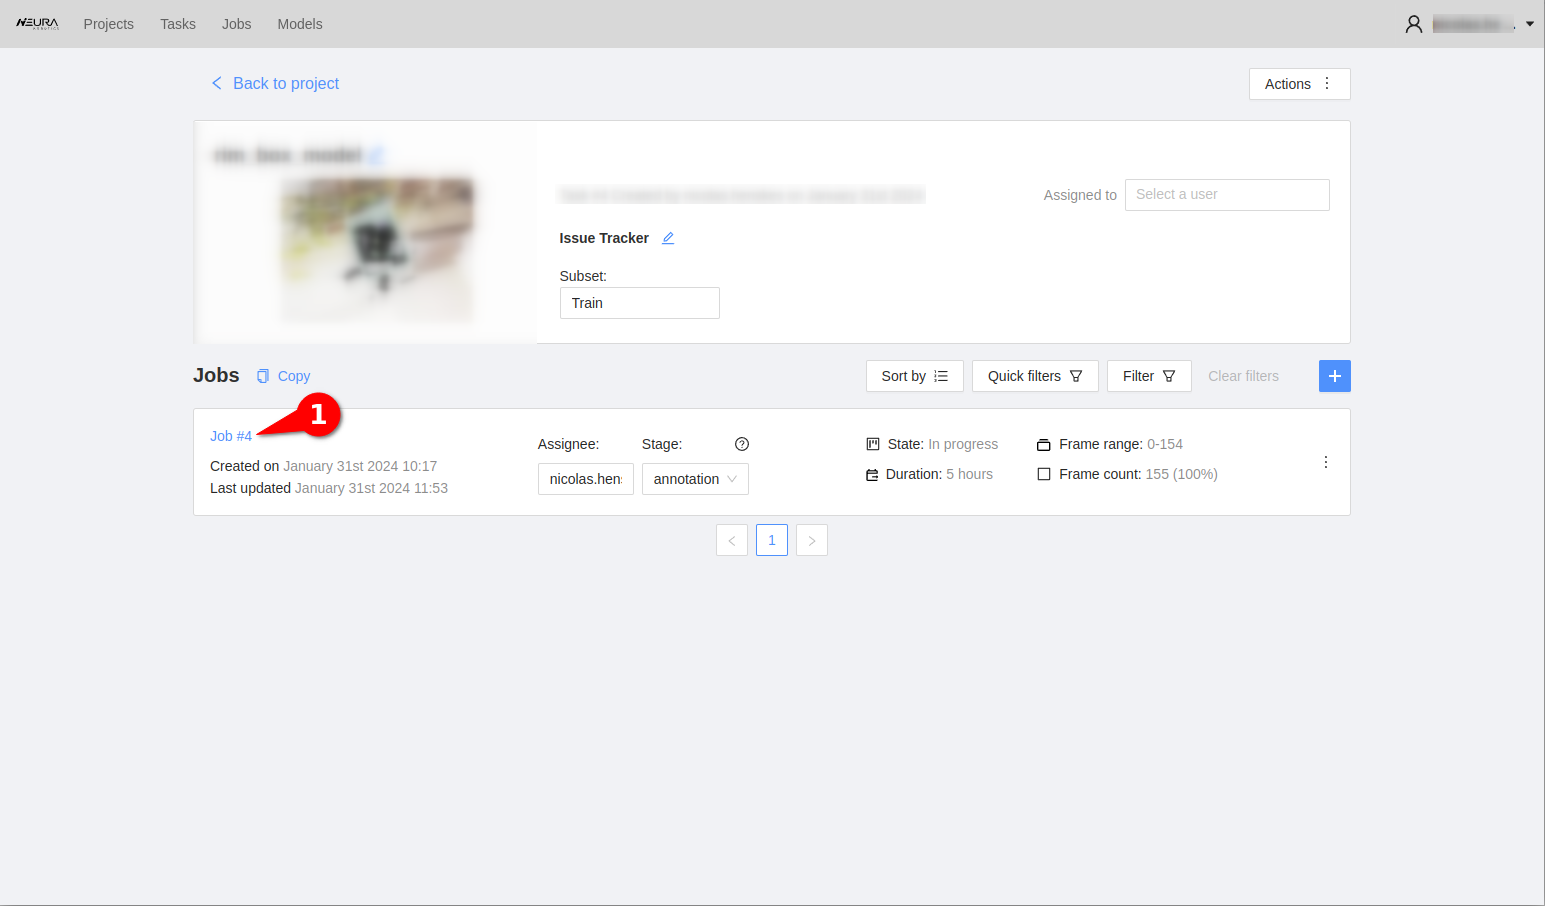
Select the AI Tools button (magic wand icon the left side tool bar) activate the slider Convert masks to polygons and click Interact. A crosshair cursor appears. Click on the object in the image to leave a marker. Wait for ~5 seconds to complete the segmentation inference call.
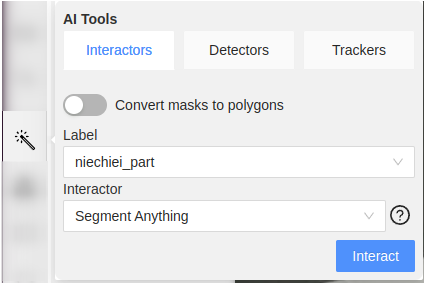
Now there should be a white, preliminary mask around the object boundaries. Sometimes the mask may only cover the object partially, in such cases, leaving another marker by clicking once more on another section of the object body helps. Once the preliminary mask is satisfactory, press N key on the keyboard to finalize the annotation of the object. Repeat steps 5-6 for all the objects of interest and frames.
Hint
While the AI tool is active, a left mouse click will add a positive marker which ‘includes’ a region. A right click will add a negative marker which ‘excludes’ a region. In some cases where you see non-conjoined masks, using both types of markers can help to create a singular mask.
Hint
For large datasets (>20 images), it is recommended to use the available keyboard shortcuts to accelerate the annotation process, e.g., for frame navigation - one frame back, - one frame forward, activating last used tool .
Full list of shortcuts can be viewed by tapping F1 key.
Once all images are annotated, click on the Save button. See Exporting the Dataset section below for how to export the dataset.
Important
Always label every object - even if it’s partially occluded or only partially in the frame or partially hidden by reflections/shadows. If an object is partially occluded such that there are multiple, disconnected parts of it visible, they still need to be labeled as one segmentation mask. In cvat, this is only possible with masks, not with polygons (deactivate “convert masks to polygons” in the automatic annotation tool)
Exporting the Dataset
Click on Projects on the top left corner to go to the project page. Click on the ellipsis on your project to see more options. Click on .
Choose
Neura COCO 1.0as the export type, activate Save images slider and provide a descriptive name to your dataset. Click .Back in AI Hub GUI, go to section and search for the name of your exported dataset. Refresh the page if you do not see it immediately. Click on the Play button to visualize the dataset.
Video Guide
Note
The video guide reflects the version of the tool as of the recording time and may not reflect the latest interface and features.
Train an Object Detection Model
Follow this guide to learn how to prepare and, if necessary, train an object detection model. Neura offers two ways to train an object detection model: using AI Hub or the AI Development Arena. The latter is significantly faster and more user-friendly. Both use different methods for object detection.
Using the AI Hub - Method: neura_DLIS1 or neura_DLSI3
Here’s how you can train an object detection model, using AI Hub. This tutorial assumes that you have at least one registered dataset, possibly generated using AI Hub: Data Generation.
Note
Find detailed information about the training process and the desricption of training parameter here.
Step 1: Train a model and test
Using an external PC, access Maira GUI at http://192.168.2.14:8080 and switch to AI Hub Mode.
Click .
Select Object Detection as the Type of Training.
Select neura_DLIS1 or neura_DLIS3 as the Method.
Select as many datasets and dataset types from the Dataset list dropdown and it’s corresponding types. Provide a suitable name for the model and define the number of iterations.
Click . The progress bar should gradually fill up.
Once the training is complete, you will see a message indicating that the process has finished.
Successfully trained models can be found under > . Database search allows finding the generated dataset by the assigned name.
Attention
Don’t forget to test your model after training. See Model Testing for more information.
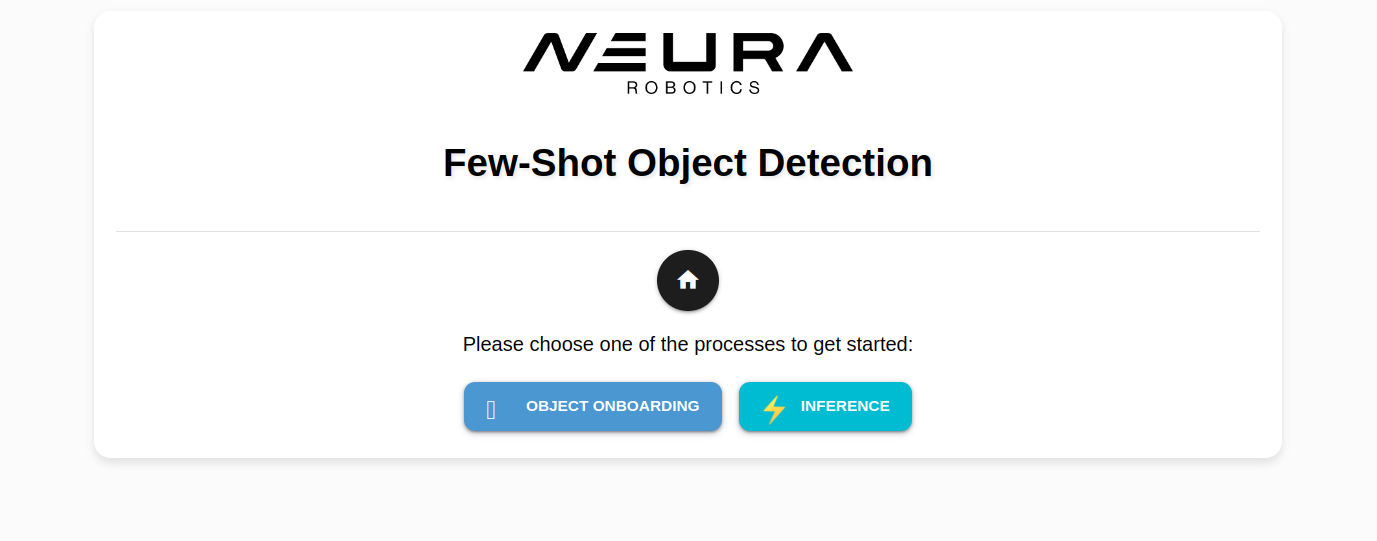
Using the AI Development Arena Object Onboarding Wizard - Method: neura_DLIS2
This tutorial assumes that you have completed the tutorial about collecting real data (Tutorial: Collect Real Data) and saved a dataset with the type OBJECT ONBOARDING.
Hint
What is Object Onboarding Wizard?
As of now, if you capture images using an external camera, you need to do the following to make the images available for Object Onboarding (to train a neura_DLIS2 model).
Ensure the image files are prefixed with rgb_ followed by a digit and with .png, .jpg or .jpeg as extensions. (e.g., rgb_1.jpg)
Store the image files in a folder with a name that matches the object name
Copy the folder into a USB and use the robot’s File Transfer utility to transfer the folder to the AI server location: object_perception/objects/object_templates.
Using an external PC, access Maira GUI at http://192.168.2.14:8080 and switch to AI Hub Mode.
Click AI Dev Arena and a new tab to AI Dev Arena opens.
Click Object Onboarding Wizard to open the wizard. A new tab opens.
Step 1: Generating masks for the new object
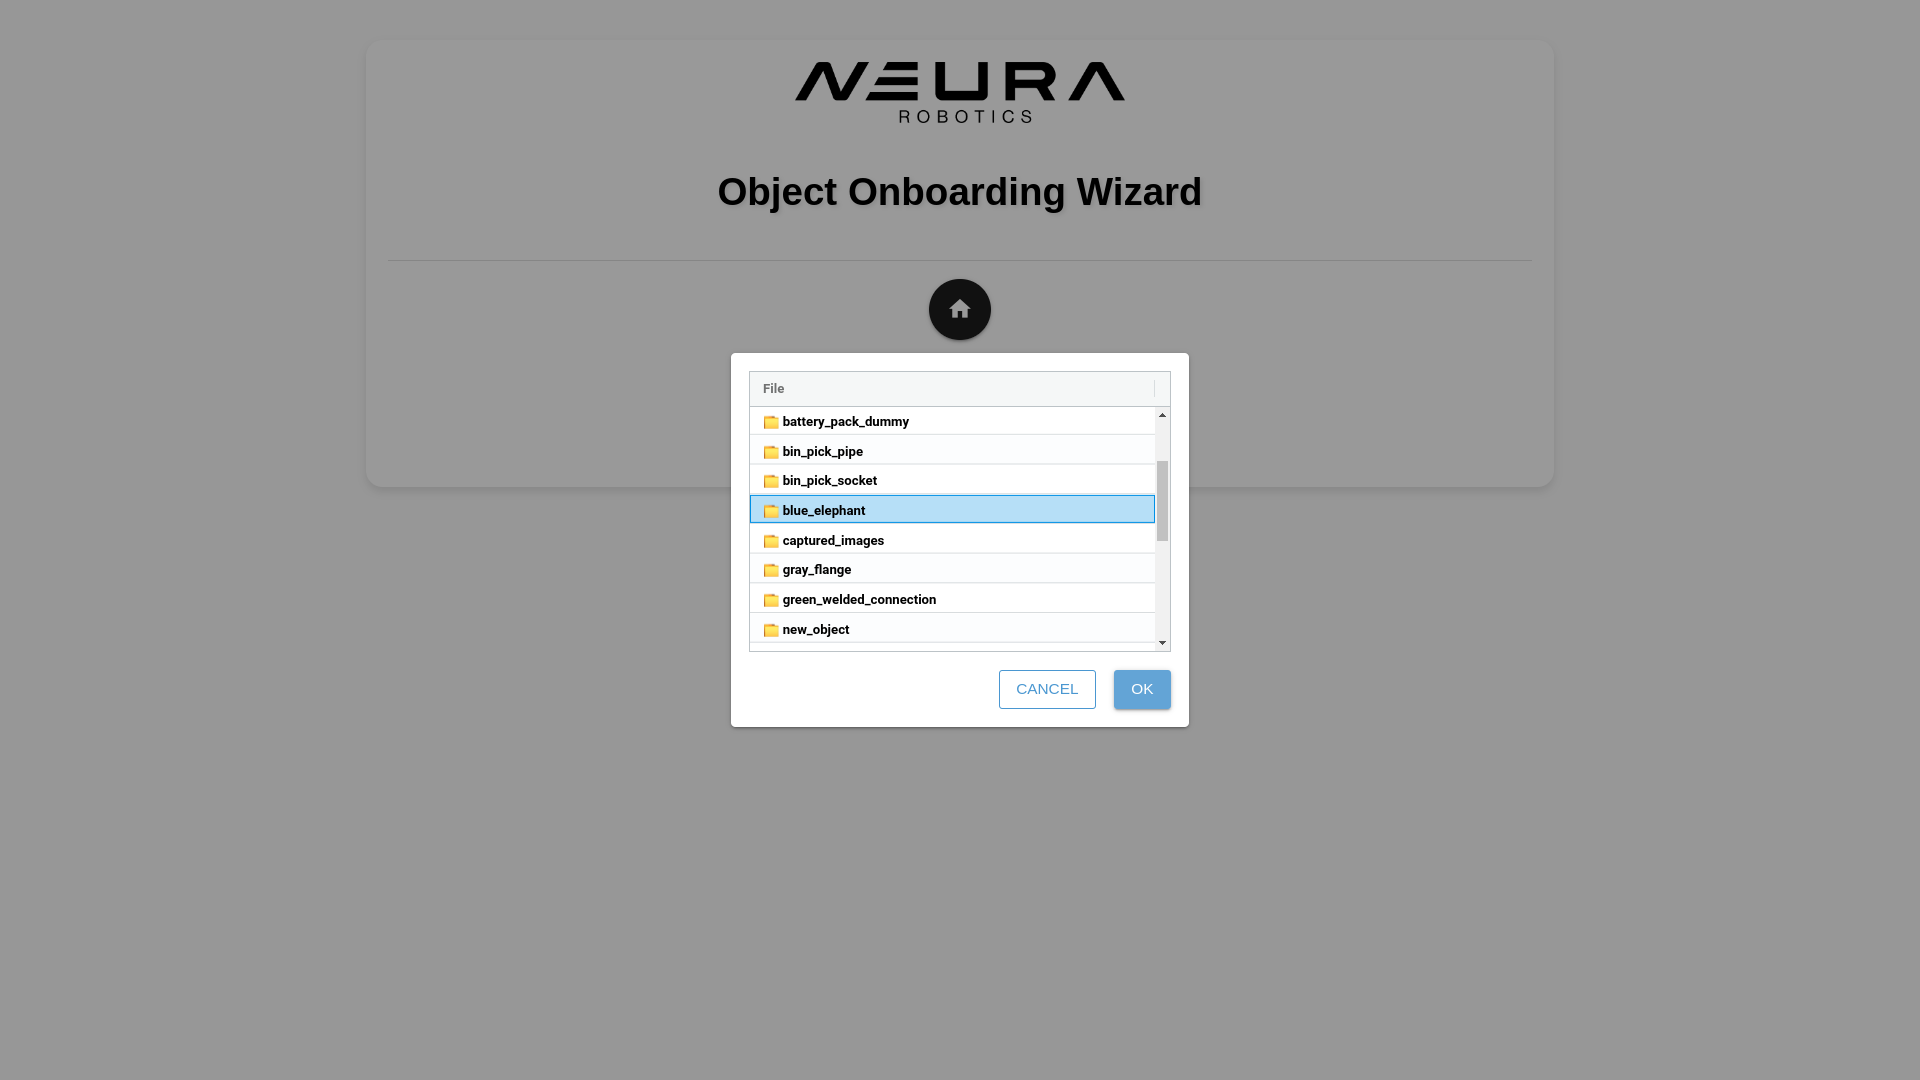
Click Object Onboarding and click Load Images. Navigate into object_templates directory, click the folder that matches the assigned name during saving the dataset. Click OK.
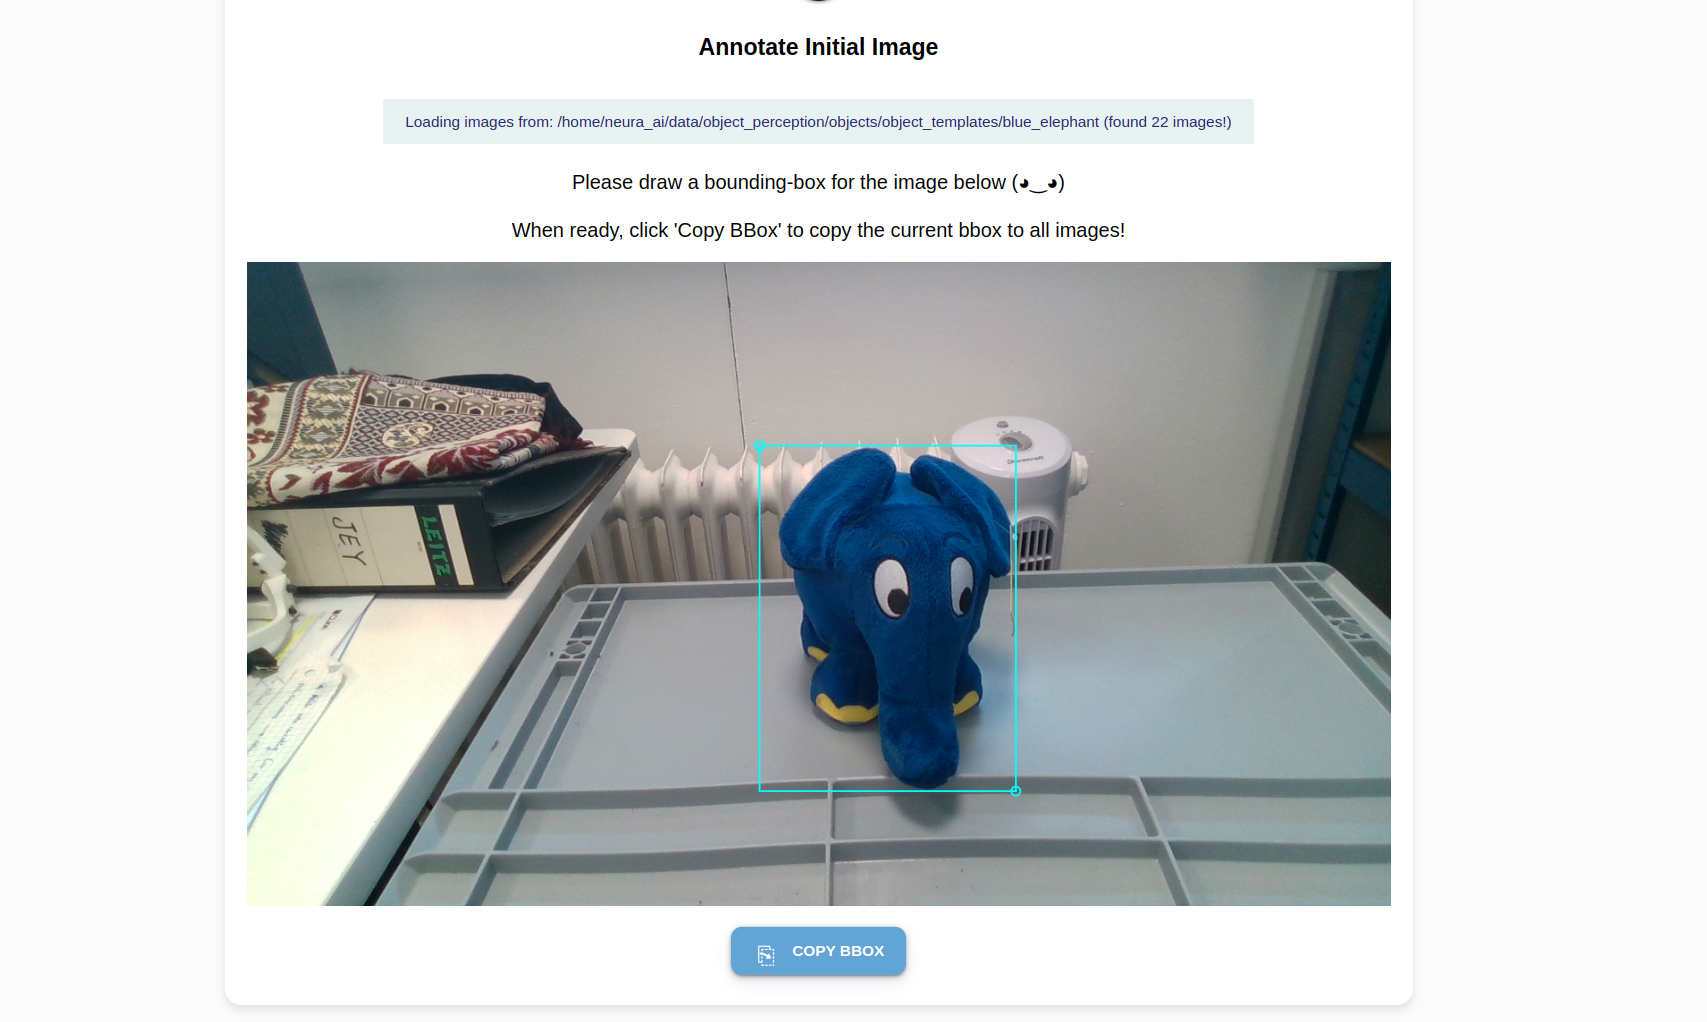
You see your first image and a crosshair arrow. Draw a bounding box around the object:
Position the crosshair in such a way that your object of interest is tightly (tangentially touching) the lower right quadrant. Left-click once.
Position the crosshair in such a way that your object of interest is tightly (tangentially touching) the upper left quadrant. Left-click once. A complete bounding box is formed around the object.
Click Copy Box to apply the relative position of the bounding box to all images.
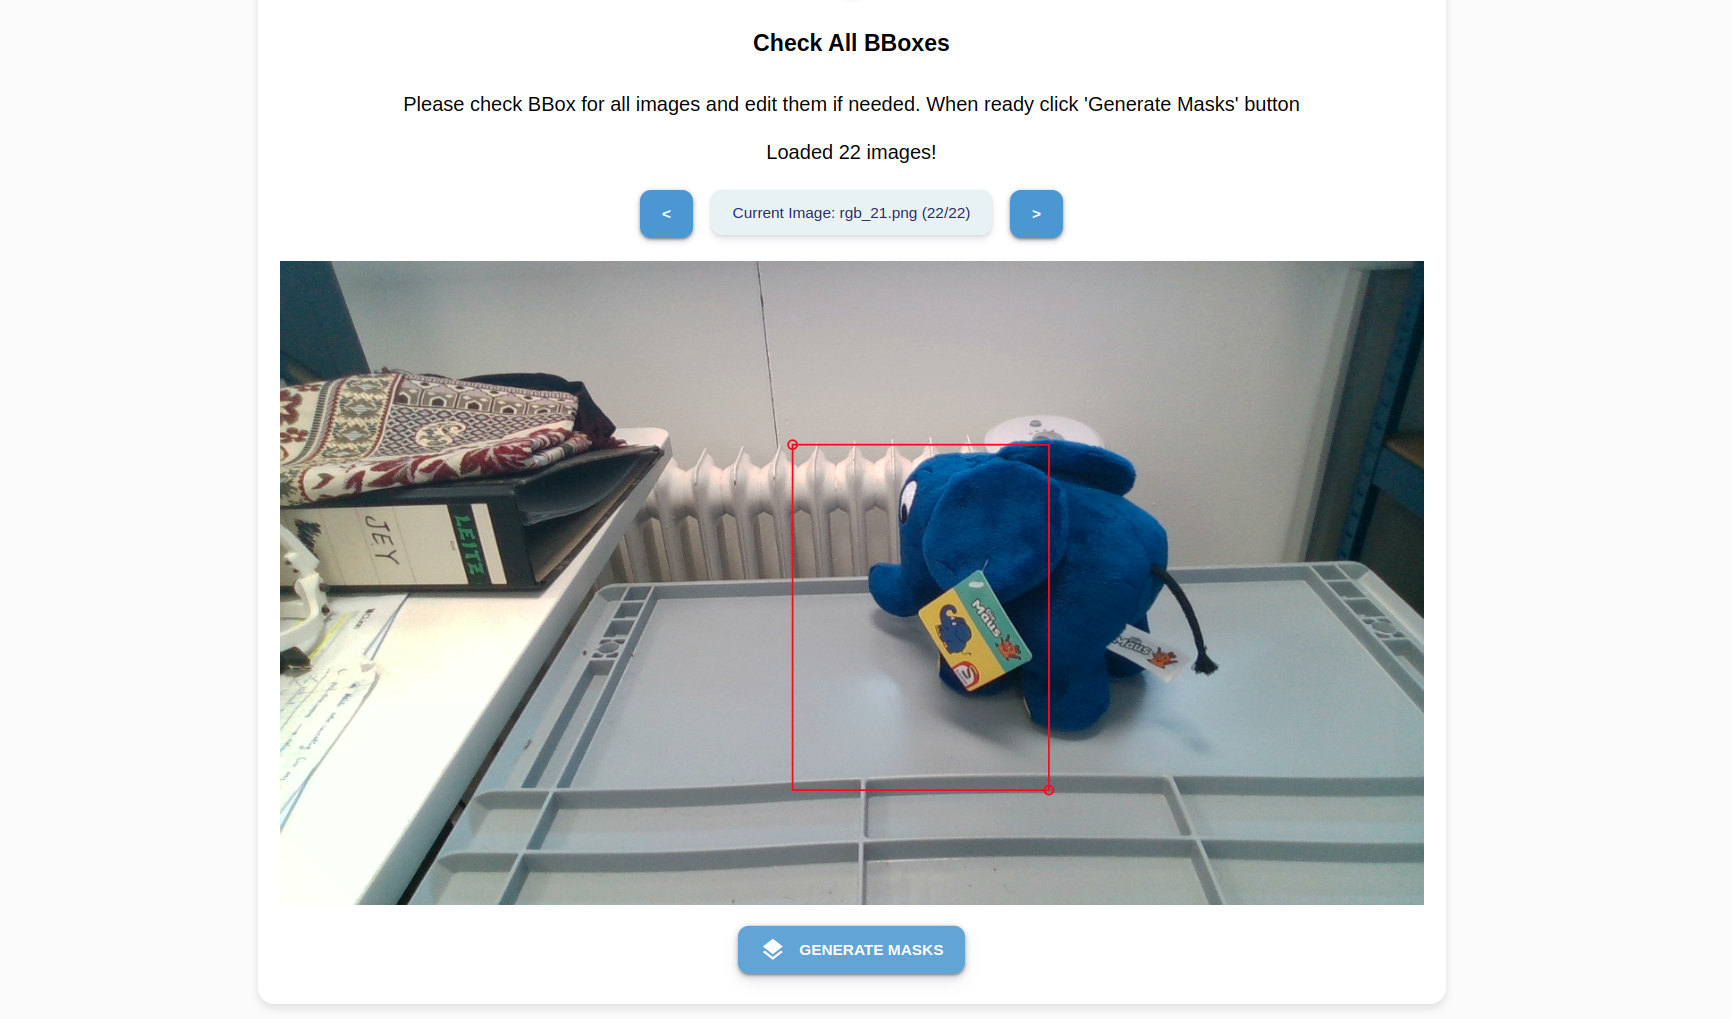
Click through the images to review the bounding boxes. If an adjustment is needed, simply redraw the box.
Attention
You only need to annotate one object per image. If you have multiple candidates that can be annotated in an image, pick the one that’s least occluded.
Note
The bounding box does not need to be perfectly aligned. The majority of the object should be inside the box, but parts of it can extend beyond the boundary.
Click Generate Masks to automatically generate red masks around your object’s boundaries.
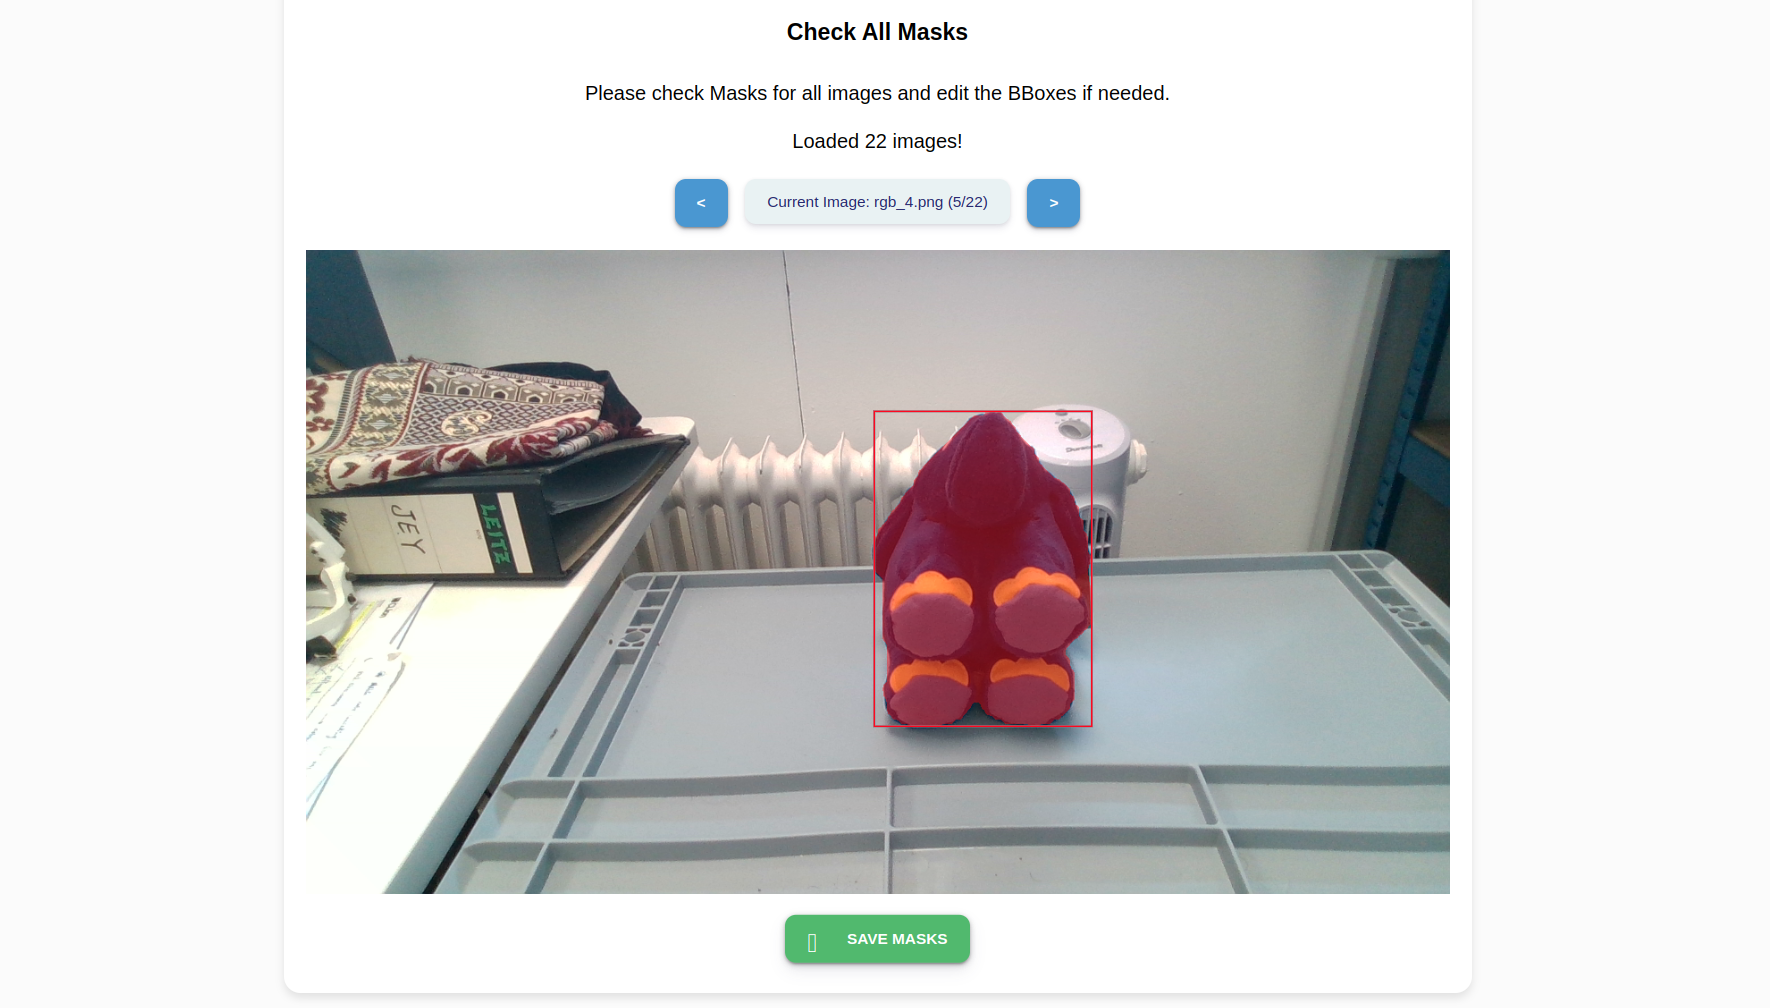
Press Save Masks to save the mask templates. Click on the Home icon to return to the front page of the wizard.
Step 2: Train a model from the generated masks and test
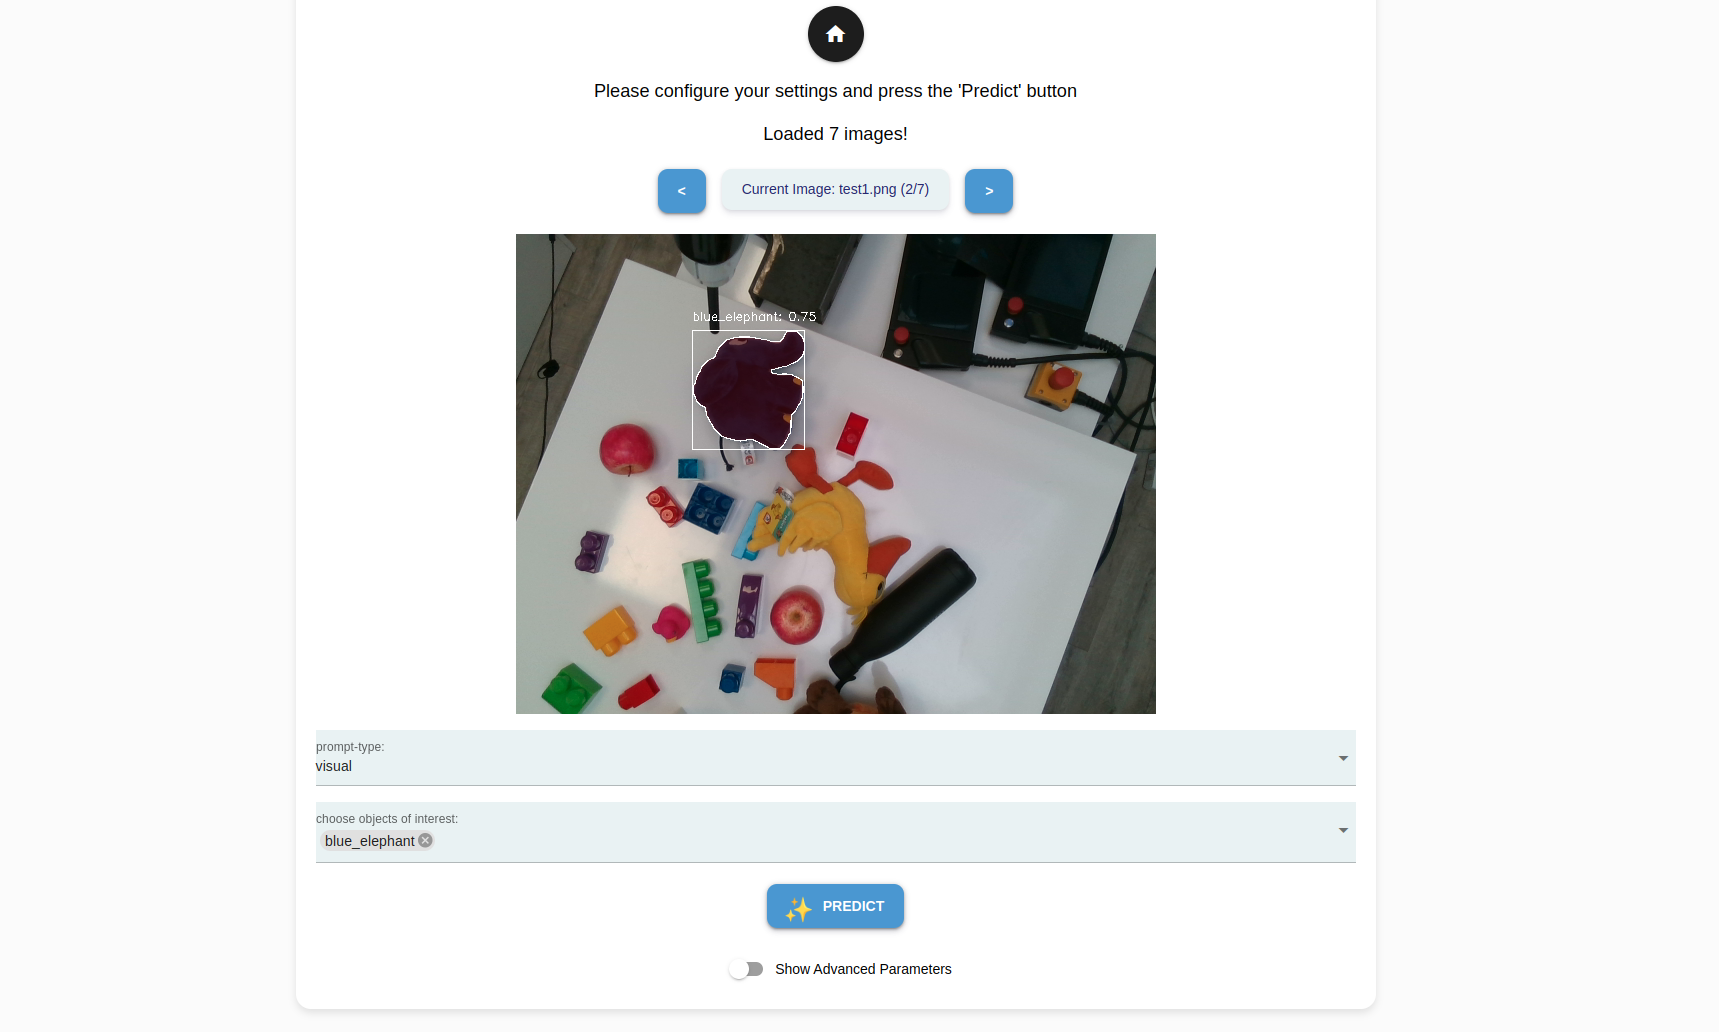
Click Inference to create a model from the generated masks and also to perform a sample inference. Select Load Images to select the images from the file system to make a sample inference. Click OK.

Tip
You could use an image from the object_templates/<your object folder>. If you would like to test the model on an unseen image captured using an external camera, save the image in a USB and use the Robot Mode’s File Manager utility to transfer the image to object_perception/objects/test_images.
For each image your have selected, you can choose from the following prompt types to experiment and evaluate their performance.
Prompt Type |
Description |
|---|---|
Visual |
Primary detection mode for neura_DLIS2 method. Detects only the selected, onboarded objects. |
Everything |
Detects all objects in the image. |
Text |
Detects all objects, which attributes that matches the input prompt the closest. |

There are also several
Advanced parametersthat can be shown and configured.
Parameter |
Description |
|---|---|
detection threshold |
The confidence score required for an object to be considered detected. A higher threshold means only high-confidence detections are retained, while a lower threshold allows more potential detections, including uncertain ones. |
visual similarity threshold |
Determines how closely a detected object must match a reference object in terms of appearance. A high threshold ensures only highly similar objects are detected, while a lower threshold allows more variation. |
mask threshold min |
The minimum threshold for a pixel to be considered part of the detected object’s segmentation mask. A higher value results in a stricter, more refined mask, while a lower value captures more surrounding pixels. |
mask threshold max |
The upper limit for the mask threshold, ensuring that pixels beyond a certain confidence level are included in the object’s segmentation. |
iou |
A metric measuring the overlap between the predicted bounding box (or mask) and the ground truth. A higher IoU means stricter matching, ensuring detected objects closely align with their actual shapes. |
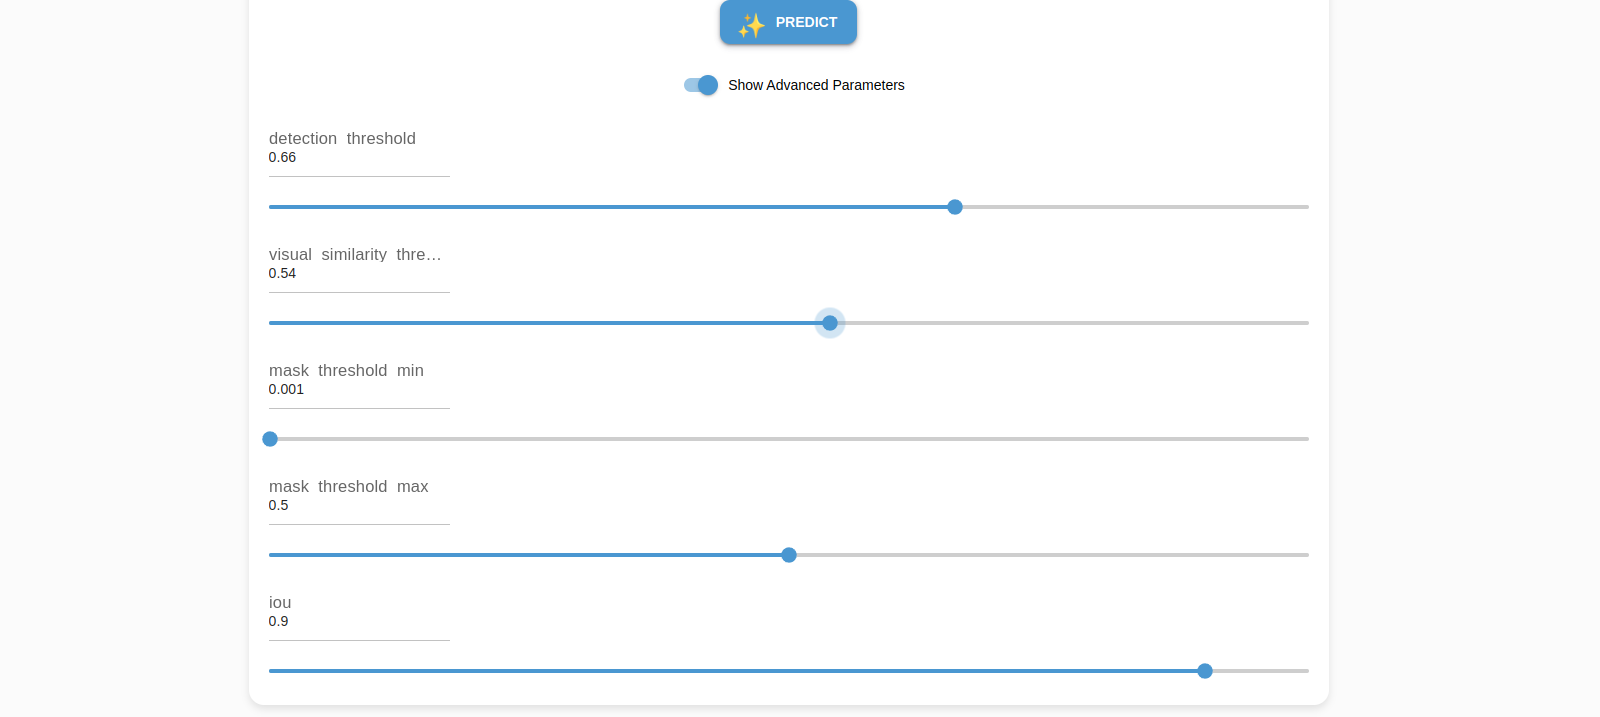
After specifying the inference parameters for every image, click Predict. The first time a new or updated model is loaded, it may take a few extra seconds to complete. Subsequent predictions take an average of ~0.5 seconds.
Note
If the inference results are not satisfactory, tune the Advanced Parameters
Use 6D Pose Estimation of Objects
Follow this guide to learn how to prepare the 6D pose estimation of objects.
There are two general approaches to 6D pose estimation:
Deep-Learning Method Use a dedicated pose estimation model trained to directly predict the 6D pose of an object.
Non–Deep Learning Method Use an instance segmentation model to detect the object in an RGB image, followed by classical (non–deep learning) algorithms to match the observed point cloud with a preloaded 3D object model.
Note
Training a deep learning–based pose estimation model is currently not available but will be supported in a future release.
Non-Deep Learning Method
Neura offers two methods for 6D pose estimation, neura_nonDLPE1 and neura_nonDLPE2. Both methods follow the same preparation and usage workflow.
Step 1: Upload the 3D Object Model
Upload the .ply or .obj file to the AI Hub under User Objects.
- Ensure that:
The file is successfully uploaded.
The object is visible in the Data Management section of the AI Hub.
Refer to the corresponding tutorial for detailed instructions on uploading a mesh model.
Step 2: Train an Instance Segmentation Model
Train an instance segmentation model to detect the object in RGB images.
- The segmentation model is required to:
Identify the object in the scene.
Provide a mask or bounding region for pose refinement.
Follow the instance segmentation training tutorial for detailed guidance.
Using 6D Pose Estimation
Once the 3D model is uploaded and the instance segmentation model is trained, you can use 6D pose estimation in one of the following ways:
Pick App: Select he trained instance segmentation model and nne of the pose estimation methods (neura_nonDLPE1 or neura_nonDLPE2)
Python API: Call the pose estimation client directly to compute the object pose.
Hint
The output of the pose estimaton client is a 6D pose representing the transformation bewtween the camera frame and the zero frame of the object as defined in the
.obj or .ply file.